Commençons par une question simple : combien de comptes Gmail possédez-vous ? Chaque utilisateur de Gmail possède probablement plusieurs comptes qu'il utilise à des fins différentes, un pour un usage privé, un autre pour des problèmes liés au travail, un troisième pour des projets spécifiques et enfin un compte générique/de groupe boîtes de réception partagées pour gérer leurs opérations quotidiennes.
La gestion de plusieurs comptes de messagerie peut être difficile, car passer de l'un à l'autre peut nuire à la productivité. Une boîte de réception unifiée peut rationaliser la gestion des e-mails et garantir une meilleure organisation.
Lorsqu'aucun de ces comptes n'est connecté, il est facile de perdre le focus et de perdre du temps à passer de l'un à l'autre, sans parler du risque de manquer des messages ou de laisser des e-mails sans réponse.
Heureusement, Gmail peut aider les utilisateurs à gérer plusieurs comptes Gmail et adresses e-mail, le tout depuis une seule boîte de réception. Ce blog vous explique les étapes à suivre pour y parvenir : connecter plusieurs boîtes de réception Gmail à partir d'une seule adresse.
L'utilisation de Gmelius peut encore augmenter votre efficacité lorsque vous créez un boîte de réception partagée ou intégrez des outils de gestion de projet pour vous aider à collaborer depuis votre compte Gmail, mais nous mettrons en évidence quelques fonctionnalités supplémentaires de Gmelius après vous avoir montré comment intégrer vos différents comptes Gmail.
Gérez plusieurs comptes Gmail dans une seule boîte de réception
Gmail propose de nombreuses fonctionnalités permettant de gérer plusieurs comptes, notamment les suivantes :
Ces premières étapes sont excellentes pour améliorer la communication et l'organisation de votre vie quotidienne. Cependant, si vous souhaitez augmenter l'efficacité de vos boîtes de réception professionnelles, vous devriez jeter un œil à certaines des autres fonctionnalités de Gmelius et intégrations bidirectionnelles avec vos outils préférés. En outre, l'accès aux « paramètres Gmail » via l'icône représentant un engrenage dans votre boîte de réception Gmail principale est essentiel pour configurer et gérer plusieurs comptes.
Vous recherchez une meilleure façon de gérer la communication au sein de l'équipe ? Essayez Gmelius!
Suivez ces étapes pour associer plusieurs comptes à partir d'un ordinateur portable ou de bureau. Pour configurer un compte Gmail secondaire et le gérer efficacement, vous pouvez configurer le transfert des e-mails du compte secondaire vers le compte principal. Une fois activée, cette fonctionnalité Gmail utilise un compte comme compte Gmail principal pour tous les comptes. Vous pourrez toujours passer facilement d'un profil individuel à l'autre et répondre aux e-mails provenant d'adresses individuelles.
Commencez par le compte qui deviendra le compte principal.
Étape 1 : Accédez à « Paramètres » > « Afficher tous les paramètres » > « Comptes »
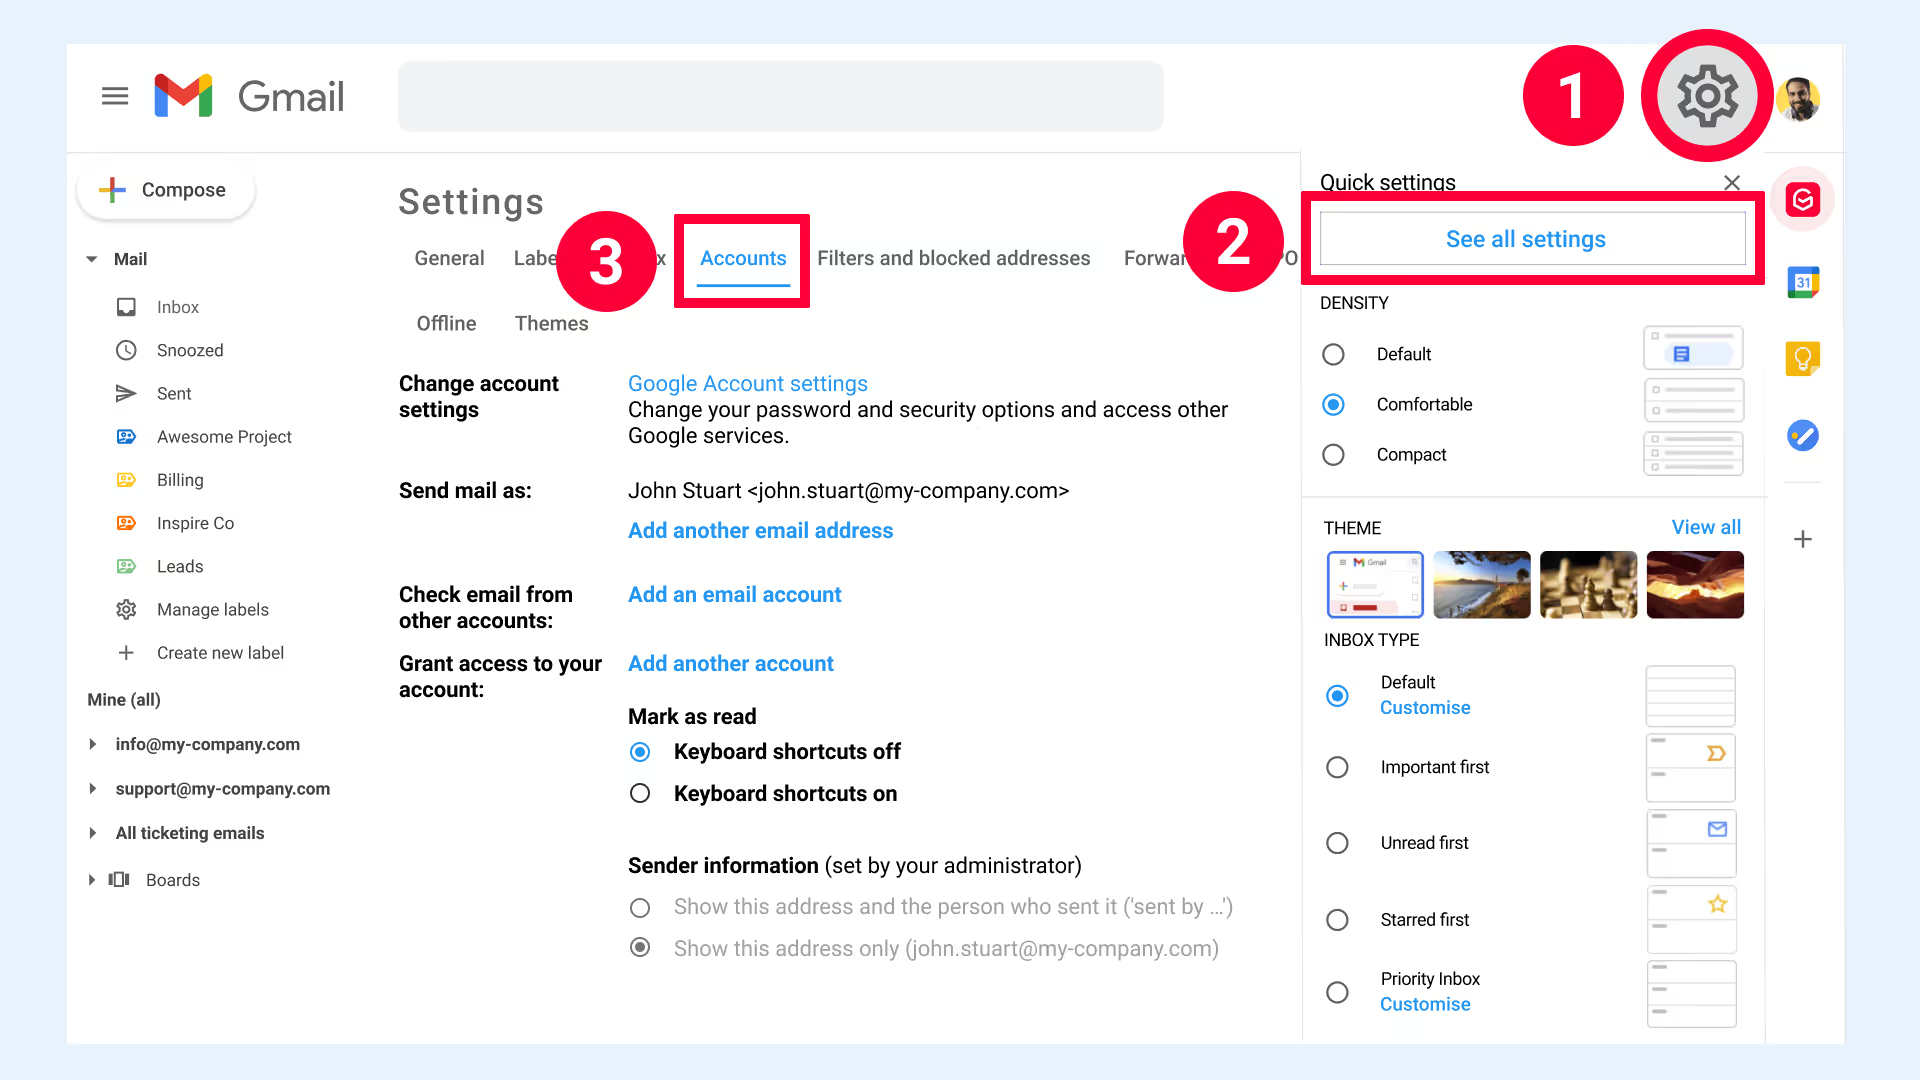
Commencez par le compte Gmail à partir duquel vous souhaitez gérer tous vos autres comptes et accédez à « Paramètres » > « Afficher tous les paramètres » > « Comptes ».
Étape 2 : Dans la section « Envoyer le courrier en tant que : », ajoutez votre compte Gmail secondaire
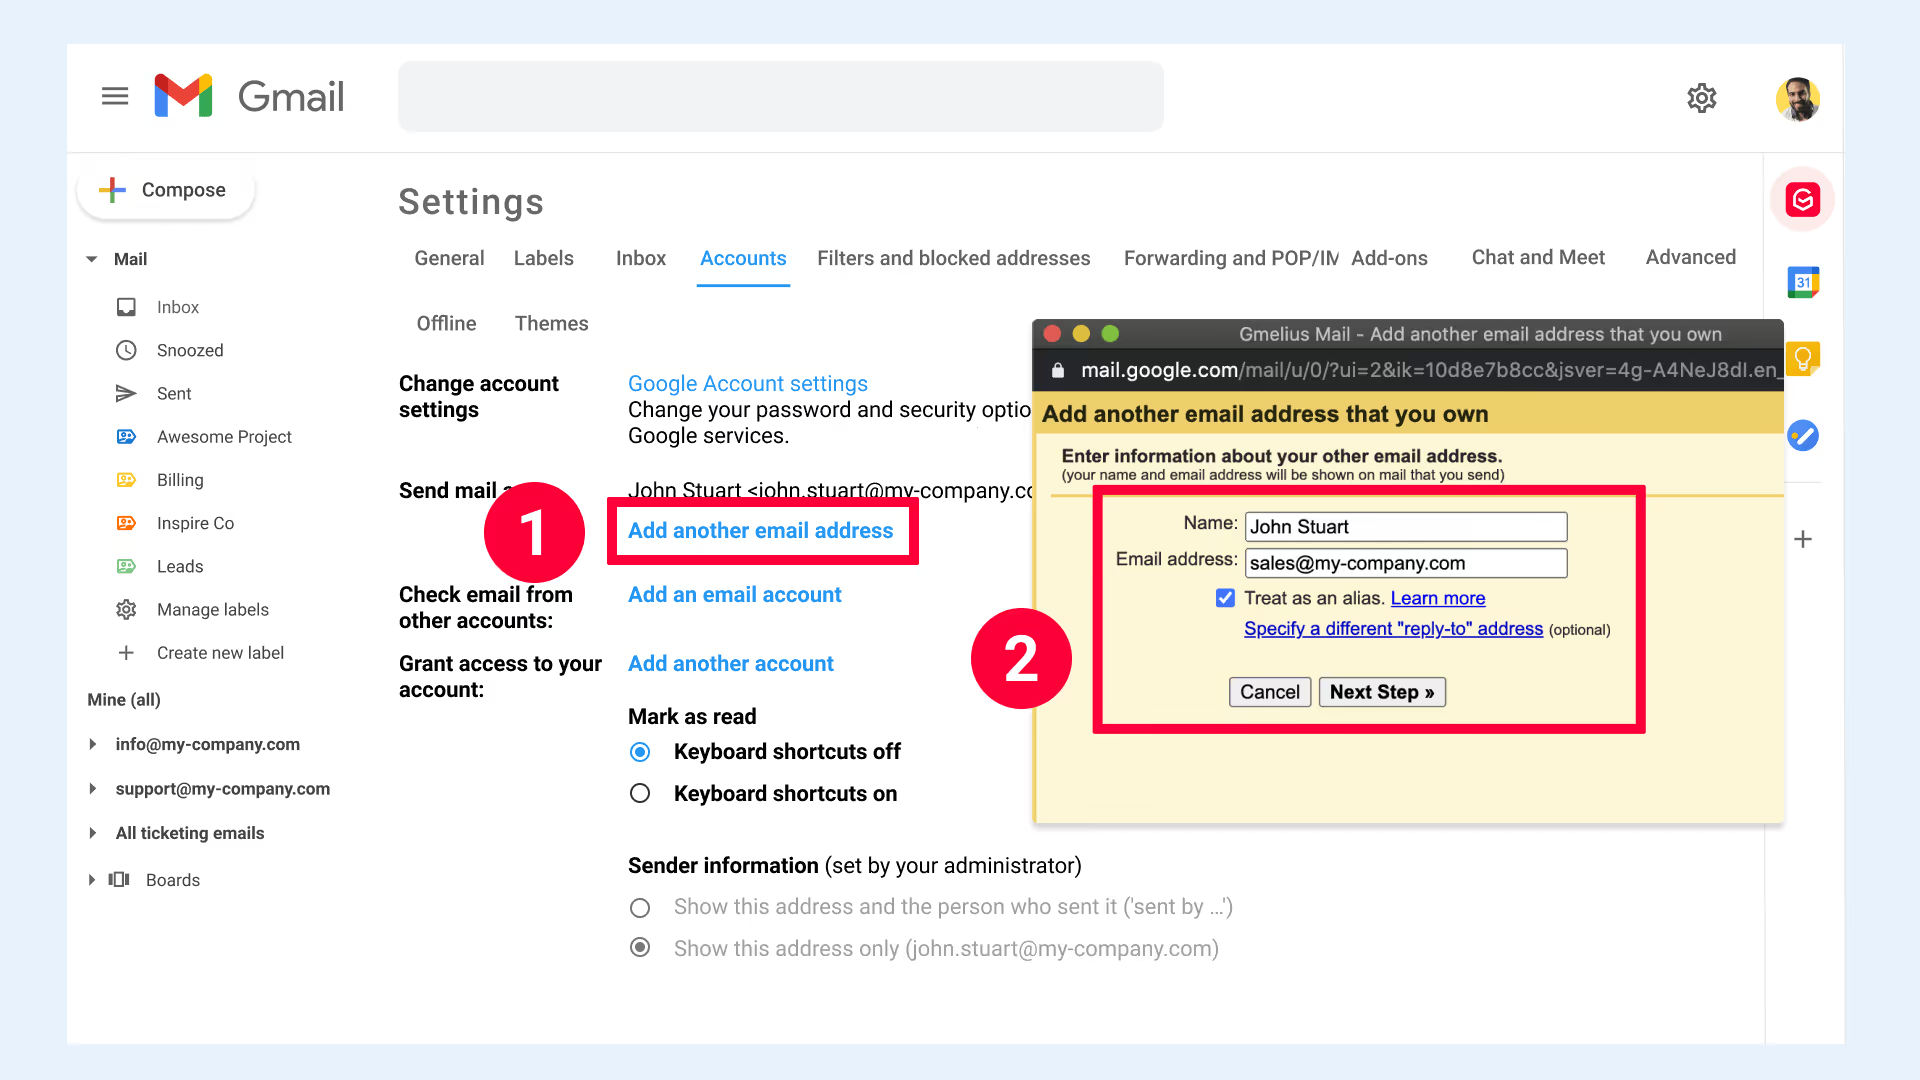
Dans le « Envoyer un e-mail en tant que : » section, cliquez sur « Ajouter une autre adresse e-mail ». Une fenêtre contextuelle apparaîtra dans laquelle vous pourrez ajouter l'adresse e-mail que vous souhaitez ajouter, ainsi que le nom de l'expéditeur qu'elle doit afficher. Vérifiez le « Traiter comme un alias » pour vous assurer que les e-mails provenant de votre compte secondaire arrivent dans votre boîte de réception principale.
Lorsque vous avez terminé, cliquez sur « Prochaine étape ».
Étape 3 : Cliquez sur le bouton « Envoyer la vérification »
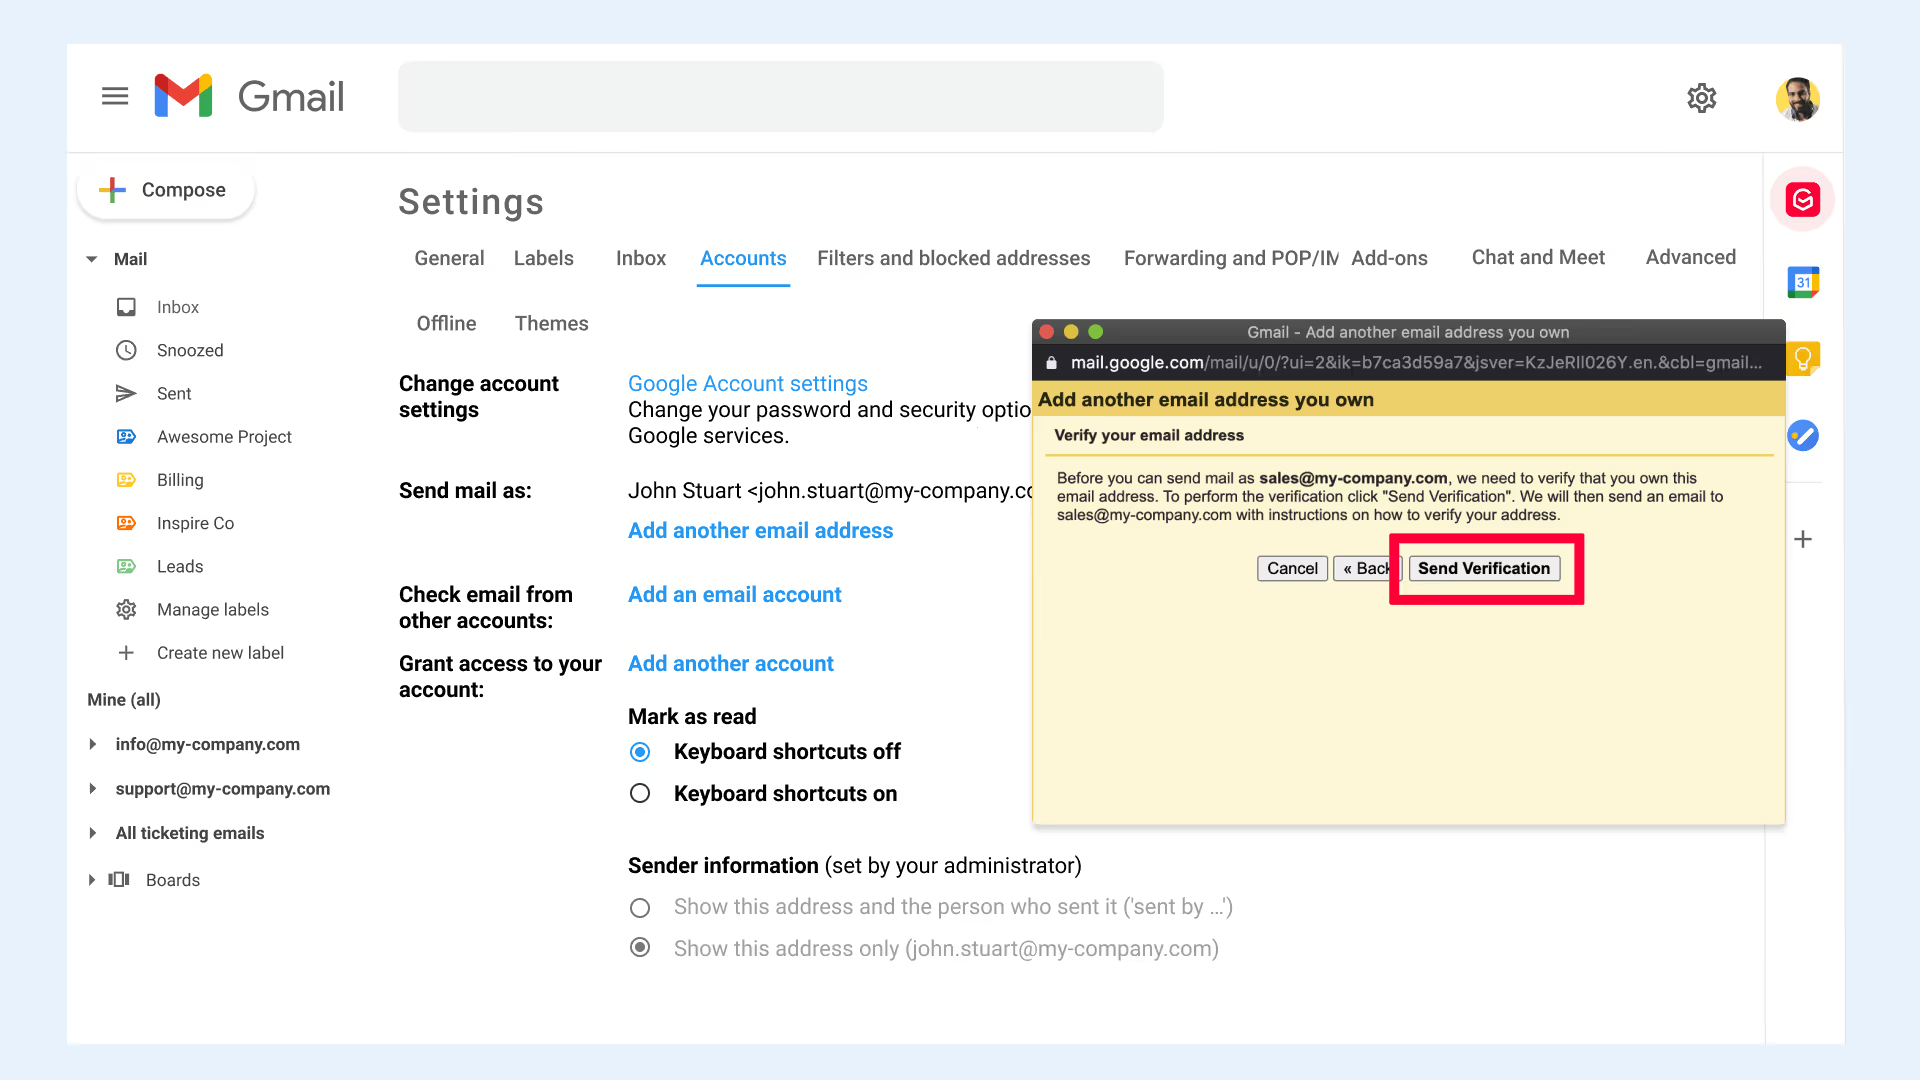
Vous pouvez maintenant cliquer sur « Envoyer la vérification » bouton, qui entraînera l'envoi automatique d'un e-mail à votre compte de messagerie secondaire. Veillez à ne pas fermer la fenêtre contextuelle une fois que vous avez cliqué sur le bouton.
Étape 4 : Vérifiez votre adresse e-mail secondaire
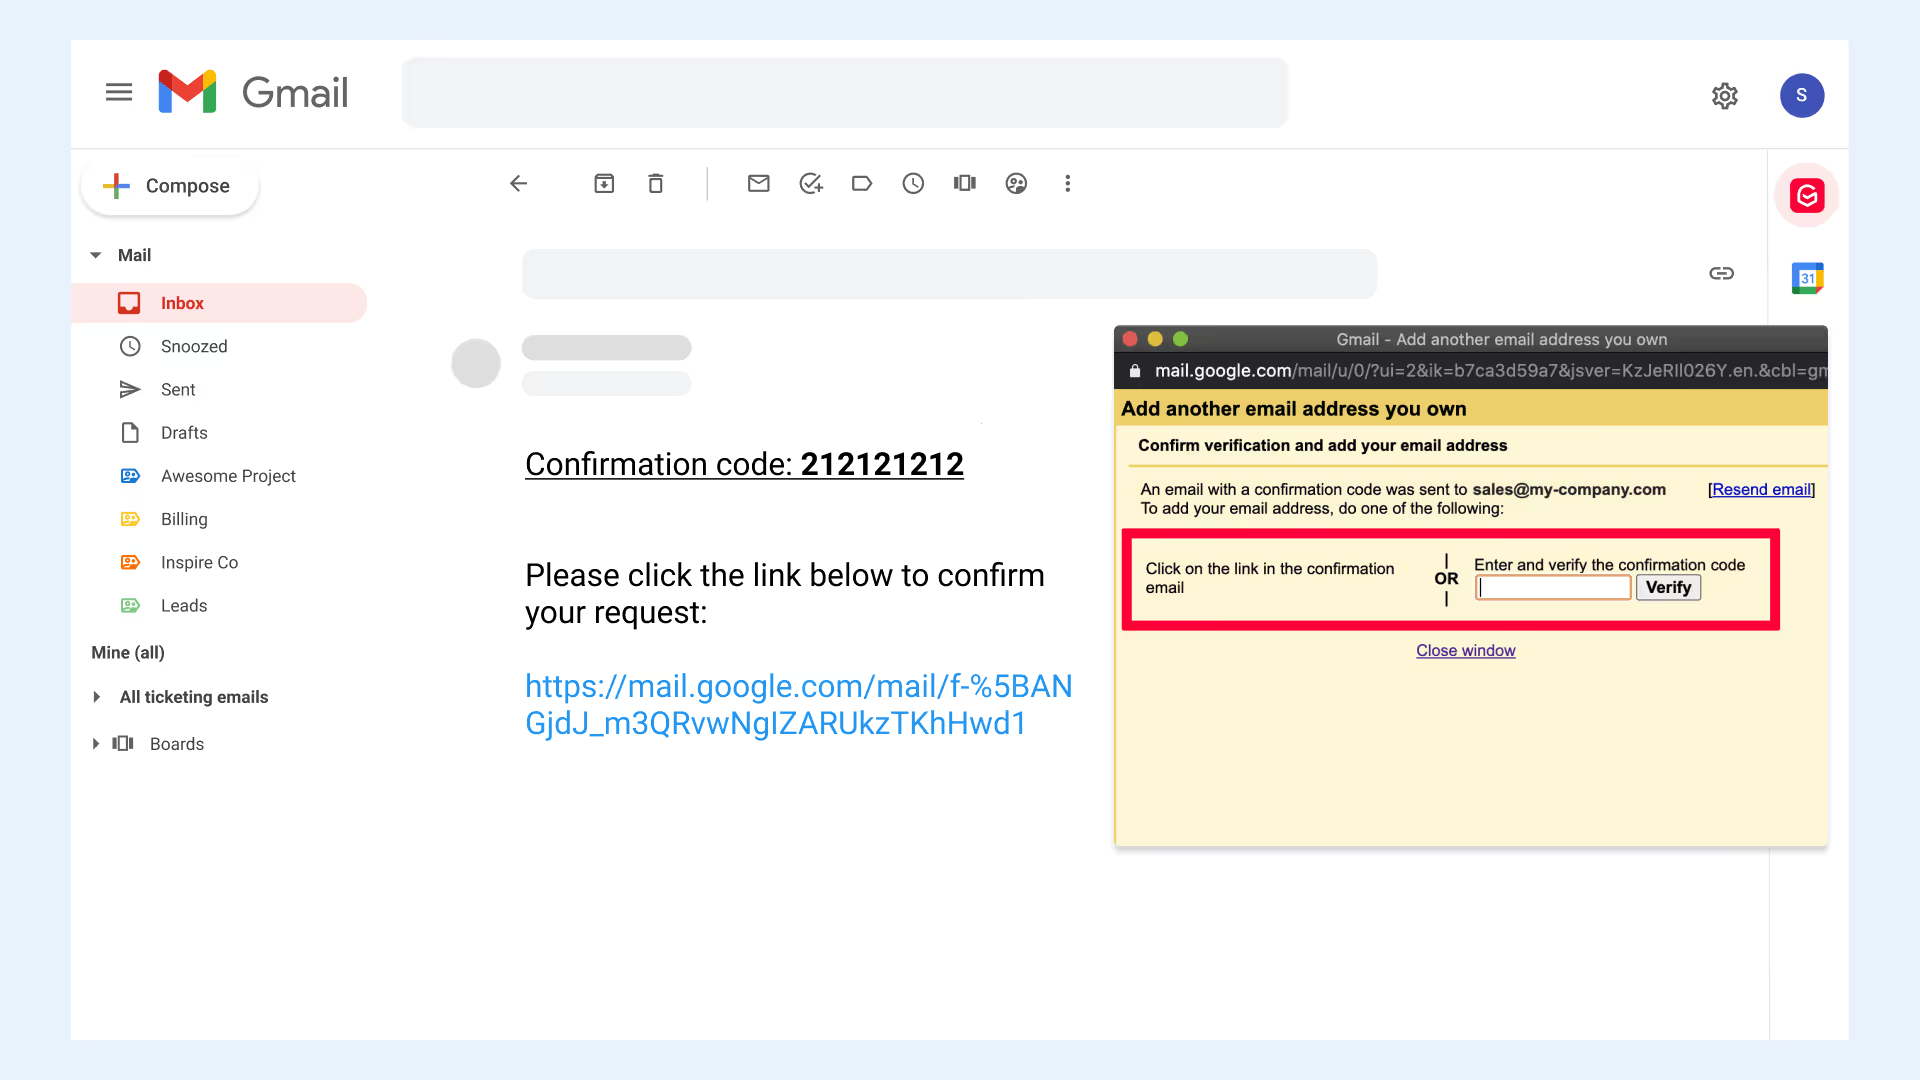
Accédez à votre compte de messagerie secondaire, recherchez l'e-mail de vérification et cliquez sur le lien de vérification dans cet e-mail ou copiez/collez le code de vérification dans l'e-mail envoyé à « Entrez et vérifiez le code de confirmation » champ dans la fenêtre contextuelle de votre compte principal.
Lorsque cela sera fait, vous pourrez envoyer des e-mails depuis votre adresse e-mail secondaire, directement depuis votre boîte de réception Gmail principale.
Étape 5 : Sélectionnez votre mode de réponse par défaut
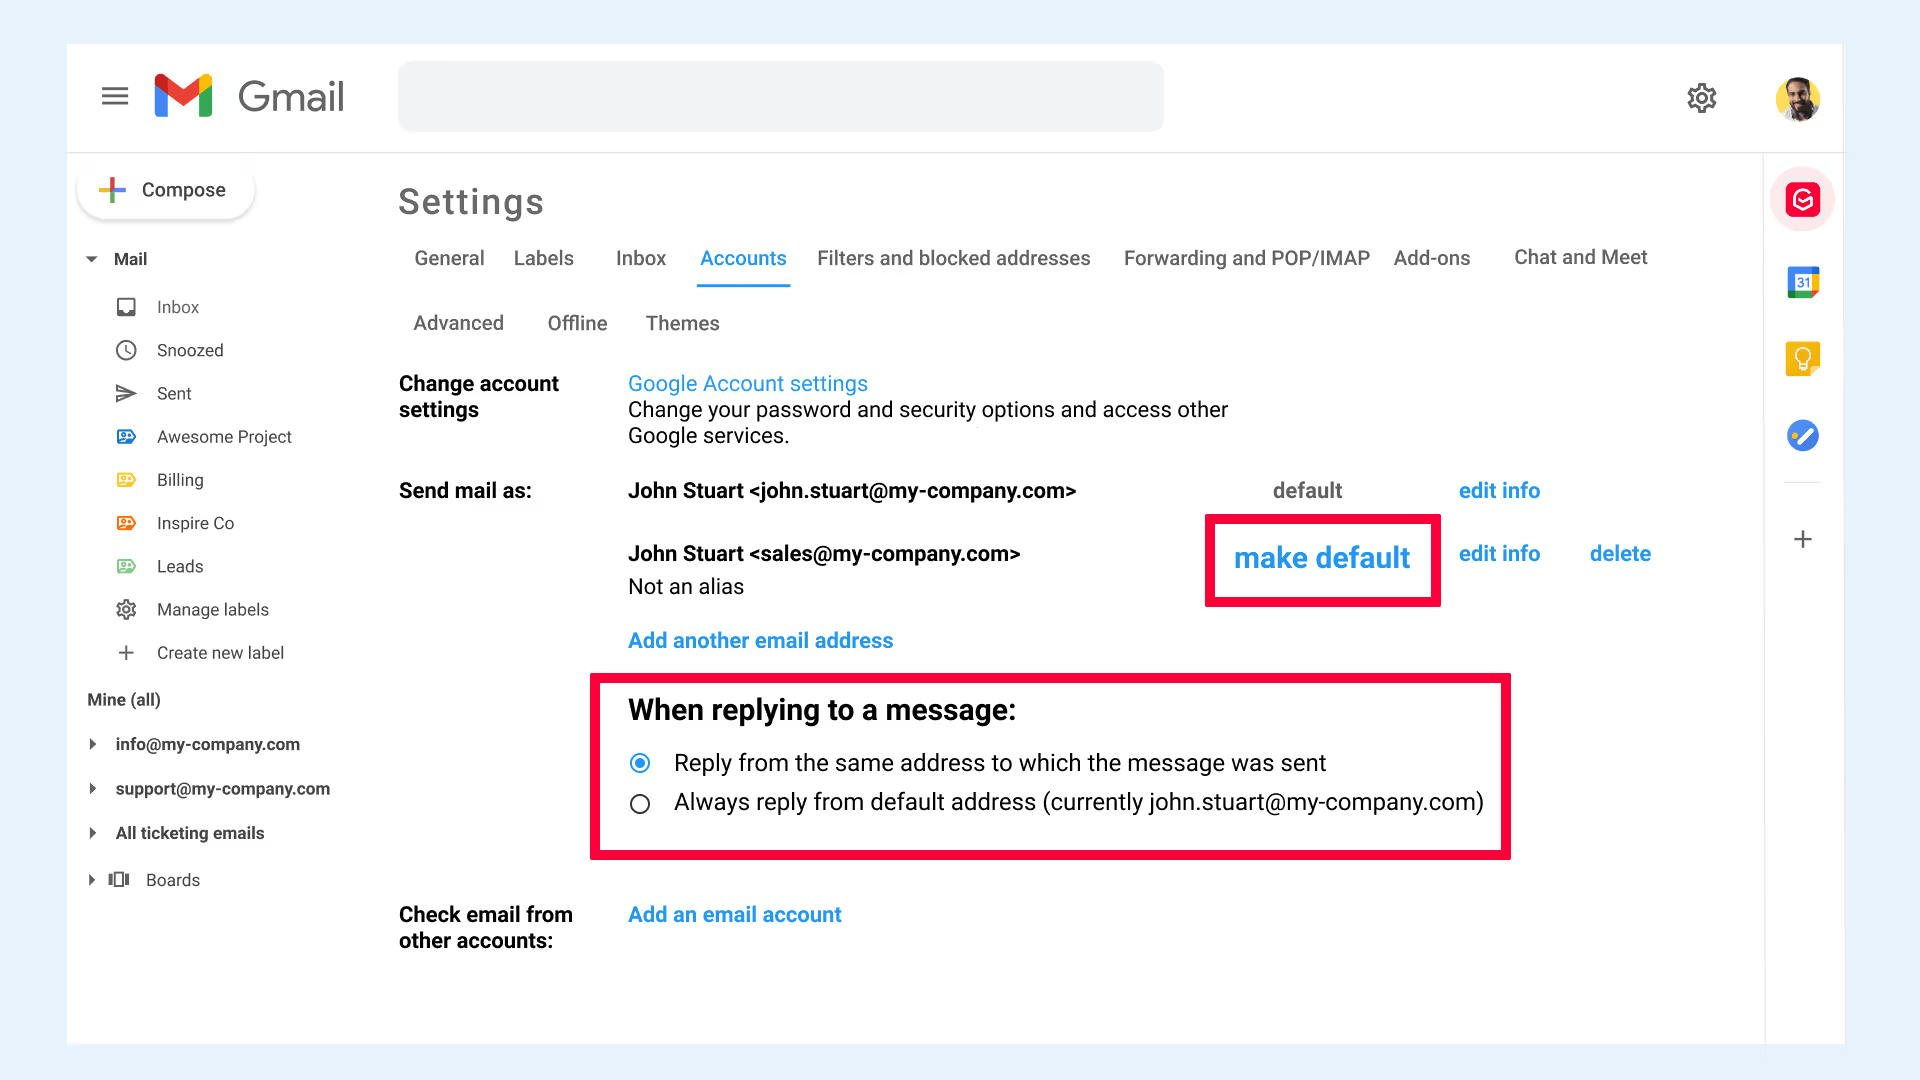
Gmail définit automatiquement votre adresse e-mail principale comme adresse e-mail par défaut pour envoyer de nouveaux e-mails. Si vous souhaitez modifier cela, vous pouvez sélectionner « définir par défaut » à côté de l'adresse e-mail secondaire à partir de laquelle vous souhaitez envoyer de nouvelles adresses e-mail.
Vous pouvez également décider si vous souhaitez répondre aux e-mails provenant de la même adresse e-mail que celle à laquelle l'e-mail a été envoyé, ou de votre adresse e-mail par défaut en sélectionnant l'option appropriée sous « Lorsque vous répondez à un message : ».
Étape 6 : Dans votre compte secondaire, allez dans « Paramètres » > « Transfert et POP/IMAP » > section « Transfert »
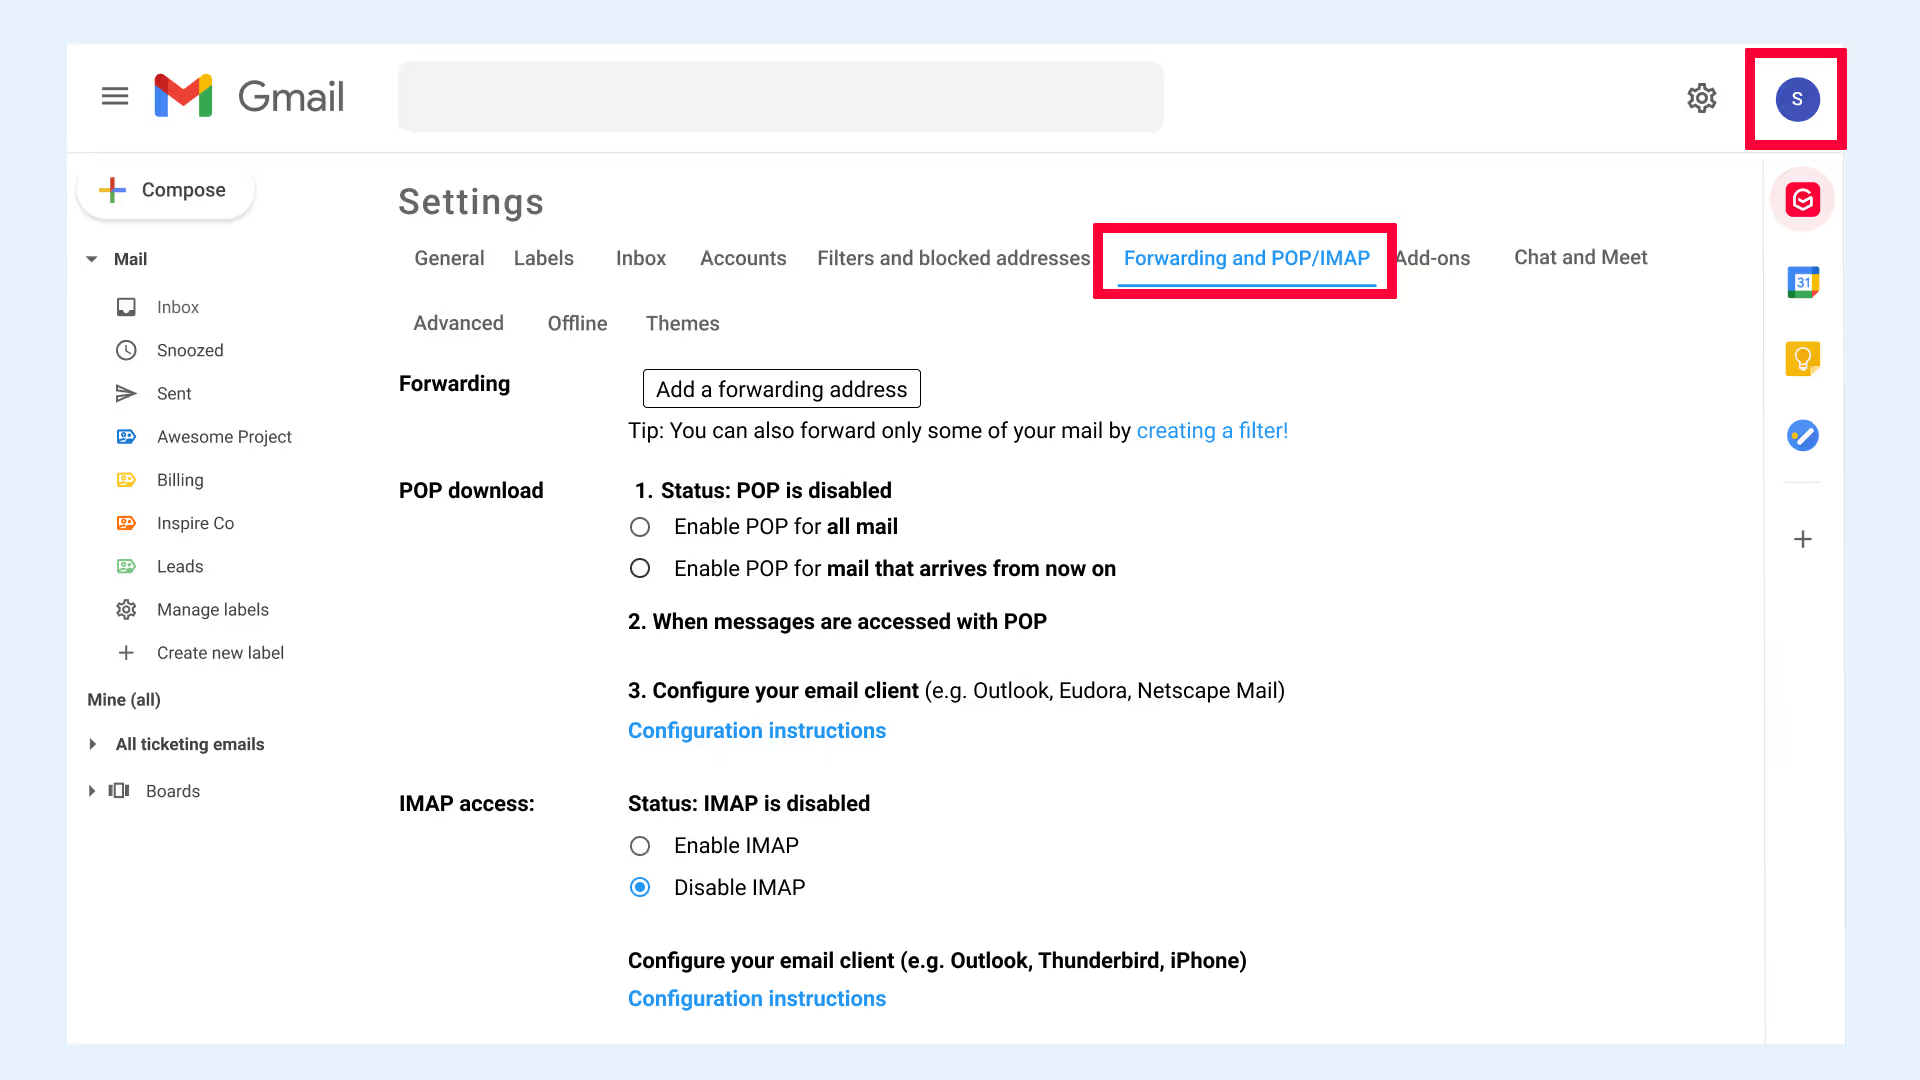
Pour cette étape, vous devez vous rendre dans votre compte Gmail secondaire. Accédez à tous les paramètres et accédez à « Transfert et POP/IMAP » onglet.
Étape 7 : Cliquez sur « Ajouter une adresse de transfert » et saisissez l'adresse Gmail de votre compte principal
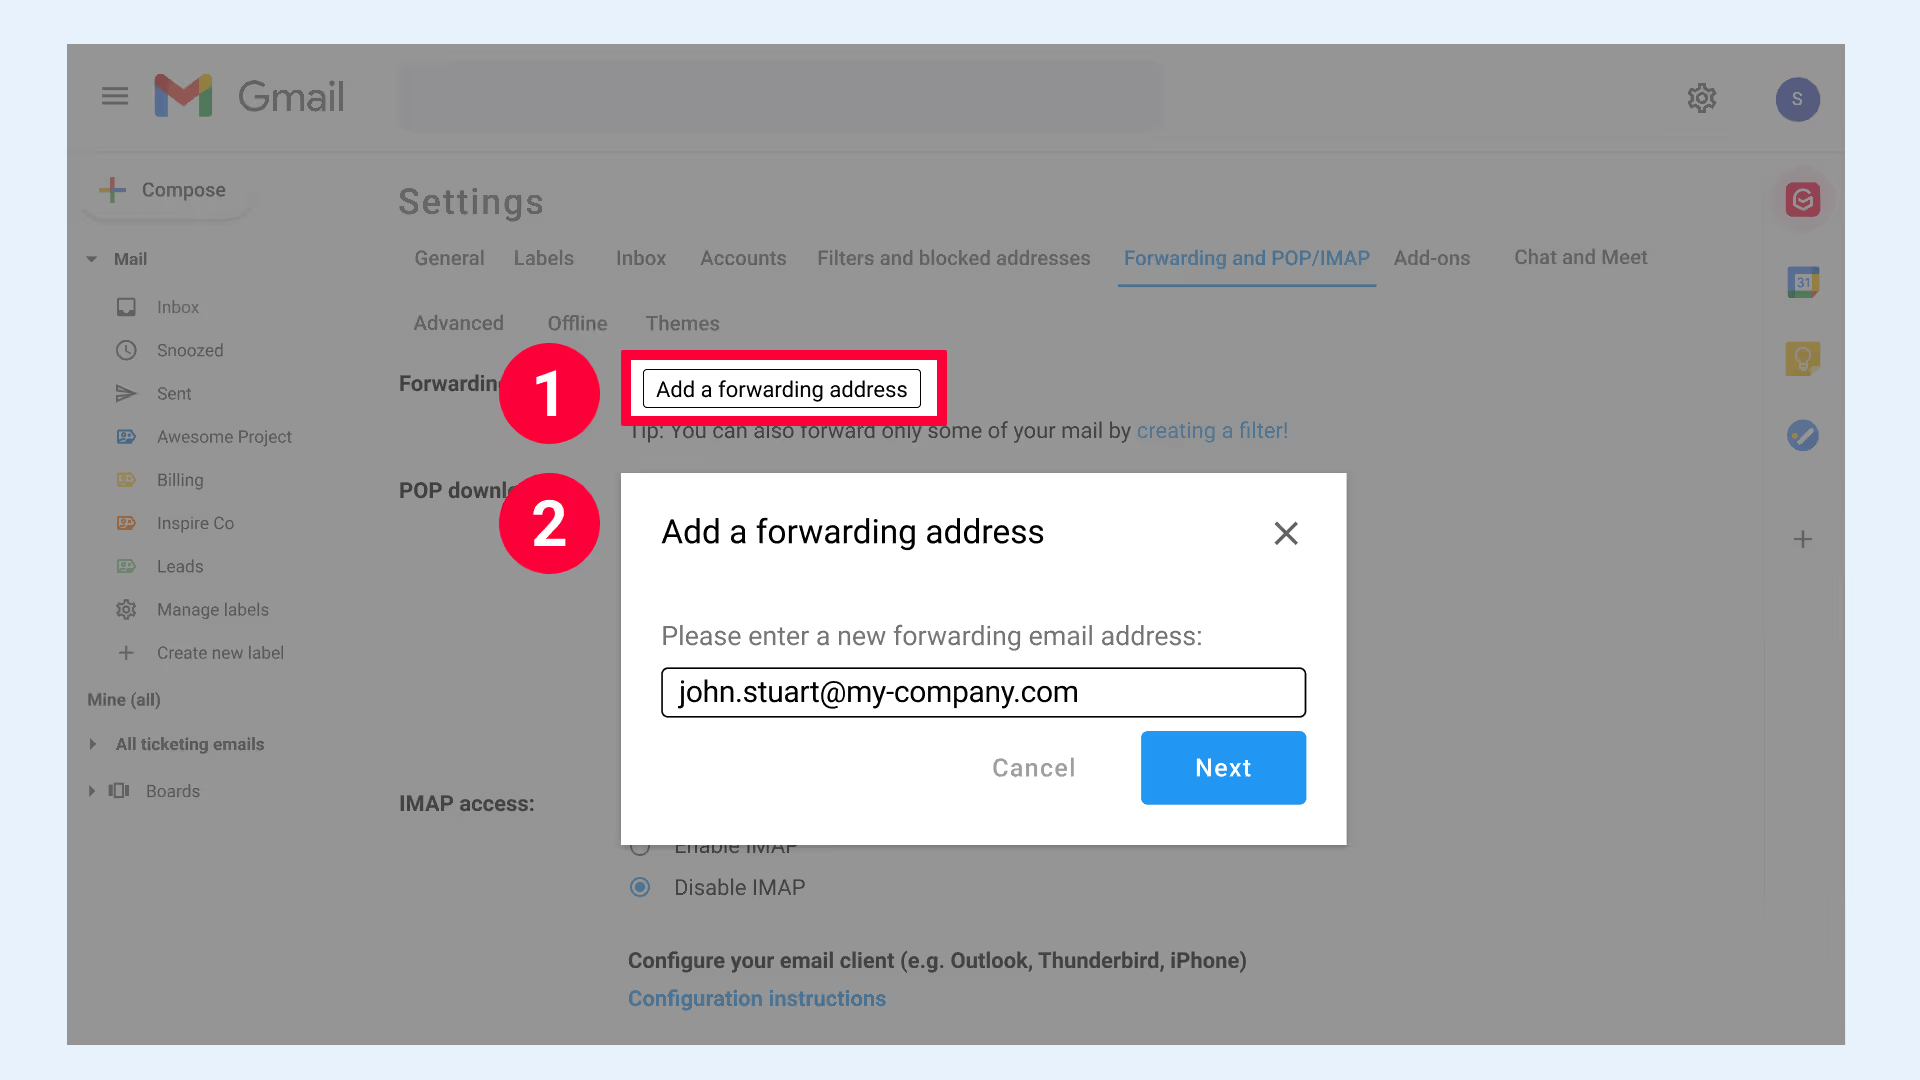
Dans le »Transfertsection «, cliquez sur le »Ajouter une adresse de transfert« et saisissez l'adresse e-mail de votre compte Gmail principal. Cliquez « Suivant » > « Continuer » > « OK » pour qu'un e-mail de confirmation soit envoyé à votre adresse Gmail principale.
Étape 8 : Copiez/collez le code de confirmation pour confirmer votre adresse de transfert.
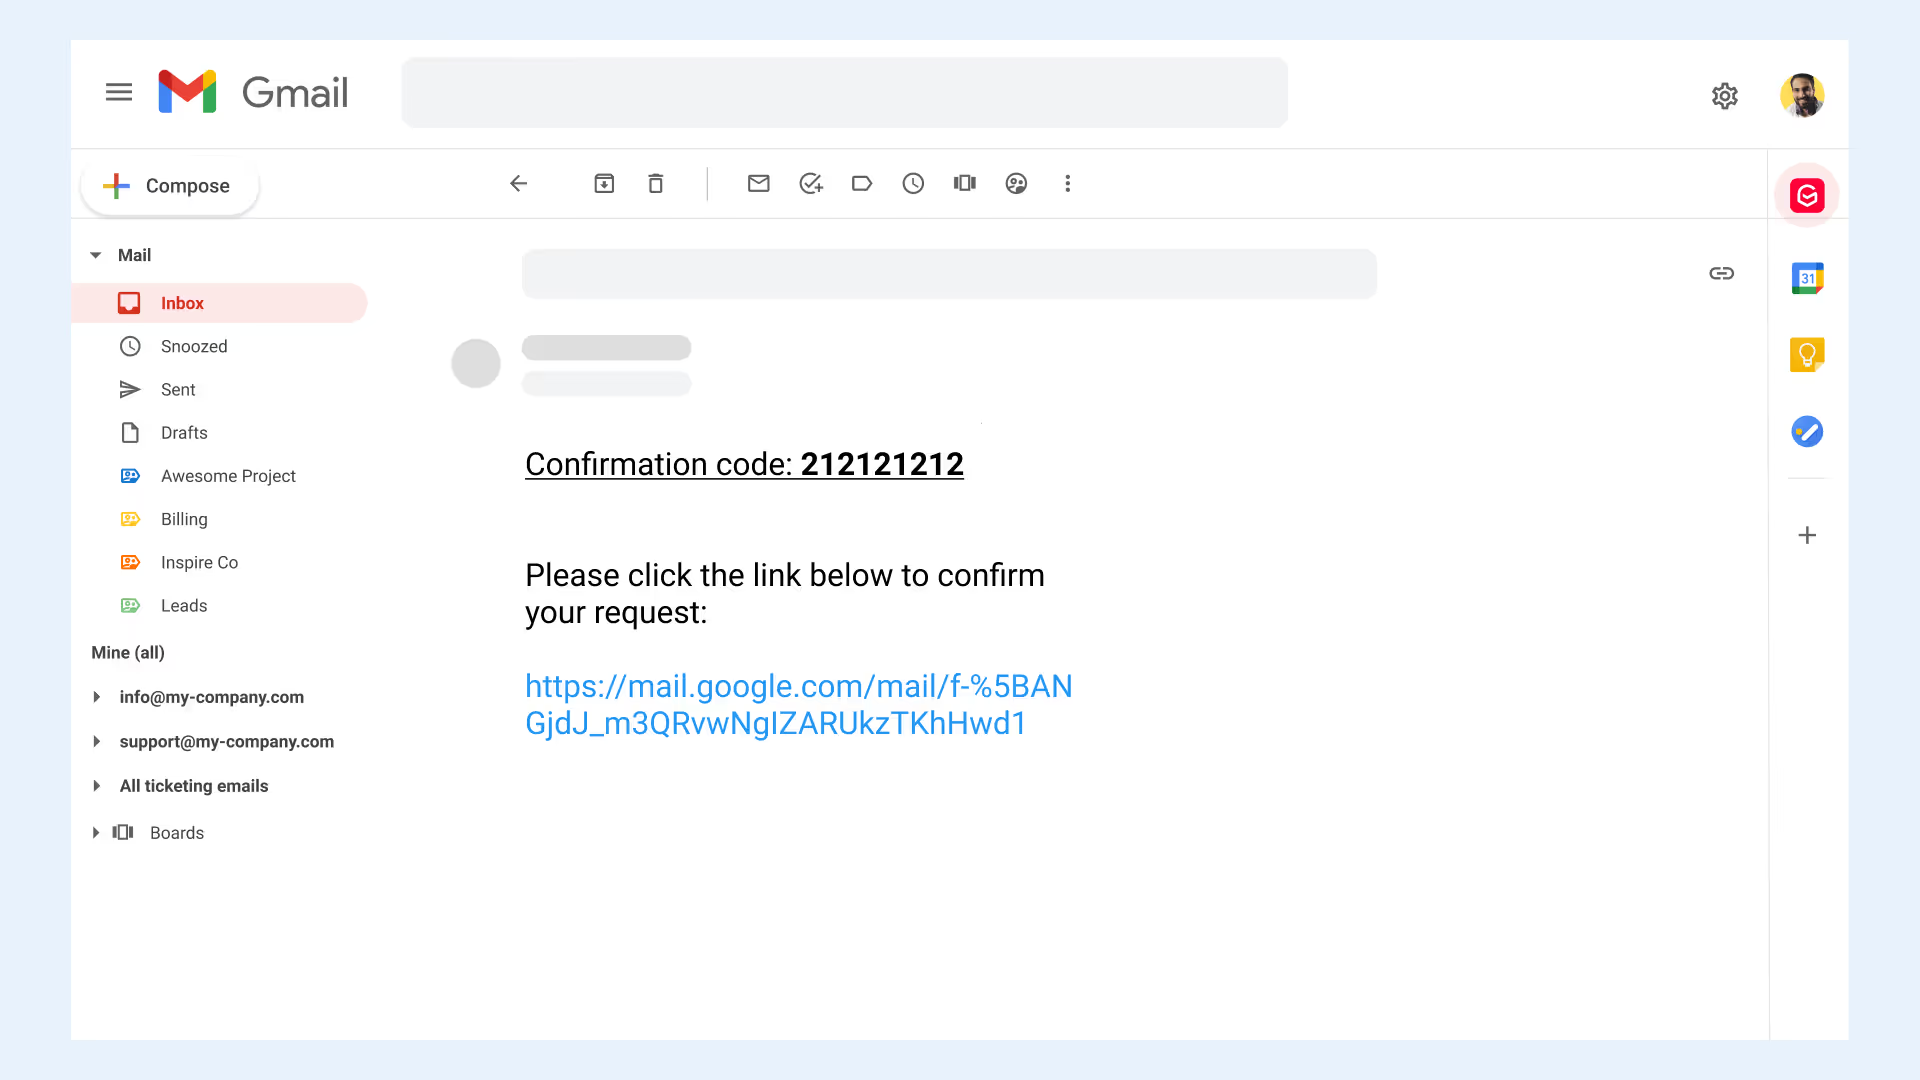
Retourner à votre compte principal, recherchez l'e-mail de confirmation, puis cliquez sur lien de confirmation. Un nouvel onglet de navigateur s'ouvrira pour vous informer que votre adresse e-mail a été confirmée.
Vous pouvez également copier/coller le code de confirmation depuis l'e-mail dans le champ correspondant dans la fenêtre contextuelle de votre compte Gmail secondaire. Cliquez « Vérifier » pour finaliser le processus de vérification.
Étape 9 : Choisissez une option de transfert
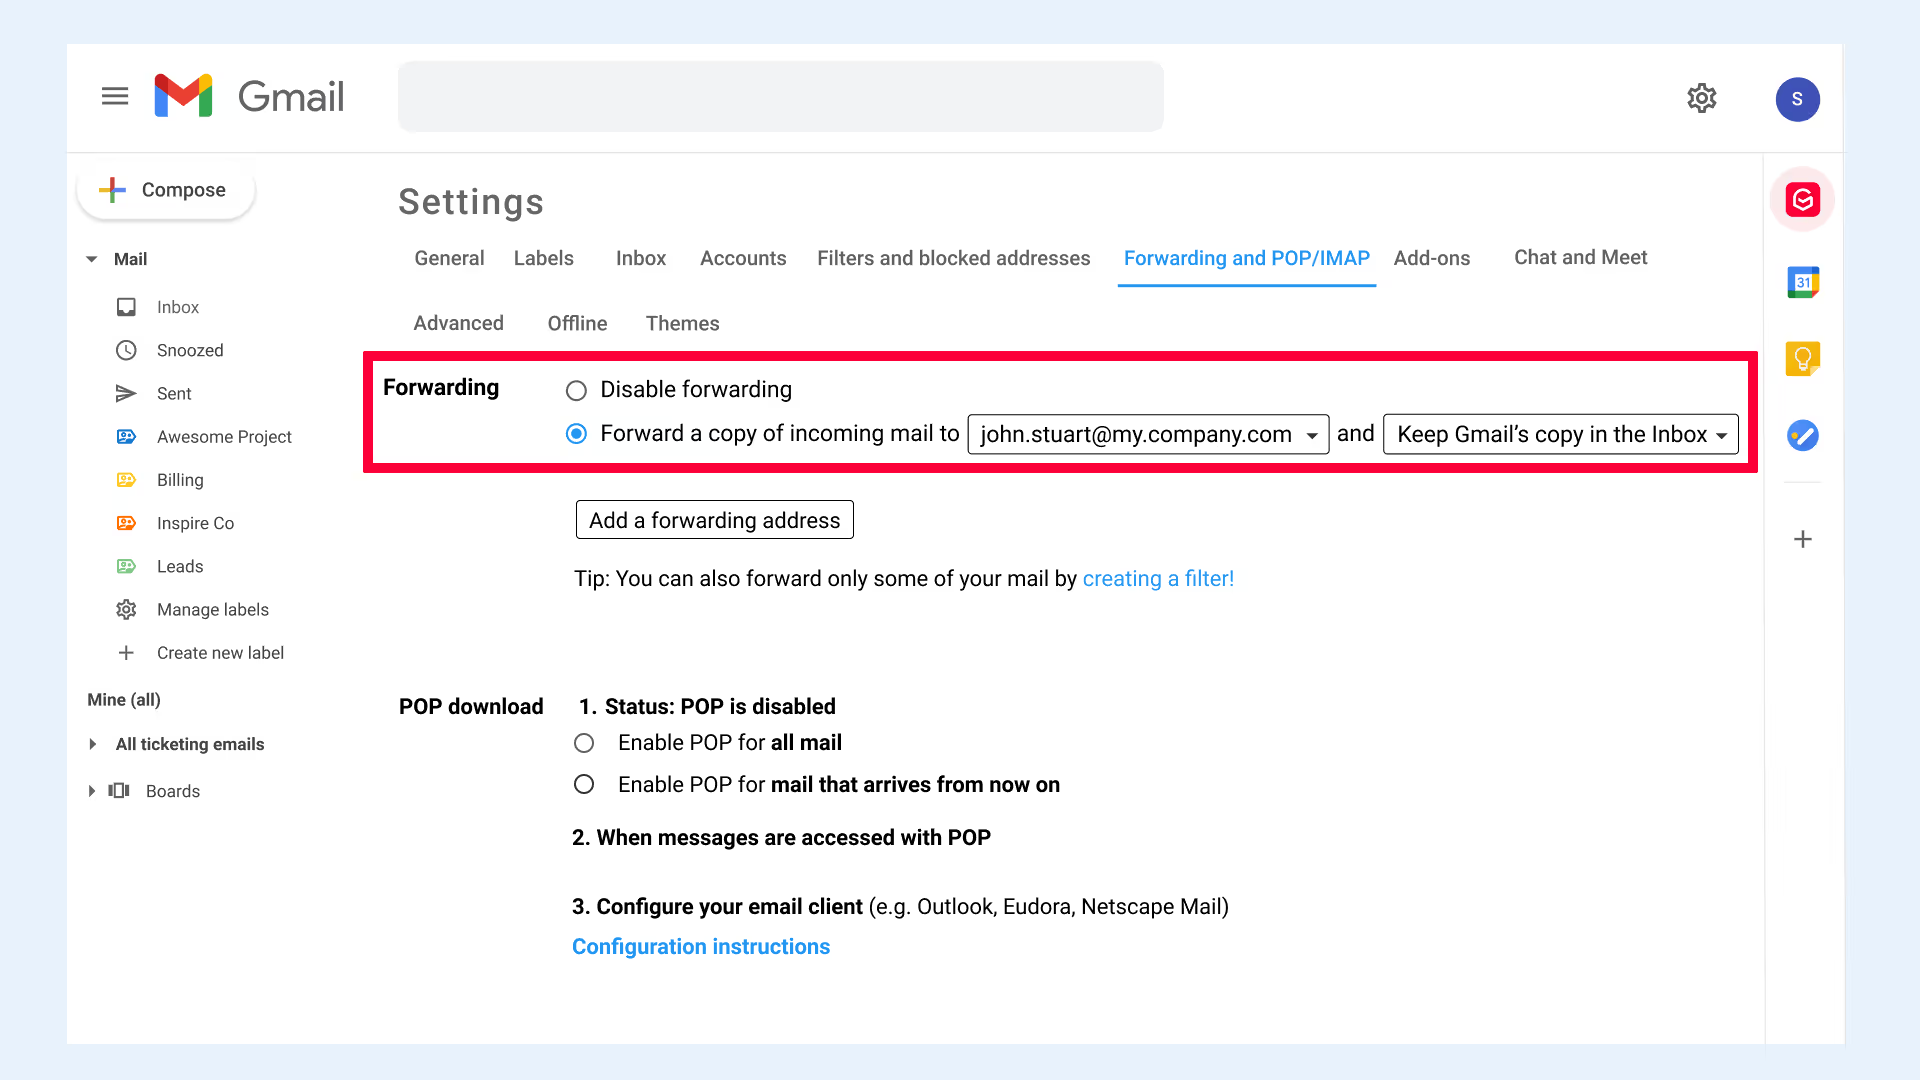
Revenez à votre compte Gmail secondaire et sous « Transfert : », sélectionnez une option dans la liste déroulante sous « Transférer une copie du courrier entrant à... ».
Enregistrez vos modifications au bas de la page et tous les e-mails entrants sur votre compte secondaire seront désormais transférés vers votre compte Gmail principal.
Notez que vous pouvez également transférer automatiquement des e-mails provenant de comptes autres que Gmail. Consultez la documentation d'assistance du client de messagerie concerné pour savoir comment le configurer.
Il est également possible d'utiliser votre principal Boîte de réception Gmail pour envoyer et recevoir des e-mails depuis des comptes autres que Gmail. Vous ne pourrez importer que des e-mails provenant de cinq autres comptes au maximum. Si vous devez importer plus de cinq comptes, la meilleure option est de transférer les e-mails. La gestion de plusieurs comptes Google, en particulier des comptes Gmail, peut être difficile, mais il existe des stratégies pour organiser les e-mails efficacement et améliorer la productivité.
Commencez par le compte qui deviendra le compte principal et suivez les instructions étape par étape ci-dessous.
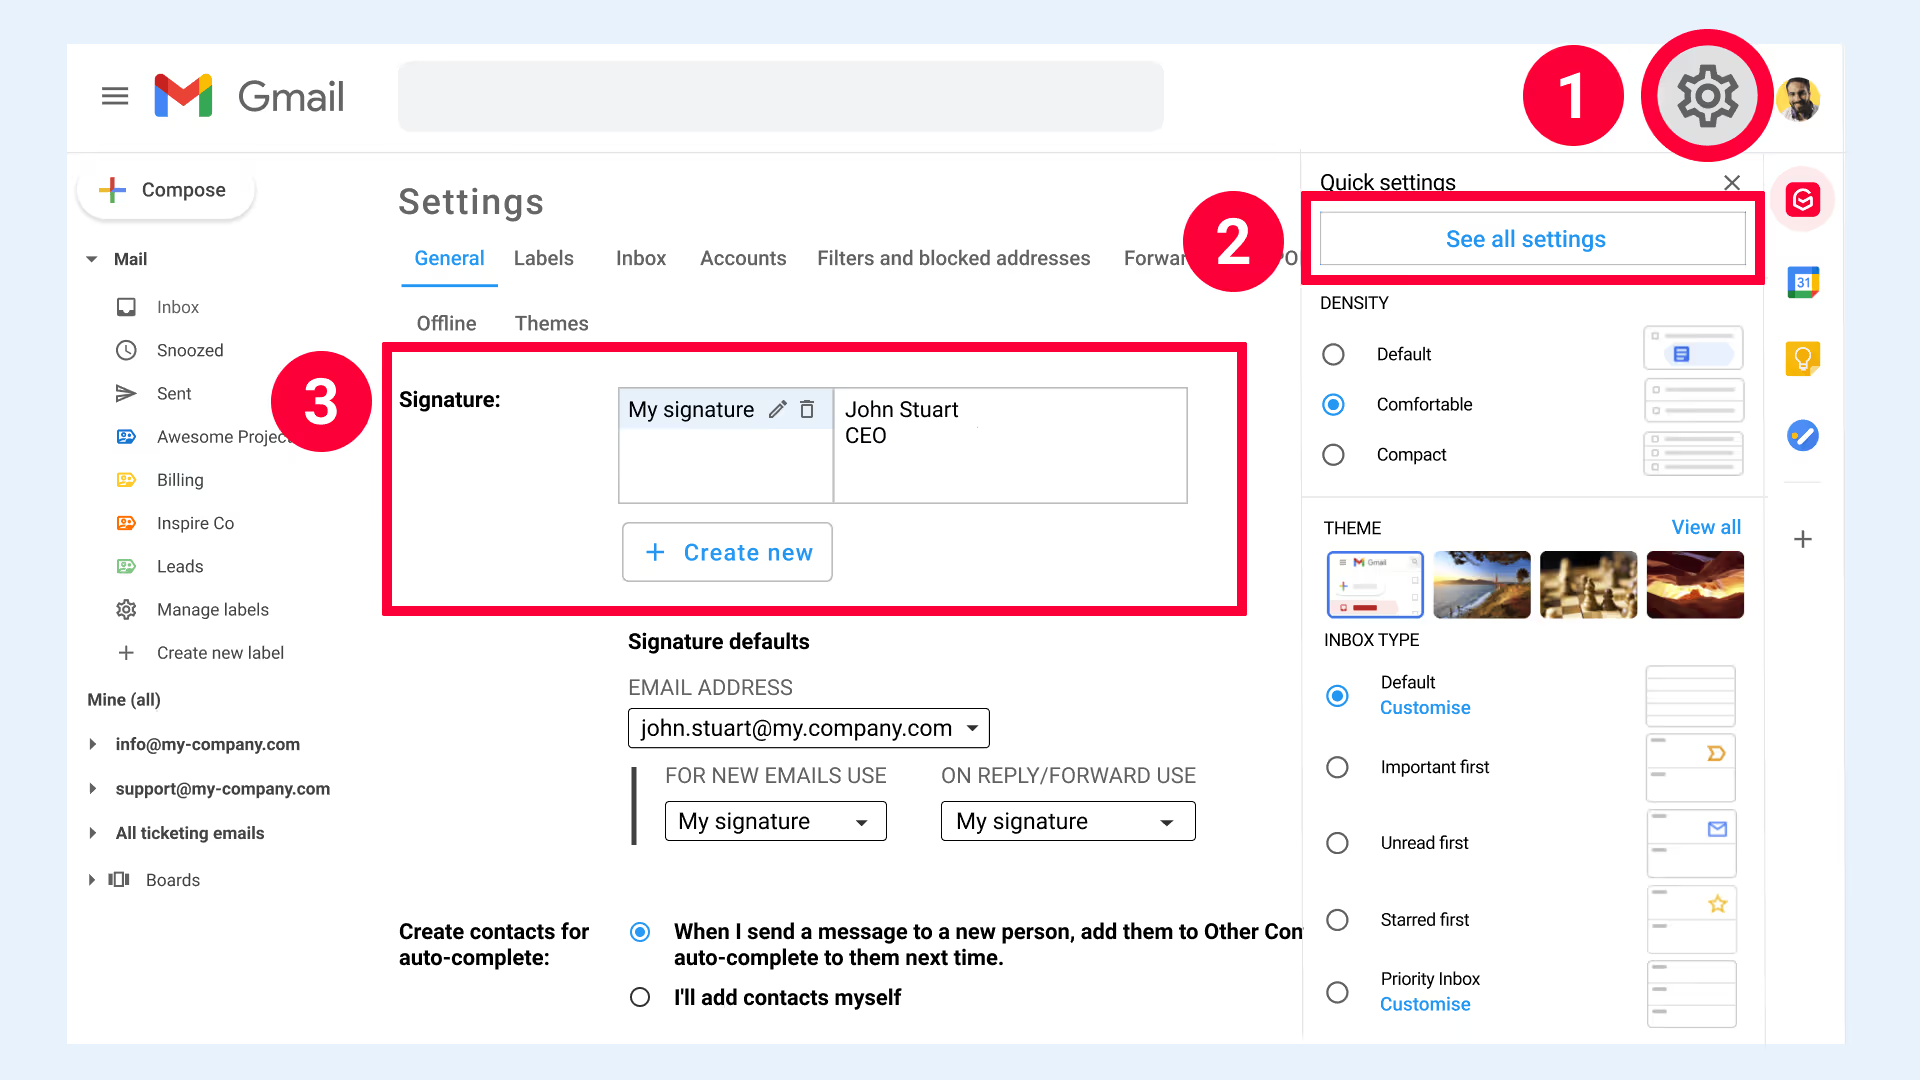
Une fois que vous avez ajouté vos comptes Gmail secondaires à votre boîte de réception principale, vous pouvez attribuez facilement une signature e-mail unique à chacun d'entre eux.
- Dans le coin supérieur droit du navigateur, sélectionnez « Paramètres » icône
- Dans « Paramètres rapides », sélectionnez « Afficher tous les paramètres »
- Faites défiler vers le bas jusqu'à « Signature : »
- Sélectionnez « Créer un nouveau » si vous n'avez pas encore de signature, ou sélectionnez chaque adresse e-mail ajoutée à votre compte pour modifier sa signature
- Cliquez « Enregistrer les modifications » en bas de page
Une fois que vous avez connecté tous les comptes Gmail à votre compte principal, vous pouvez également configurer des groupes d'e-mails pour votre boîte de réception principale. Les boîtes de réception multiples Gmail sont essentiellement des mini-boîtes de réception situées dans votre boîte de réception principale qui vous permettent de voir les e-mails classés.
Résolution des problèmes courants
Lors de la gestion de plusieurs comptes Gmail, les utilisateurs peuvent rencontrer des problèmes courants tels que des e-mails dupliqués, des problèmes de connexion et des e-mails manquants. Voici quelques conseils de dépannage :
- E-mails dupliqués: Pour éviter les e-mails dupliqués, assurez-vous de sélectionner l'option « Archiver les messages entrants (ignorer la boîte de réception) » lors de la configuration du transfert d'e-mails. Cela permet d'éviter que le même e-mail apparaisse plusieurs fois dans votre boîte de réception.
- Problèmes de connexion: pour résoudre les problèmes de connexion, essayez d'utiliser un gestionnaire de mots de passe ou de créer des mots de passe forts et uniques pour chaque compte. Cela peut vous aider à garder une trace de vos informations d'identification et à garantir un accès sécurisé à vos comptes.
- E-mails manquants: pour résoudre les e-mails manquants, vérifiez s'ils ont été archivés ou marqués comme spam. Assurez-vous également que les paramètres POP3/IMAP sont corrects. Parfois, les e-mails peuvent être filtrés ou redirigés en raison de paramètres incorrects.
En résolvant ces problèmes courants, vous pouvez garantir une expérience plus fluide lors de la gestion de plusieurs comptes Gmail, en gardant votre boîte de réception organisée et efficace.
Un moyen plus efficace de prévenir de tels problèmes consiste à mettre en œuvre une solution intégrée à Gmail conçue et construite pour consolider plusieurs comptes.
Gmelius facilite l'intégration des comptes en fournissant des fonctionnalités qui facilitent les transitions et l'organisation des comptes, le tout depuis Gmail lui-même. Nous proposons des fonctionnalités telles que :
- Boîtes de réception partagées et la prise en charge de la gestion de plusieurs comptes dans un seul compte Gmail.
- Gestion de l'automatisation des flux: mettez à jour plusieurs tâches et devoirs à la fois directement depuis votre boîte de réception.
- Notes par e-mail: ajoutez des informations supplémentaires à côté de l'e-mail principal.
- Analytique: Identifiez les goulots d'étranglement dans le fonctionnement de votre flux de travail grâce à de nouvelles analyses pour chaque membre de l'équipe et chaque boîte de réception.
- Brouillons d'e-mails partagés : Rédigez des e-mails collaboratifs pour obtenir des réponses parfaites grâce à des brouillons d'e-mails partagés.
Organisez tous vos comptes Gmail dès aujourd'hui
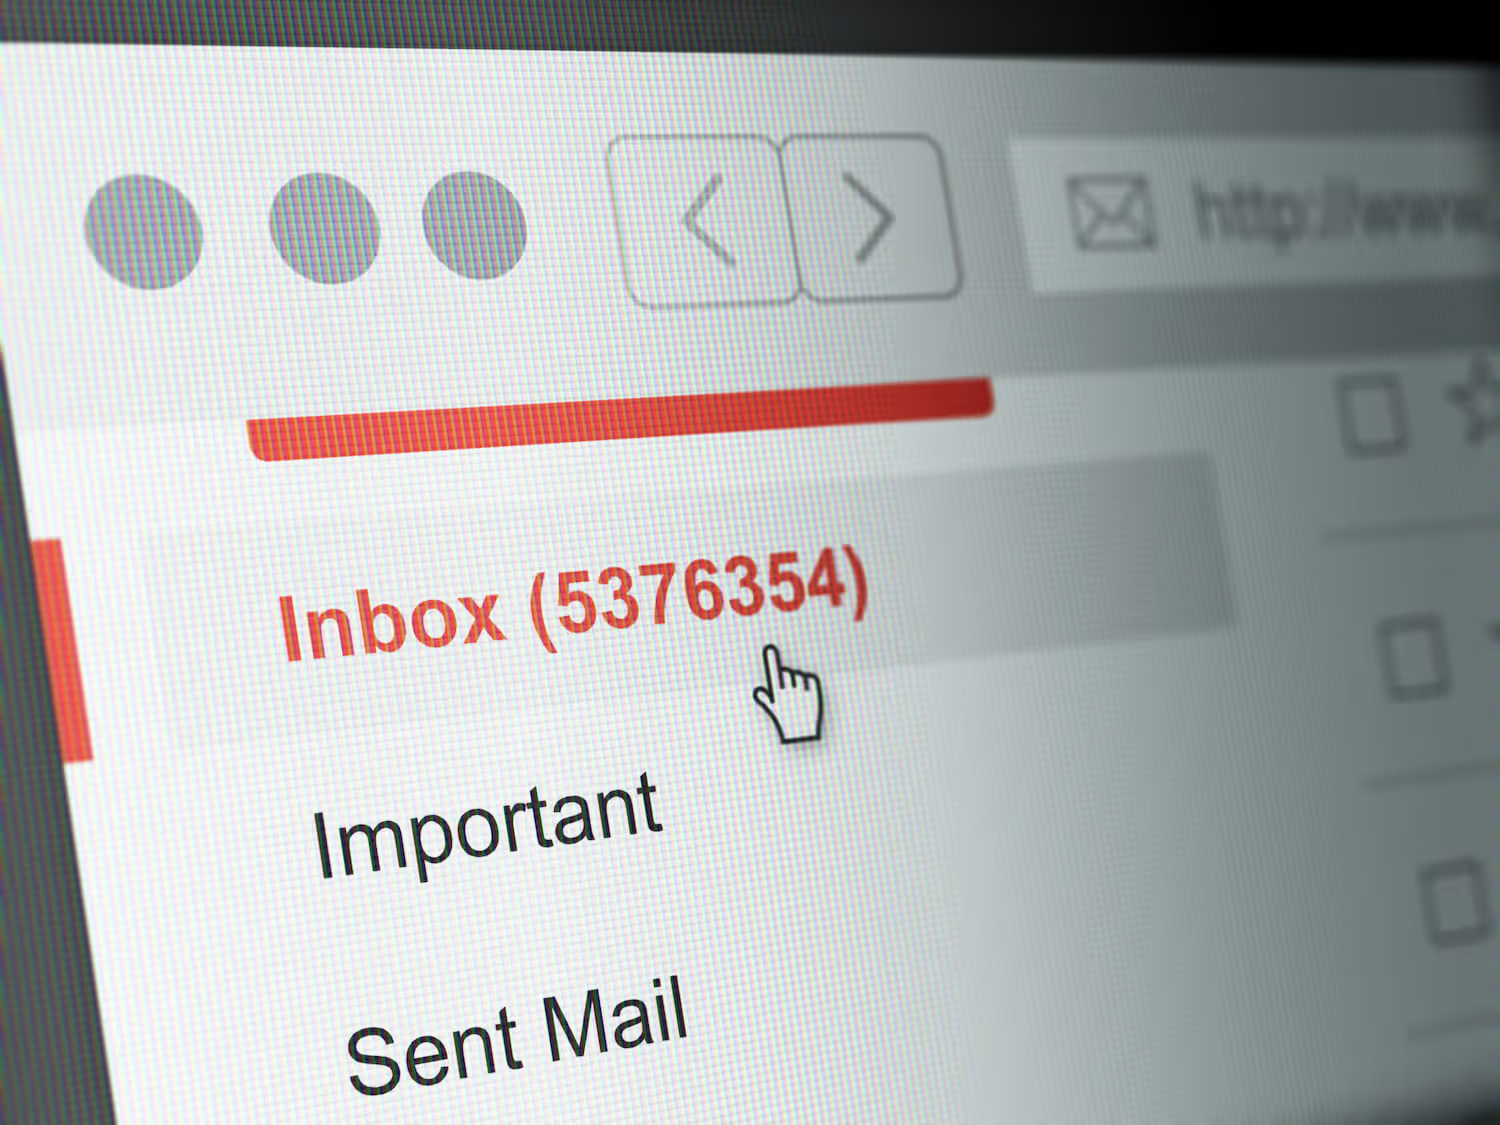
Le fait de passer d'un compte Gmail à un autre peut vous faire perdre du temps, de la concentration et, potentiellement, de la bonne volonté de contacts et de clients importants. En suivant les étapes décrites dans cet article pour gérer plusieurs comptes Gmail à partir d'une seule boîte de réception, vous serez en mesure de gérer vos activités quotidiennes avec une messagerie beaucoup plus efficace.
Si vous ou votre entreprise souhaitez améliorer l'efficacité et la productivité et éviter les problèmes courants tels que le partage de mots de passe, donnez Gmelius essayez de créer des boîtes de réception collaboratives pour vos équipes. Nous fournissons tous les outils dont vos employés ont besoin pour réussir. Attribuez et traitez les e-mails directement dans Gmail, synchronisés en temps réel pour que tout le monde soit toujours à jour.
Découvrez comment Gmelius est conçu pour améliorer la communication et la collaboration au sein des équipes. Prêt à démarrer ? INSCRIVEZ-VOUS aujourd'hui !
![Transformez plusieurs comptes Gmail en une seule boîte de réception [Guide 2025]](https://cdn.prod.website-files.com/6737568a4ac417efeb387e5a/67d2fabec0cc2aab9168ba01_67cb05c5466ba081a666859c_Unity%2520in%2520Diversity%2520-%2520Hands%2520of%2520So.avif)


.avif)

.avif)
.avif)