Let's start with a simple question: how many Gmail accounts do you have? Each Gmail user likely has multiple accounts they use for different purposes, one for private use, another for work-related issues, a third one for specific projects, and finally generic/group shared inboxes to manage their daily operations.
Managing multiple email accounts can be challenging, as switching between them can hinder productivity. Whether you’re a solo founder juggling client communications, or a small team managing accounting, support, and general inquiries through different addresses, switching between disconnected inboxes slows everything down.
Important emails fall through the cracks. Tasks get duplicated. Accountability disappears.
The good news? Gmail offers native features to consolidate and streamline account management, from forwarding and filtering to multi-inbox views and alias replies. And when your needs go beyond what Gmail alone can offer, Gmelius brings the structure: shared inboxes, task assignments, workflow automation, and full-team visibility, right inside Gmail.
This guide walks you through how to unify multiple Gmail accounts into a single command center. Then, we’ll show you how Gmelius builds on that foundation to help teams communicate, delegate, and stay on track, without ever leaving their inbox.
📩 Step-by-step guide to merge multiple Gmail accounts:
- Link your Gmail accounts.
- Set up email forwarding.
- Import emails from non-Gmail accounts.
- Set up unique signatures for each account.
- Use Gmail’s Multiple Inboxes view.
- Create shared inboxes with Gmelius.
- Automate workflows with Gmelius rules.
- Collaborate using email notes and shared drafts.
- Monitor team performance with Gmelius analytics.
- Eliminate password sharing by managing access securely.
Manage Multiple Gmail Accounts in One Inbox
Gmail has many features to help manage multiple accounts, including, but not limited to:
These first steps are great for better communication and organization in your day-to-day life. However, if you want to increase efficiency for your professional inboxes, you should take a look at some of Gmelius’ other features and two-way integrations with your favorite tools. Additionally, accessing ‘gmail settings’ through the gear icon in your primary Gmail inbox is crucial for configuring and managing multiple accounts.
Looking for a better way to manage team communication? Try Gmelius!
Follow these steps to link multiple accounts from a laptop or desktop computer. To set up a secondary Gmail account and manage it effectively, you can configure email forwarding from the secondary account to a primary one. Once activated, this Gmail feature uses one account as the primary Gmail account for all accounts. You’ll still be able to switch easily between individual profiles and respond to emails from individual addresses.
Start in the account that will become the primary account.
Step 1: Go to "Settings" > "See all settings" > "Accounts"
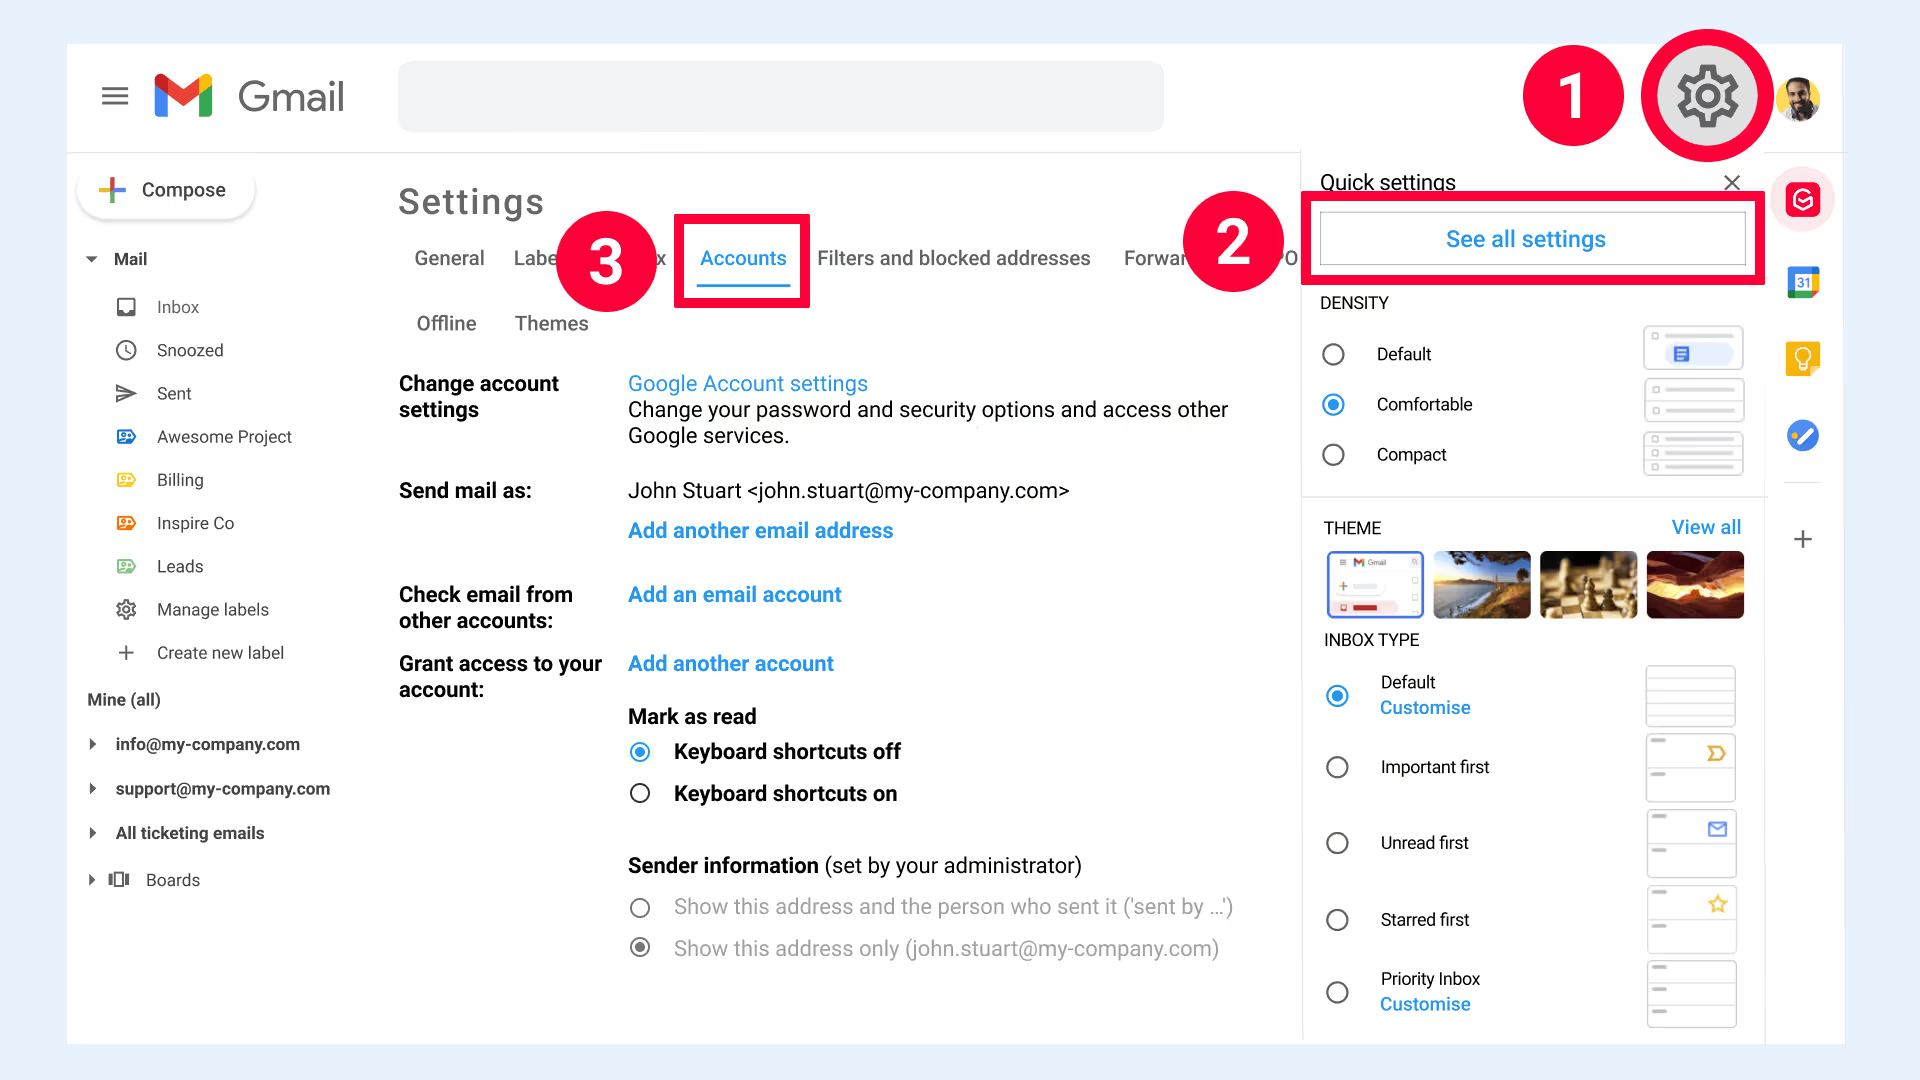
Start in the Gmail account from where you want to manage all of your other accounts and go to "Settings" > "See all settings" > "Accounts".
Step 2: In the "Send mail as:" section, add your secondary Gmail account
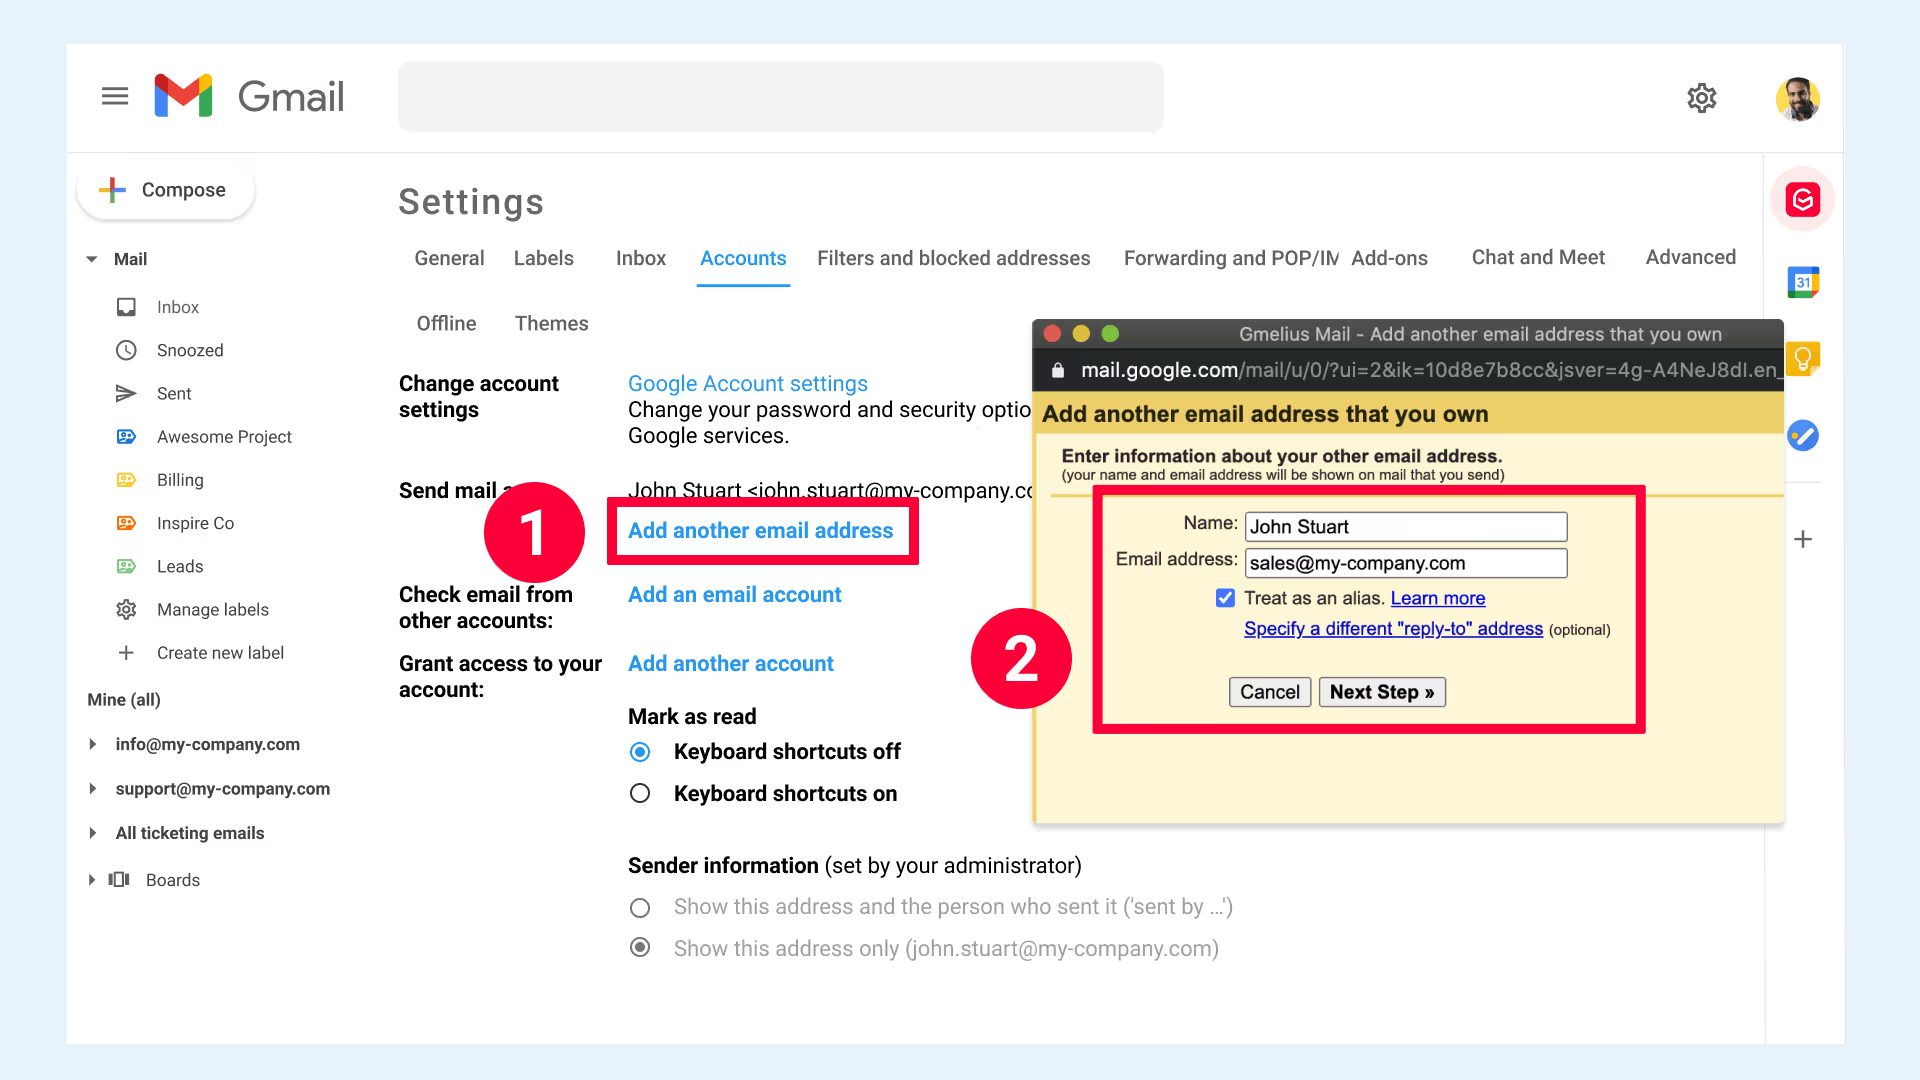
In the "Send mail as:" section, click on "Add another email address". A pop-up will appear where you can add the email address you'd like to add, as well as the sender name it should display. Check the "Treat as an alias" box to make sure emails from your secondary account arrive in your primary inbox.
When you're done, click "Next Step".
Step 3: Click the "Send Verification" button

You're now able to click the "Send Verification" button, which will cause an automatic email to be sent to your secondary email account. Make sure not to close the pop-up once you've clicked the button.
Step 4: Verify your secondary email address
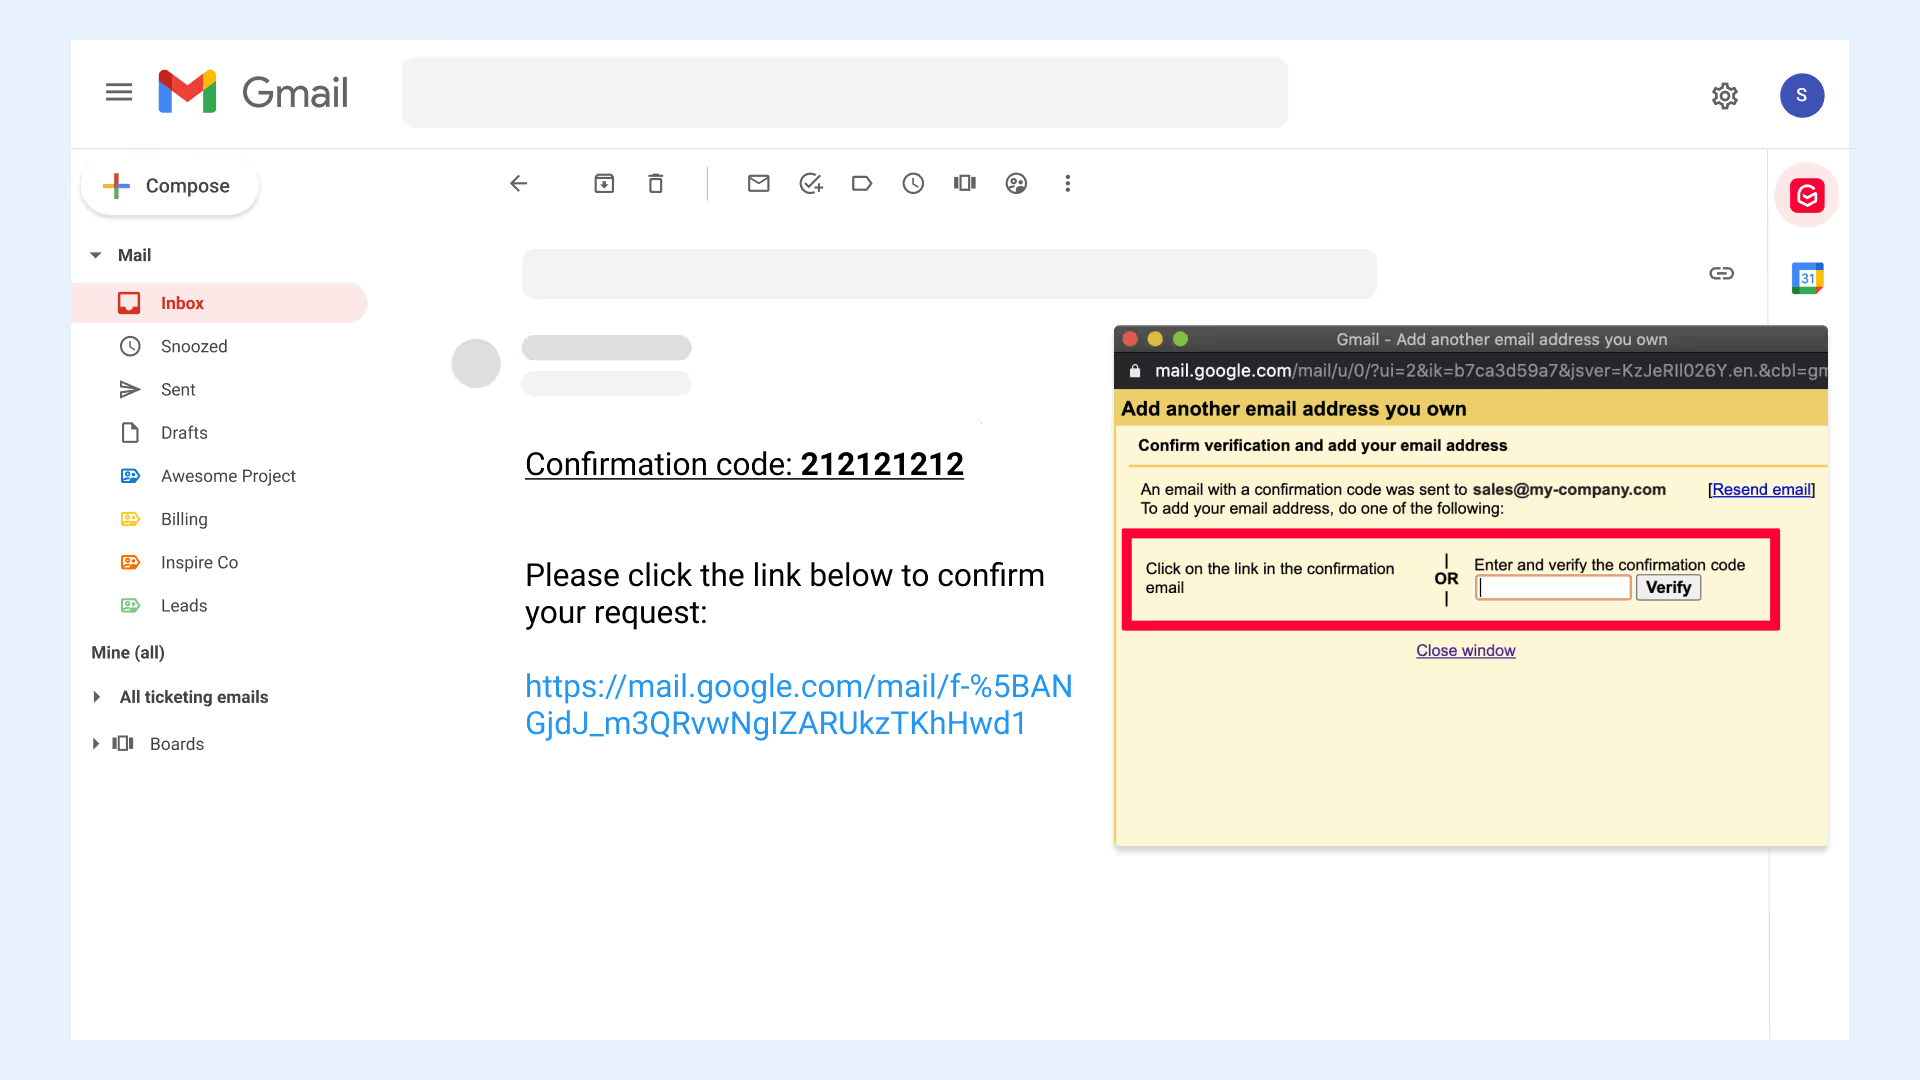
Go to your secondary email account, find the verification email and either click the verification link in that email or copy/paste the verification code in the email into the "Enter and verify the confirmation code" field in the pop-up in your primary account.
When that's done, you'll be able to send emails from your secondary email address, straight from your primary Gmail inbox.
Step 5: Select your default way of replying
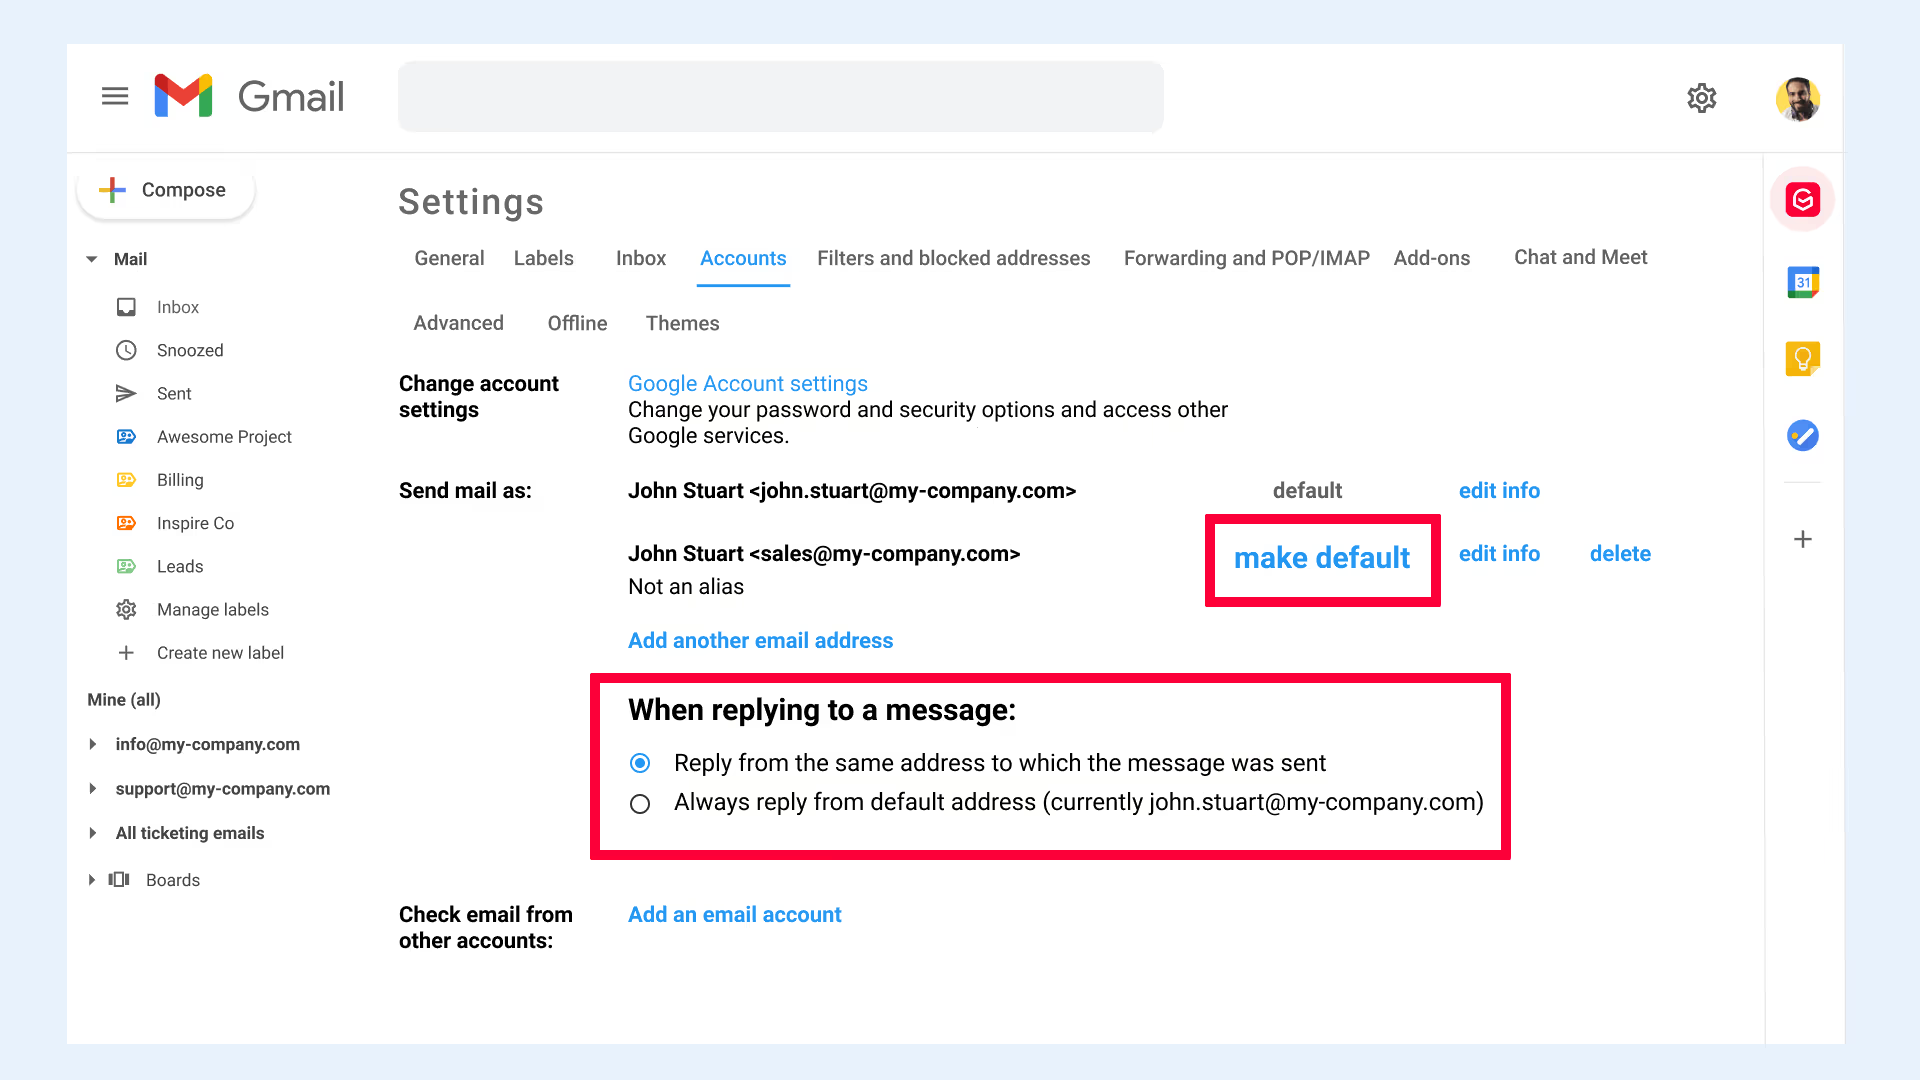
Gmail automatically sets your primary email address as your default email address to send new emails with. If you'd like to change that, you can select the "make default" next to the secondary email address you'd like to send new email addresses from.
You can also decide whether you want to reply to emails from the same email address the email was sent to, or from your default email address by selecting the appropriate option under "When replying to a message:".
Step 6: In your secondary account, go to "Settings" > "Forwarding and POP/IMAP" > "Forwarding" section
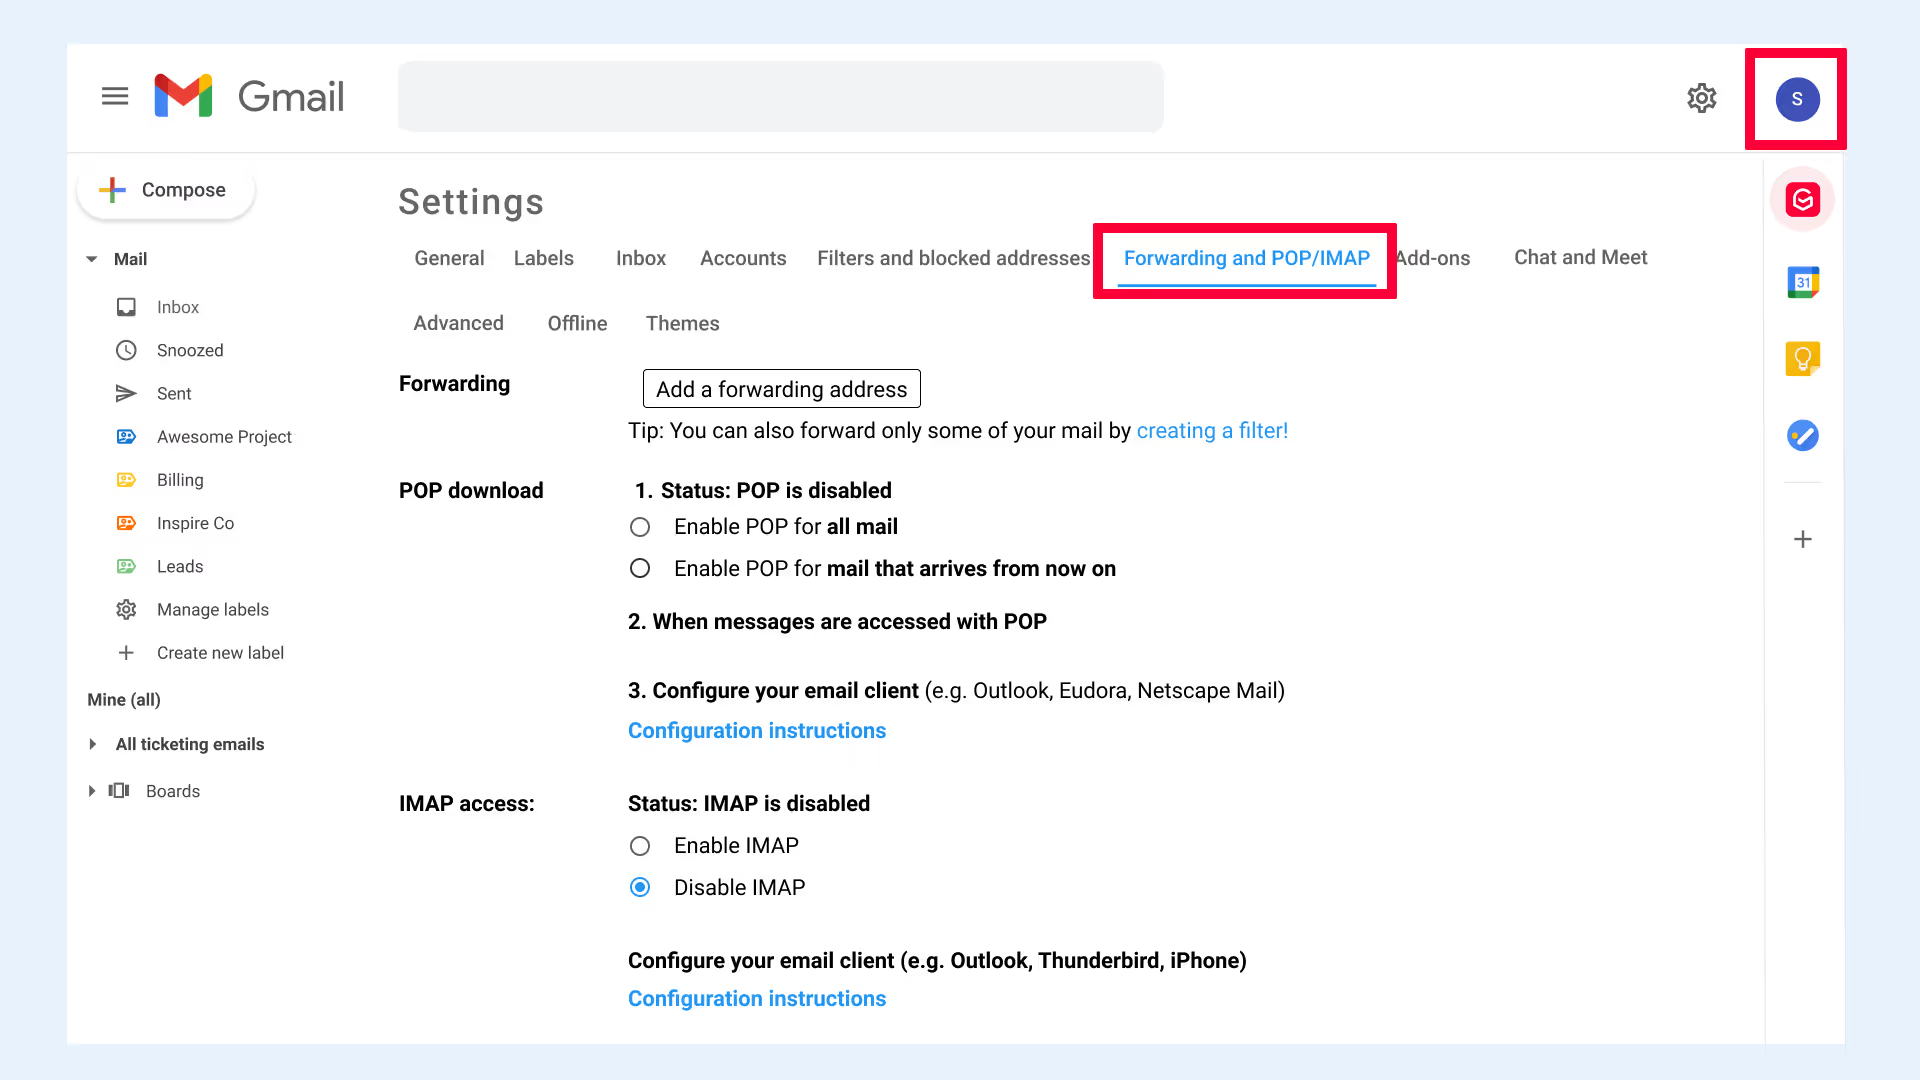
For this step, you need to go to your secondary Gmail account. Head into all settings and go to the "Forwarding and POP/IMAP" tab.
Step 7: Click "Add a forwarding address" and enter your primary account's Gmail address
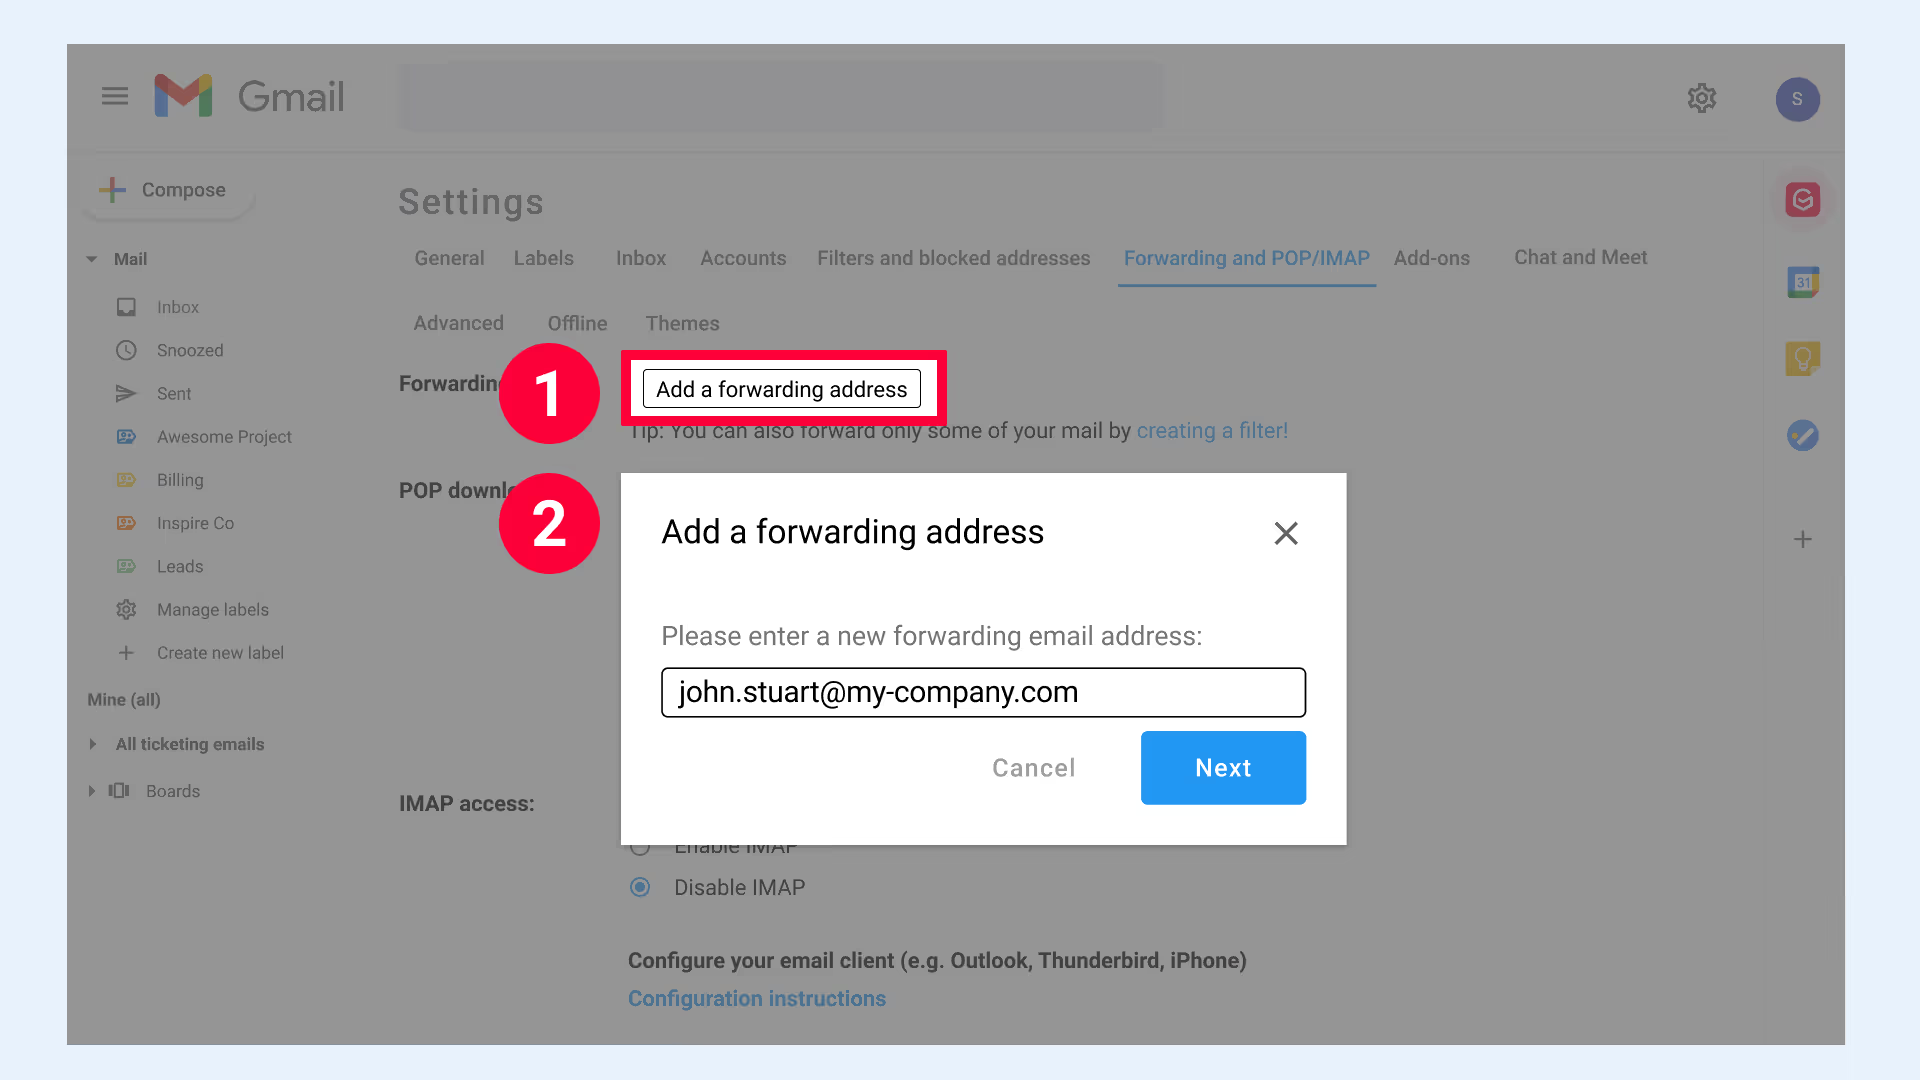
In the "Forwarding" section, click the "Add a forwarding address" button and enter the email address of your primary Gmail account. Click "Next" > "Proceed" > "OK" to have a confirmation email sent to your primary Gmail address.
Step 8: Copy/paste the confirmation code to confirm your forwarding address.
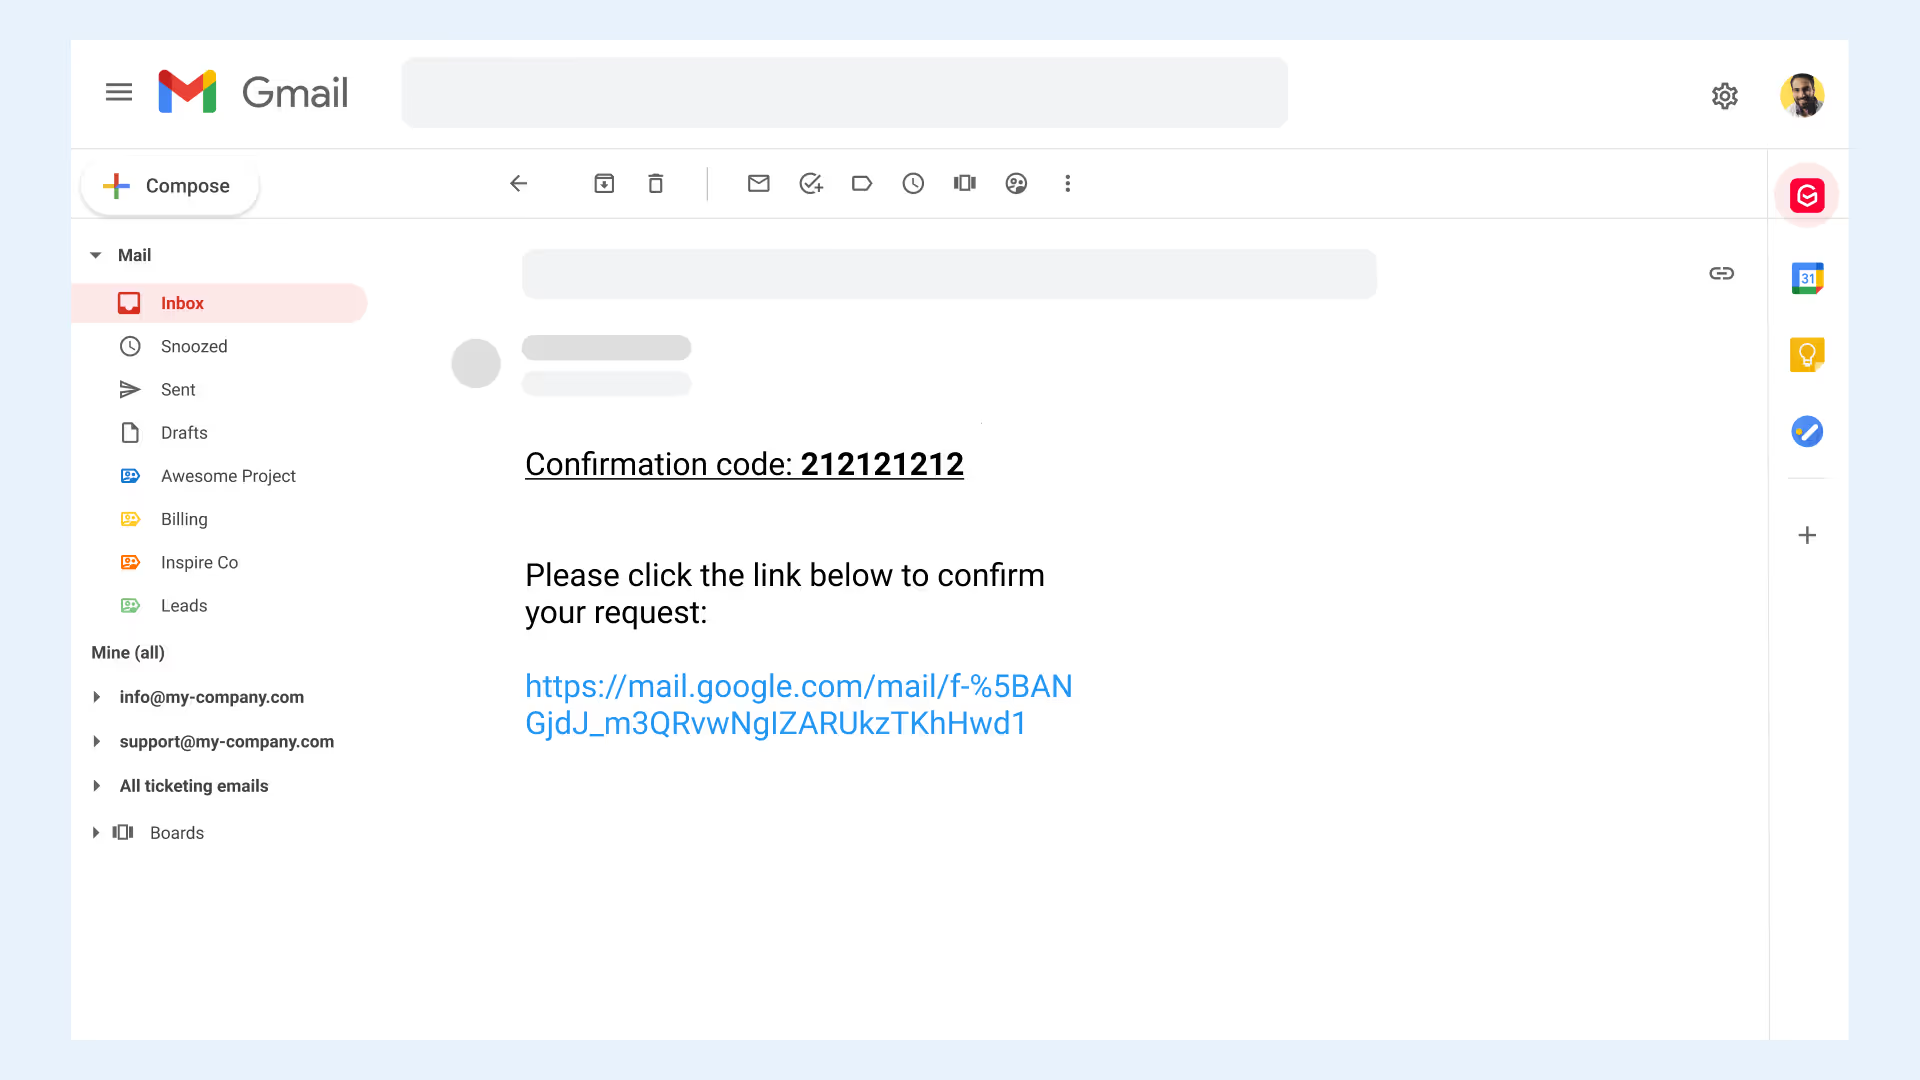
Go back to your primary account, find the confirmation email, and click the confirmation link. A new browser tab will open to let you know your email address has been confirmed.
Alternatively, copy/paste the confirmation code from the email into the related field in the pop-up in your secondary Gmail account. Click "Verify" to finalize the verification process.
Step 9: Choose a forwarding option
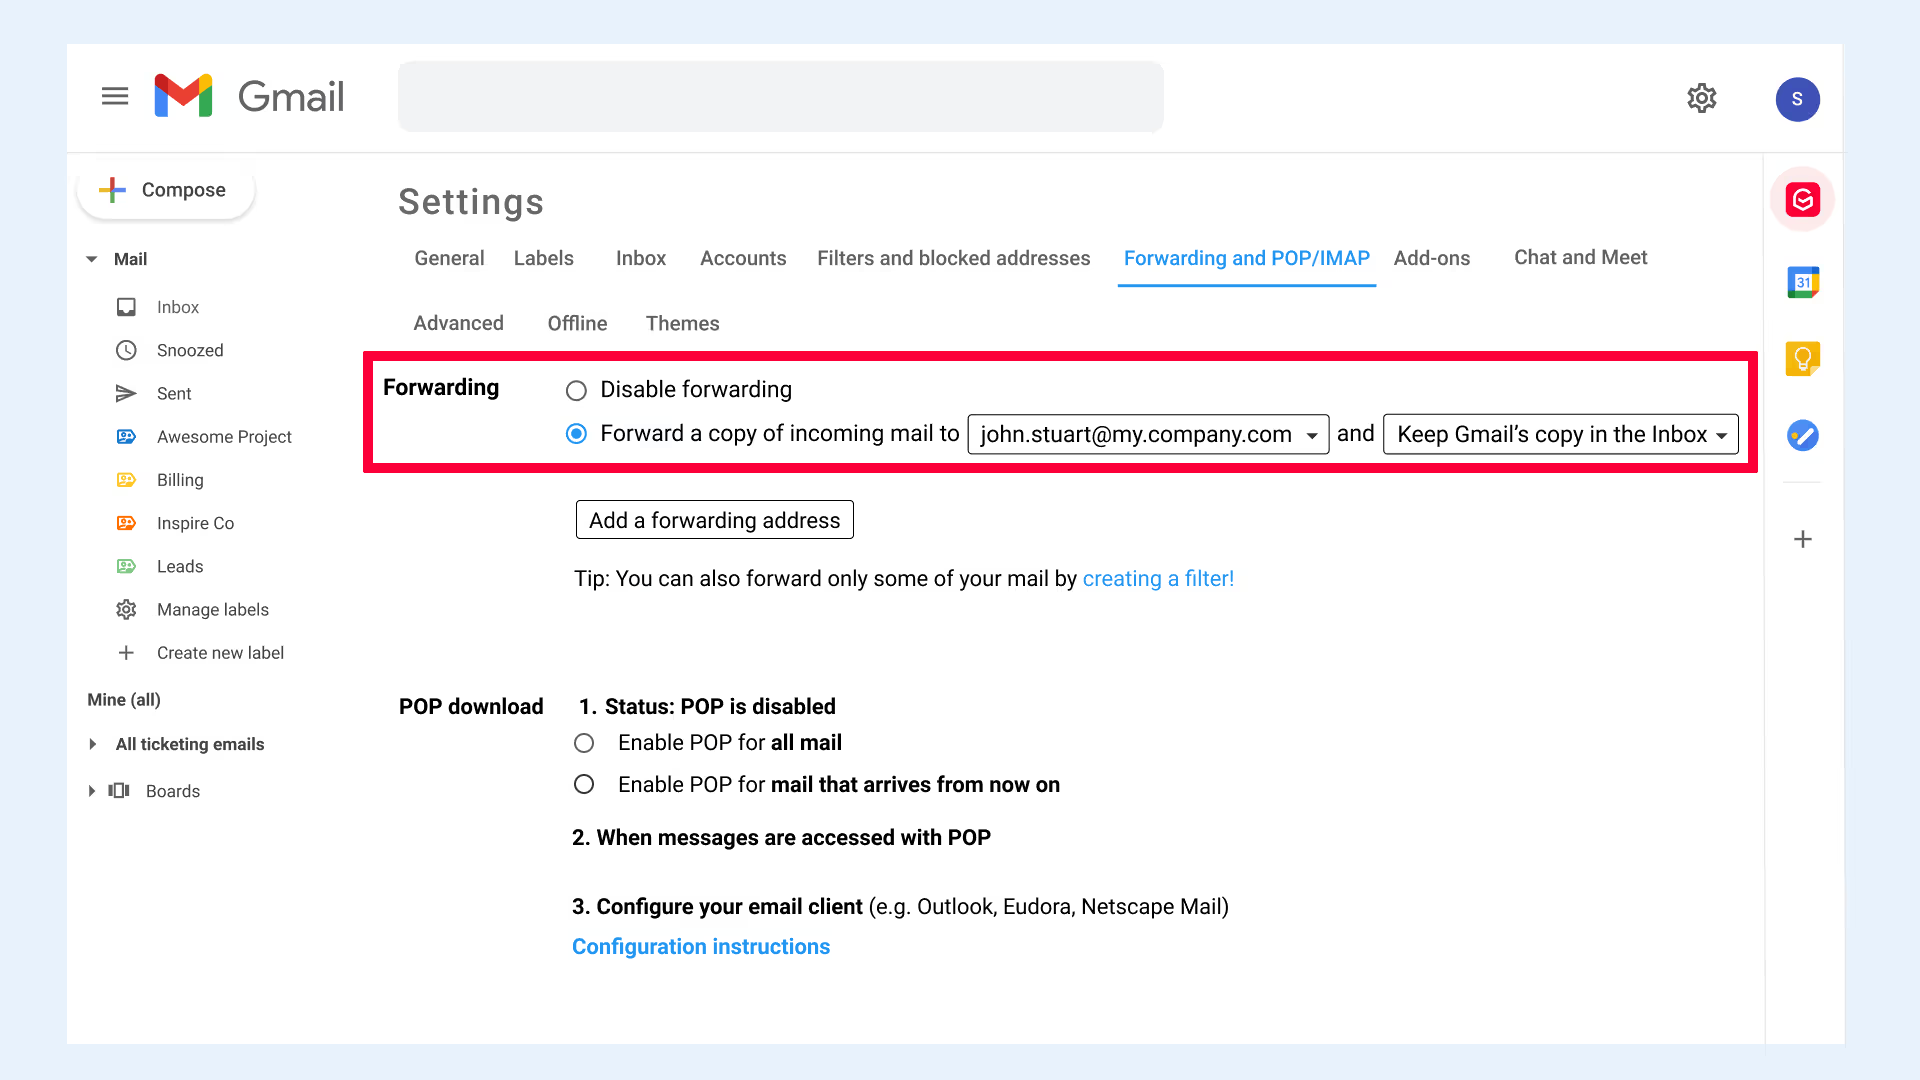
Go back to your secondary Gmail account and under "Forwarding:", select an option from the dropdown under "Forward a copy of incoming mail to…".
Save your changes at the bottom of the page and any emails coming into your secondary account will now be forwarded to your primary Gmail account.
Note that you can also automatically forward emails from non-Gmail accounts. Check the support documentation of the respective email client on how to set that up.
It is also possible to use your primary Gmail inbox to send and receive emails from non-Gmail accounts. You will only be able to import emails from up to five other accounts. If you need to import more than five accounts, the best option is to have the emails forwarded. Managing multiple Google accounts, especially Gmail accounts, can be challenging, but there are strategies to organize emails effectively and enhance productivity.
Start in the account that will become the primary account, and follow the below step-by-step instructions.
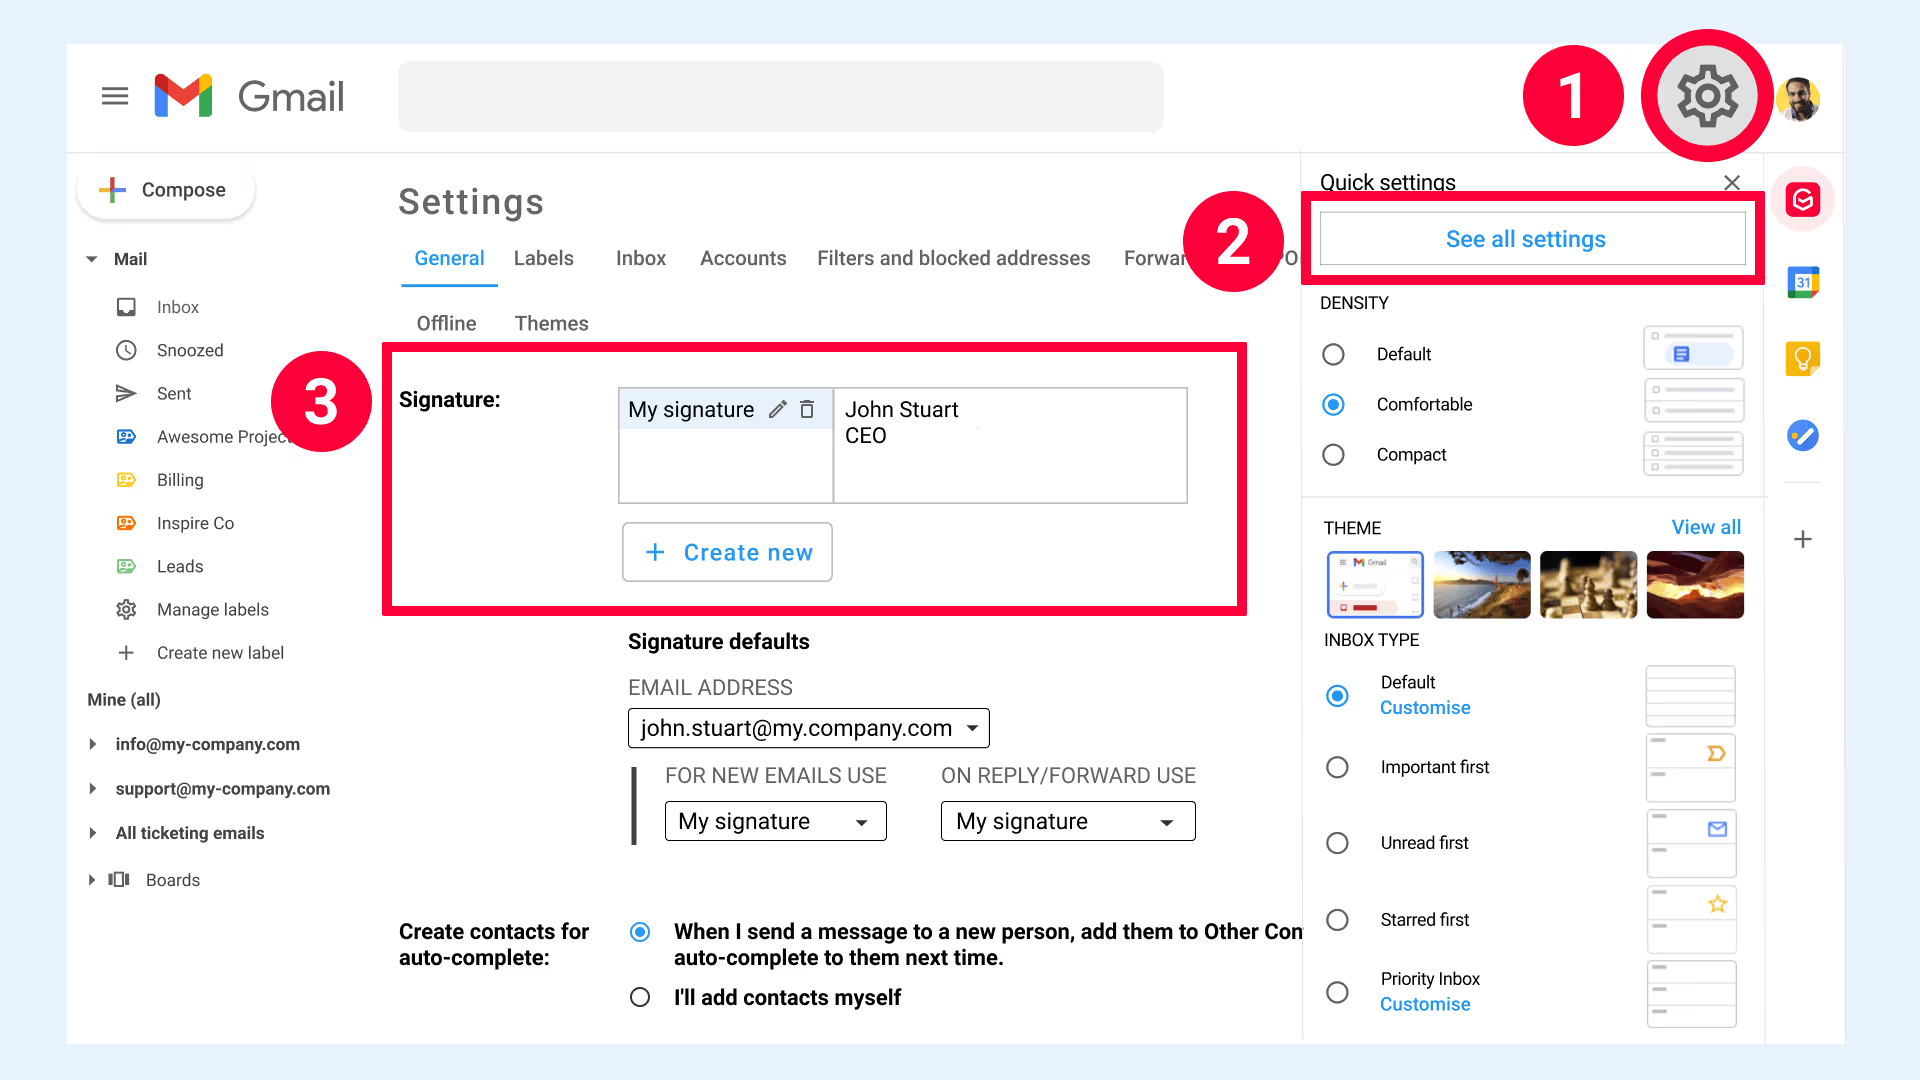
Once you've added your secondary Gmail accounts to your primary inbox, you can easily assign a unique email signature to each of them.
- In the top right corner of the browser, select the "Settings" icon
- Under “Quick Settings” select "See all settings"
- Scroll down to "Signature:"
- Select "Create new" if you don't have a signature yet, or select each email address added to your account to edit its signature
- Click "Save Changes" at the bottom of the page
Once you've connected all the Gmail accounts to your primary account, you can also set up groups of emails for your primary inbox. Gmail Multiple Inboxes are essentially mini inboxes within your primary inbox that allow you to see categorized emails.
Troubleshooting Common Issues
When managing multiple Gmail accounts, users may encounter common issues such as duplicate emails, login issues, and missing emails. Here are some troubleshooting tips:
- Duplicate emails: To avoid duplicate emails, make sure to select the “Archive incoming messages (Skip the Inbox)” option when setting up email forwarding. This prevents the same email from appearing multiple times in your inbox.
- Login issues: To resolve login issues, try using a password manager or creating strong and unique passwords for each account. This can help you keep track of your credentials and ensure secure access to your accounts.
- Missing emails: To resolve missing emails, check if the emails have been archived or marked as spam. Also, ensure that the POP3/IMAP settings are correct. Sometimes, emails might be filtered out or redirected due to incorrect settings.
By addressing these common issues, you can ensure a smoother experience when managing multiple Gmail accounts, keeping your inbox organized and efficient.
A more robust way to prevent such issues is to implement a Gmail-integrated solution designed and built to consolidate multiple accounts.
Gmelius helps with account integration by providing features that create seamless account transitions and organization, all from within Gmail itself. We provide features such as:
- Shared inboxes and support for the management of multiple accounts into one Gmail account.
- Workflow automation management: Update multiple tasks and assignments at once directly from your inbox.
- Email notes: Add extra information alongside the primary email.
- Analytics: Identify bottlenecks within your workflow operation with new analytics for each team member and each inbox.
- Shared email drafts: Write up collaborative emails for the perfect responses with shared email drafts.
Organize All Your Gmail Accounts Today
Multiple Gmail accounts don’t have to mean fragmented workflows or lost productivity. With proper account linking, smart filtering, and Gmail’s built-in inbox tools, you can bring structure and clarity to your email chaos. But for teams that need more than personal organization (like shared visibility, internal collaboration, automation, and performance tracking) Gmelius turns Gmail into a full-scale operations hub.
No more guessing who replied to what. No more forwarding chains. Just real-time coordination, shared context, and smart systems that scale as your business grows.
Ready to unify your inboxes and streamline your team’s communication?
👉 Start your free trial with Gmelius today.
TL;DR: We Answer Your Frequently Asked Questions (FAQs) About Multiple Inboxes
1. How do I merge Outlook emails into Gmail?
Go to your Gmail Settings > Accounts and Import > Check mail from other accounts, then add your Outlook email. Gmail will fetch messages via POP3. You can choose to label incoming messages for better tracking and keep a copy in Outlook if needed.
2. How can I export Outlook emails to Gmail?
First, enable IMAP in your Gmail settings. Then open Outlook, go to File > Add Account, and add your Gmail via IMAP. You can now drag-and-drop folders or emails from Outlook into your Gmail folders, and they’ll sync across devices.
3. Can I do a mail merge using Gmail?
Yes—pair Google Sheets with Gmail using add-ons like YAMM, Gmass, or Mailmeteor. Create a contact list in Sheets, draft a template in Gmail, and use the add-on to send personalized emails in bulk—complete with names, links, and unique content.
4. Can I view multiple Gmail inboxes in one account?
Absolutely. In Gmail, go to Settings > See all settings > Inbox > Inbox Type, and choose Multiple Inboxes. Add filters like is:unread, label:Support, or from:client@example.com to create distinct views inside your primary inbox—ideal for workflows or departments.
5. How do I manage two Gmail accounts in one inbox?
Start by going to Settings > Accounts and Import in your primary Gmail. Add your secondary address under “Send mail as” and enable email forwarding from the second account to your primary. You’ll now receive and reply to both from a single inbox.
6. How do I edit a Gmail address?
Gmail doesn’t let you rename your primary email address. But you can:
- Create a new Gmail and set up forwarding from the old one.
- Use aliasing:
yourname+anything@gmail.comstill delivers to your main inbox, and it’s great for filtering or signup tracking.
7. What are the top iPhone email apps right now?
Here are the best iPhone apps for different needs:
- Gmelius PWA – A powerful Gmail-based tool for team collaboration, shared inboxes, and workflow automation. Add it to your iPhone home screen for a native app feel.
- Apple Mail – Clean and native; works well with iCloud and Exchange.
- Gmail – Seamless Google Workspace integration.
- Outlook – Great for scheduling and managing calendars.
- Spark – Ideal for shared inboxes and team replies.
- Superhuman – Minimalist UI, blazingly fast, built for pros.
8. How do I schedule an email in Gmail?
Compose your message, then click the small dropdown arrow beside the Send button and select Schedule send. Choose a preset time or pick your own. Gmail will queue it up and send automatically, perfect for reaching people in different time zones.
9. Can I merge multiple Gmail accounts into one inbox?
Yes. In your main account, go to Settings > Accounts and Import, add other Gmail accounts under “Send mail as”, and enable forwarding from each of those accounts. You can even apply labels to incoming messages to distinguish between them.
10. Is it possible to use two Gmail accounts in one inbox?
Definitely. Use Gmail’s “Send mail as” + email forwarding combo. This lets you receive, reply, and send emails from both addresses inside a single inbox—without needing to switch tabs or log in/out. Add labels to keep things organized.
![Turn Multiple Gmail Accounts into One Inbox [2025 Guide]](https://cdn.prod.website-files.com/6737568a4ac417efeb387e5a/67d2fabec0cc2aab9168ba01_67cb05c5466ba081a666859c_Unity%2520in%2520Diversity%2520-%2520Hands%2520of%2520So.avif)


.avif)

.avif)