.avif)

Gmail power users know something that the average user doesn’t. In this article you will discover a full list of gmail tips:
- Integrate Gmail with Slack and Trello
- Draft your emails with AI assistants
- Use labels to properly organize your inbox
- Share email threads instead of forwarding
- Chat alongside emails for easy collaboration
- Create rules to automatically filter emails
- Automate your workflows for immediate productivity
- Set email reminders with Gmail nudge
- Schedule emails instead of sending right away
- Delegate your email account to someone else
- Use Gmail keyboard shortcuts to save time
- Search through your emails faster
- Use Gmelius email snippets
- Schedule Meetings directly in Gmail
Tip 1: Integrate Gmail with Slack and Trello
The average person has to use way too many tools to get their work done. This creates extra work, duplicating information across platforms, and more places to look at when searching for information.
And if you work with other teams, they may have their tool of preference, so you have to switch context across even more tools and their various platforms.
Sounds familiar? So our first Gmail hack is to integrate Gmail with your daily tools so you can centralize information and get some time and sanity back.
Gmelius integrates in a two-way sync with the most widely used tools by professional teams. Some of your teams may prefer to work from Slack, while others like to manage their tasks with Trello. And they shouldn't have to choose, while worrying about how all the data will be synced across their teammates. Thanks to Gmelius you no longer have to worry about that.
Imagine the time-savings, efficiency, and productivity gains when you can manage your inbox activity without leaving your favorite tools. With Gmelius, a teammate can reply to an email from Slack, or update a due date in Trello, or assign an email to another teammate in Gmail with all information synced in real time.
Now let's get into how you can become a Gmail power user.
Tip 2: Draft your emails with AI assistants
Writing emails from scratch can eat up a big chunk of your day, but Gmail AI assistants can help you cut that time in half.
Gmail’s built-in Help Me Write feature uses AI to generate reply suggestions based on your email thread. Just click the ✨ icon in the compose window, choose a tone (like formal or casual), and Gmail will create a suggested draft for you to edit. It’s a great tool for handling quick responses without starting from zero.
.avif)
But if you're looking for something more proactive (especially in a team setting) Gmelius AI Reply Assistant takes things further.
Unlike other tools, which wait for you to provide a prompt, Gmelius works in the background. It reads the conversation as it lands in your inbox and automatically drafts a reply the moment you open the email. You don’t need to click anything, it’s just there, ready to review and send.
%2012.37.40%E2%80%AFp.%C2%A0m..avif)
Why it matters
This kind of automation is a huge win for busy professionals and teams. It doesn’t just save time—it removes friction from your daily workflow. So if you’re constantly replying to similar types of emails, or just want your inbox to feel a little smarter, try enabling an AI assistant like Gmelius.
Tip 3: Use labels to properly organize your inbox
Labels are one of the easiest and most effective ways of organizing your inbox. Labels are great for categorizing by topic, client, project, action required etc.
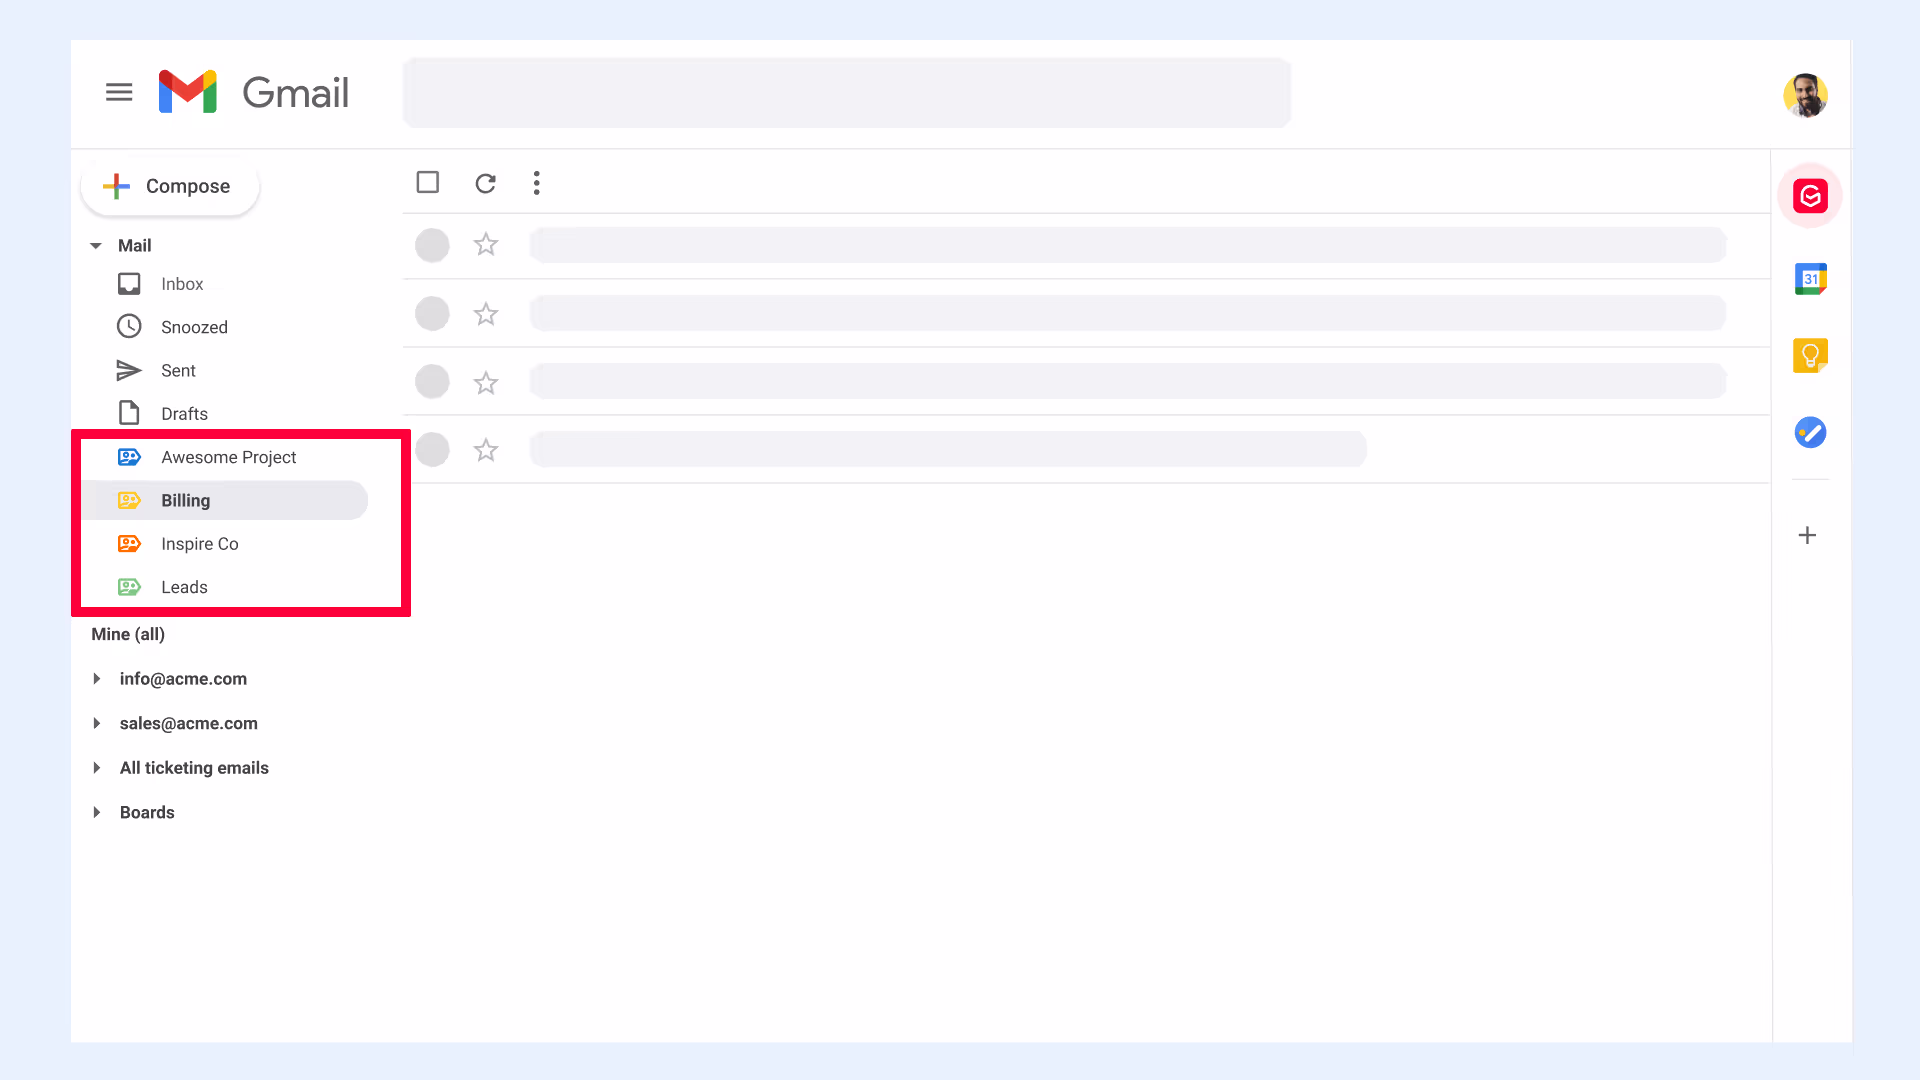
For further categorizing you can use sub-labels. For example each of your clients could have his or her own sub-label.Note: If you’re coming from another email system and moving to Gmail, you’re probably wondering why there are no folders. The answer is that Gmail doesn’t use folders: it uses labels. A Gmail conversation can have many labels and be in many locations: Inbox, Sent Mail, All Mail, and so on - which offers the user more flexibility than having messages in only one folder.
If all your Gmail messages are in your inbox and you’ve never used labels before (and many, many people are guilty of this), this is the time to start. And the best part is how Gmelius turns your labels into a shareable collaboration tool that empowers your workflows.
Gmail’s three-step labelling process
If you’re just getting started with Gmail labels, here’s a three-step process to help you get started:
- Create your labels and sub-labels
- Apply these labels to the messages that are currently in your inbox
- Each time you review your inbox you should apply labels to every new message.
Alternatively, you can set up a filter to do this step for you.
How to create a new label
- Select a message and click on the Labels button on the navigation sidebar
- And select Create new label
- Chose a name, decide if you want the label to be nester under a parent label and click on Create.
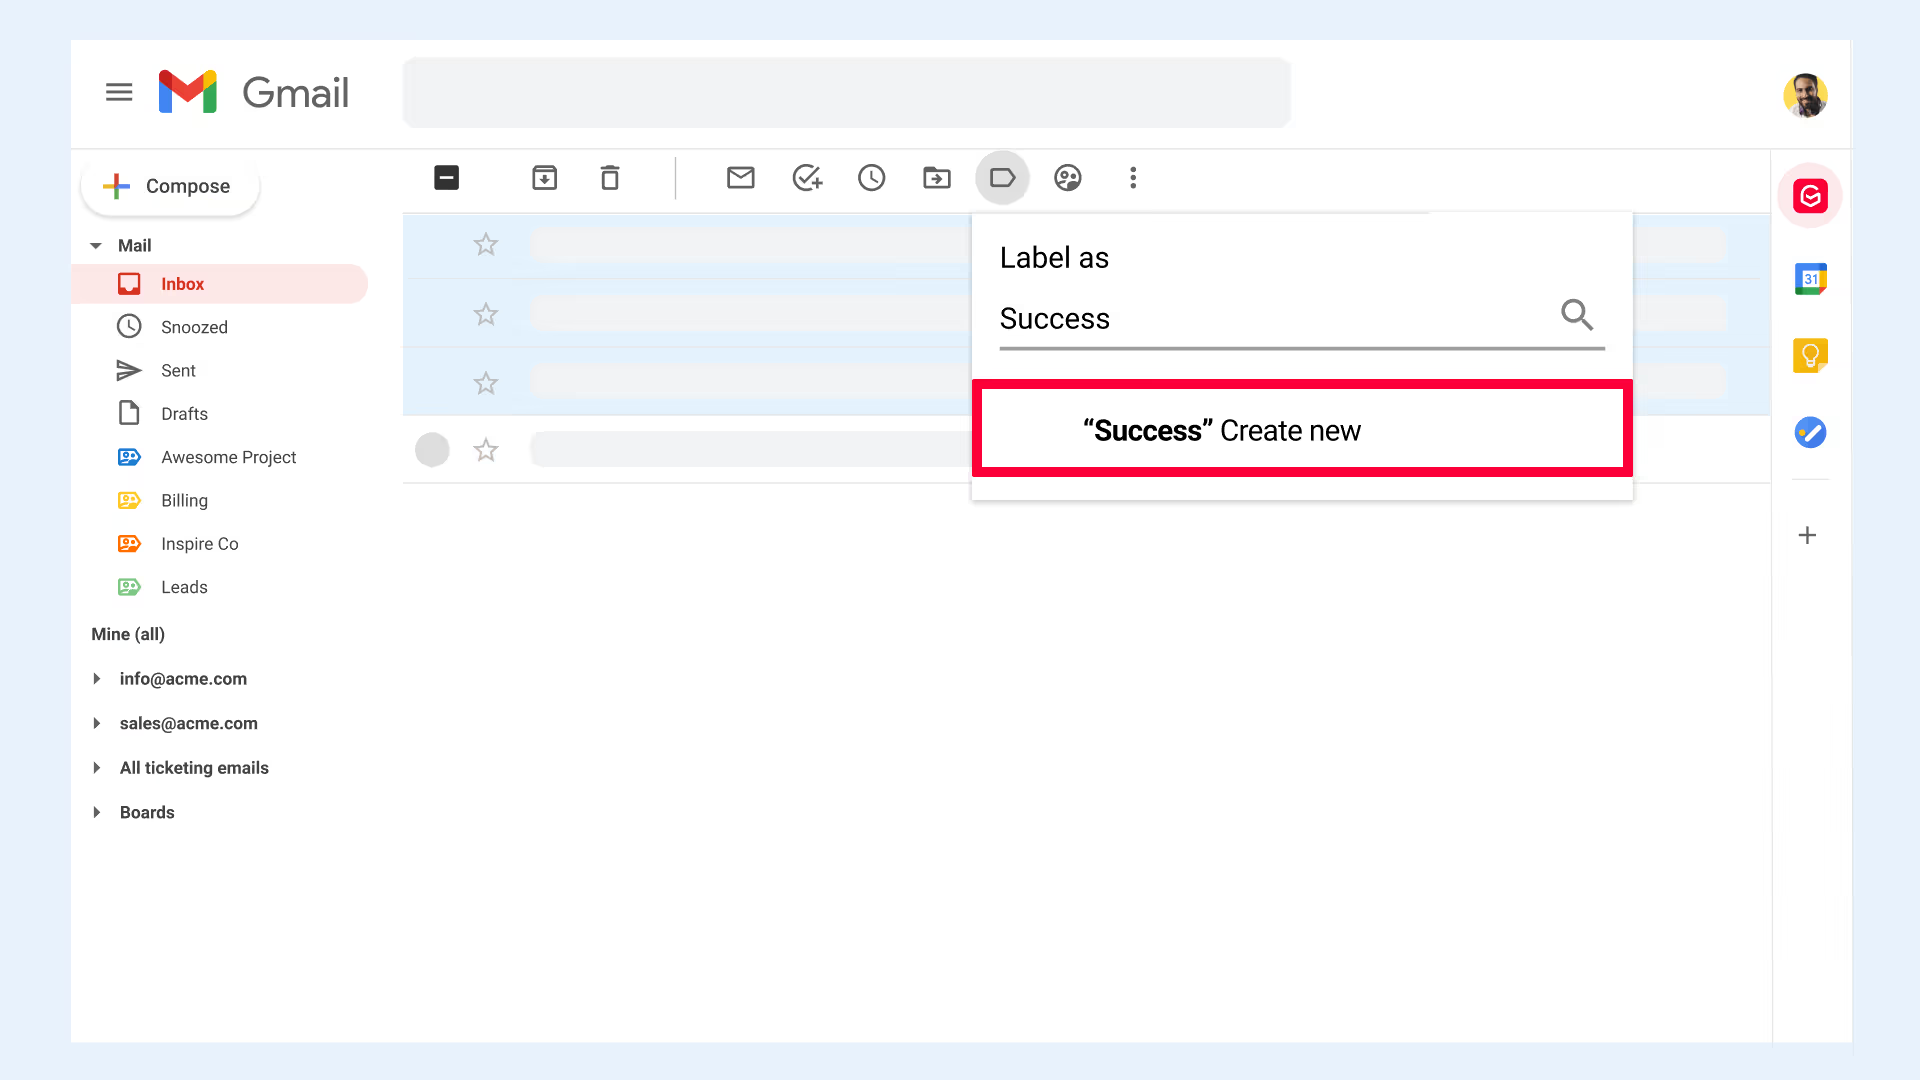
As an alternative, when a particular email is open, you can create a new label simply by starting to type the name of the label and clicking on create new.
How to apply labels to existing messages
To apply labels to messages in your inbox the easiest methods are as follows:
- From the navigation sidebar, drag the label to the message: Gmail will apply the label and the message will stay in your Inbox
- From the Inbox, drag the message to the label on the navigation sidebar. The label will be applied by Gmail and the message will be moved out of the Inbox
- At the top of the Inbox, use the Move To button or the Labels button to label or move messages; however, it’s usually quicker to use the drag-and-drop method.
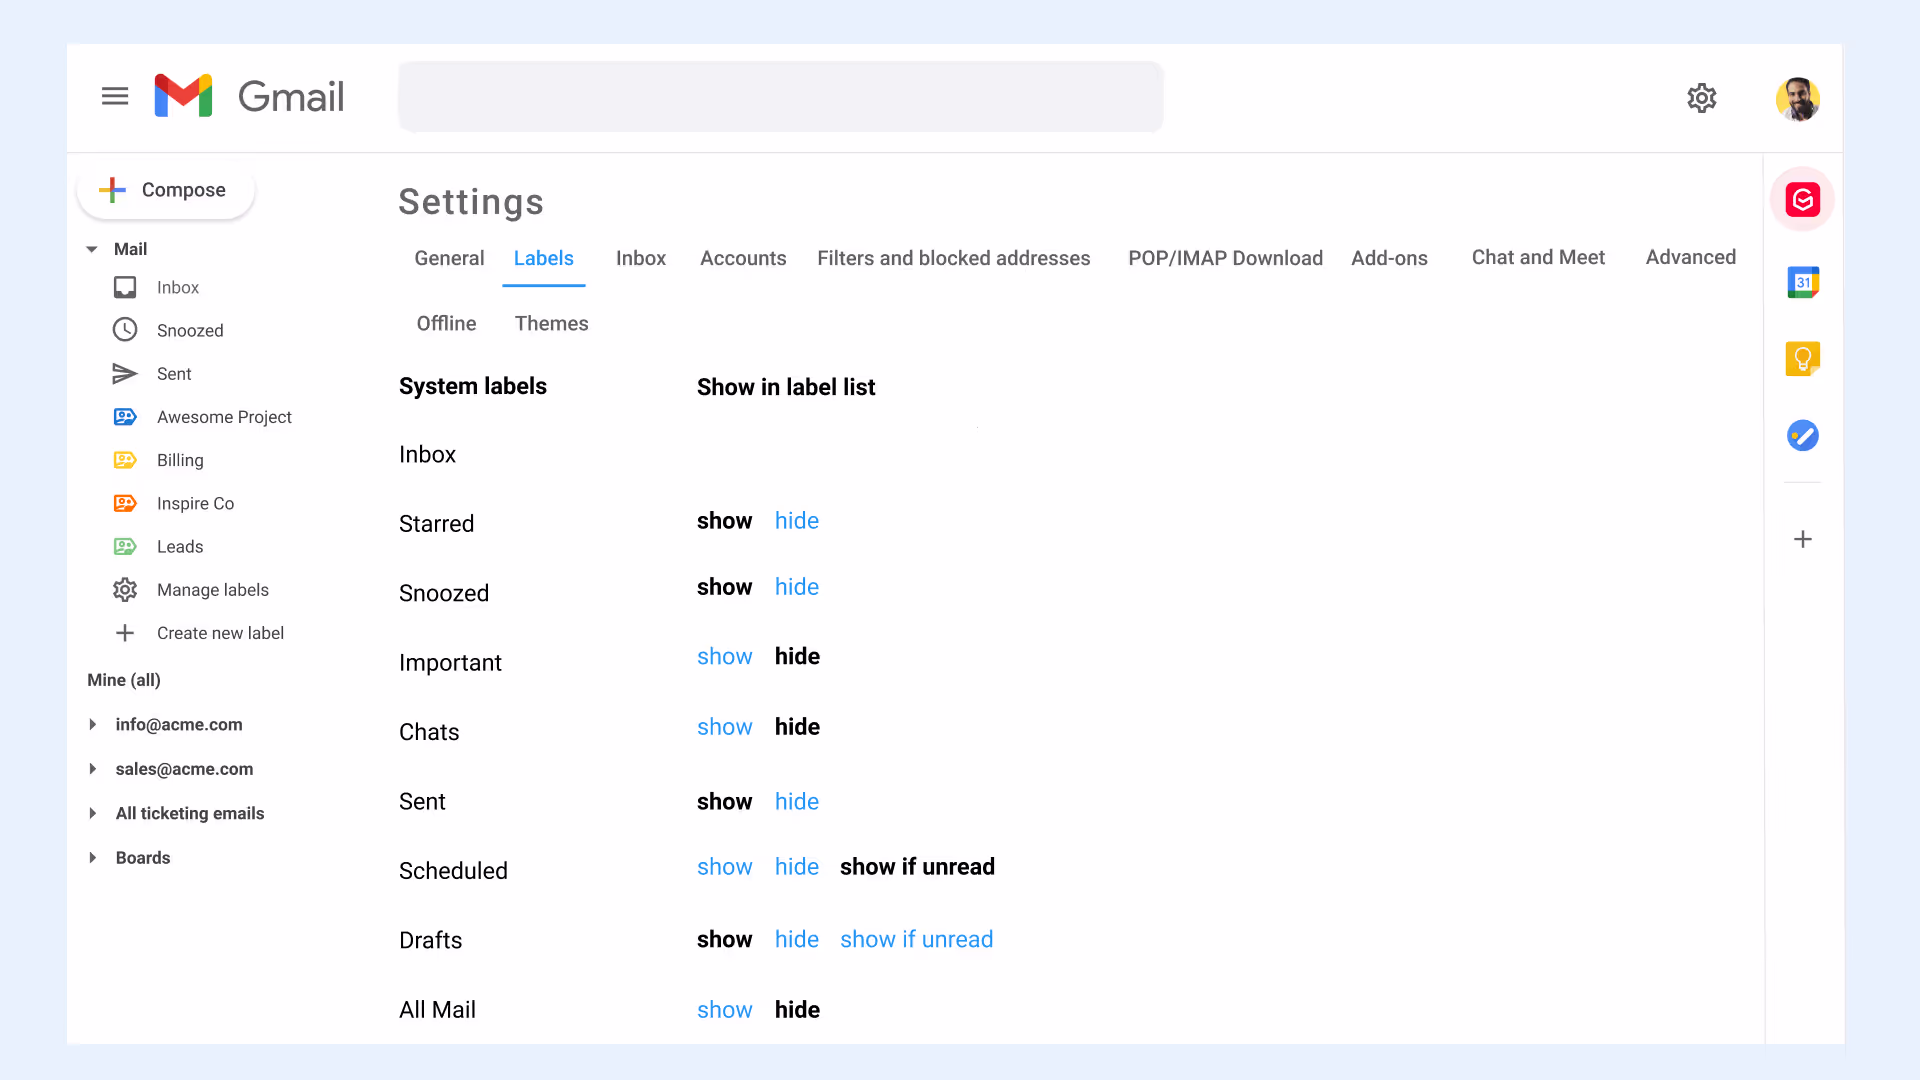
How to manage labels
If you want to view all messages that have been tagged with a certain label, click on that label in the navigation sidebar. Labels can be managed on the Labels tab of the Settings page. From here you can specify which labels to hide and which labels to show in both the message list and the label list. You can also remove a label (which doesn’t delete the messages in it) and edit the name of a label.
Check out this ultimate guide to Gmail labels to create a neat, tidy, and well-organized inbox, in a few simple steps.
Tip 4: Share email threads instead of forwarding
Gmelius offers a way for you to capture and share all conversations in an email thread.
Any email conversation can be shared with other teammates for visibility. As opposed to forwarding an email, email sharing allows team members to see future messages on the email thread, to simplify collaboration and empower teams with the most up to date information.
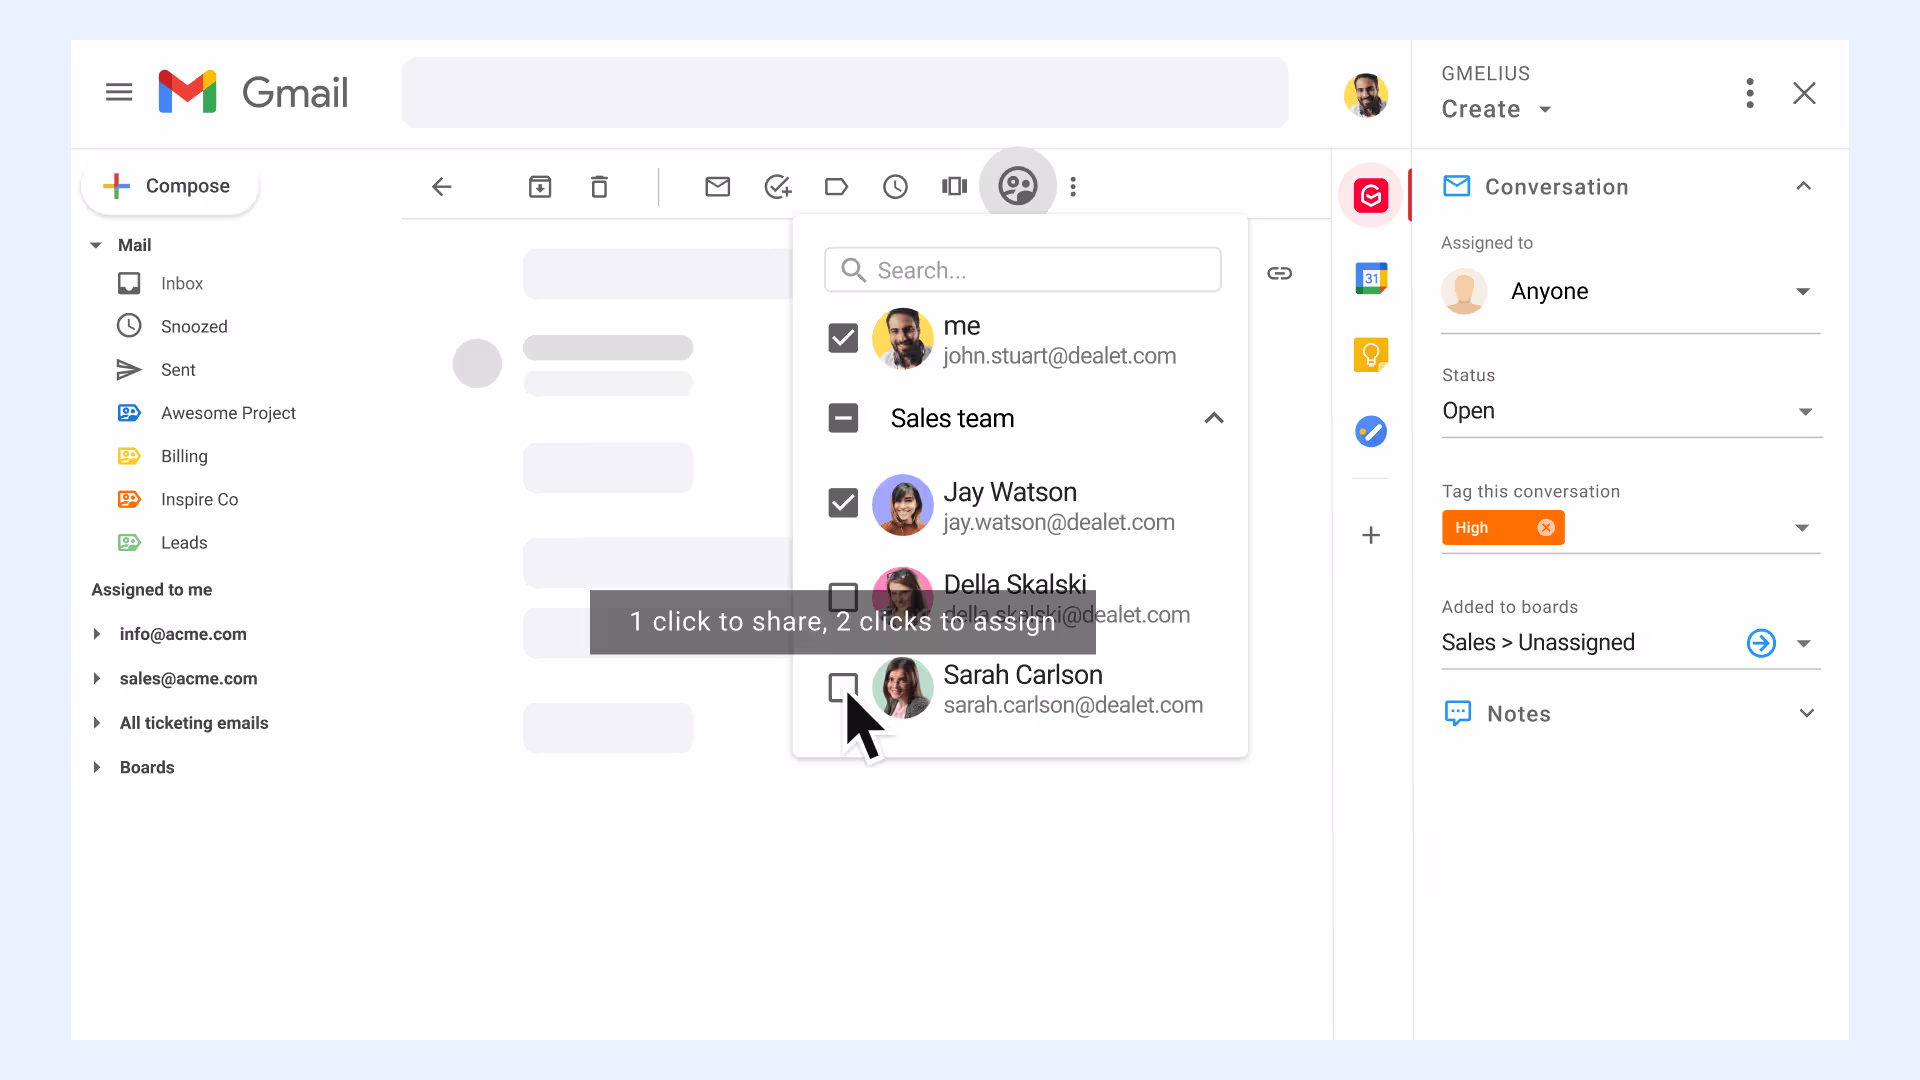
Tip 5: Chat alongside emails for easy collaboration
There is another benefit to email sharing instead of forwarding: it allows you to chat privately alongside an email and @mention your teammates. Need to align quickly, ask for extra information, or provide context to a teammate without having to forward yet another email? Then try email notes. They are so easy to use that they have become one of our user's favorite features.

Click here to learn more and install Gmelius for free.
Tip 6: Create rules to automatically filter emails
Filters are another powerful Gmail feature: they enable you to automatically perform a specific action when a message arrives in your inbox that matches the filter criteria. For example, filters can be created based on the subject line, the sender, content of the message, attachments, or size.
The most popular filters are based on the sender. You can let Gmail know what action you want taken after determining what triggers the filter. One or more of the following actions can be selected:
- Mark as read
- Archive, and skip the inbox
- Mark with a star
- Forward
- Apply with a specific label
- Delete
- Never mark as important
- Always mark as important
- Never send to Spam
- Categorize: (referring to category tabs, like Social, Primary, and so on).
A Word of Caution: Gmail filters are a wonderful timesaver, but creating filters that are too general could well result in missing vitally important messages. Let’s say you created a filter based on a word in the subject line, an important message you wanted to read could inadvertently be moved out of your Inbox. Generally, using a sender’s precise email address as a filter will yield the most accurate results.
How to create a filter
To create a filter:
- In the search box, click the Down arrow;
- Next, enter your filter criteria: this may be messages from a specific sender;
- Next, click on the "Create filter" link;
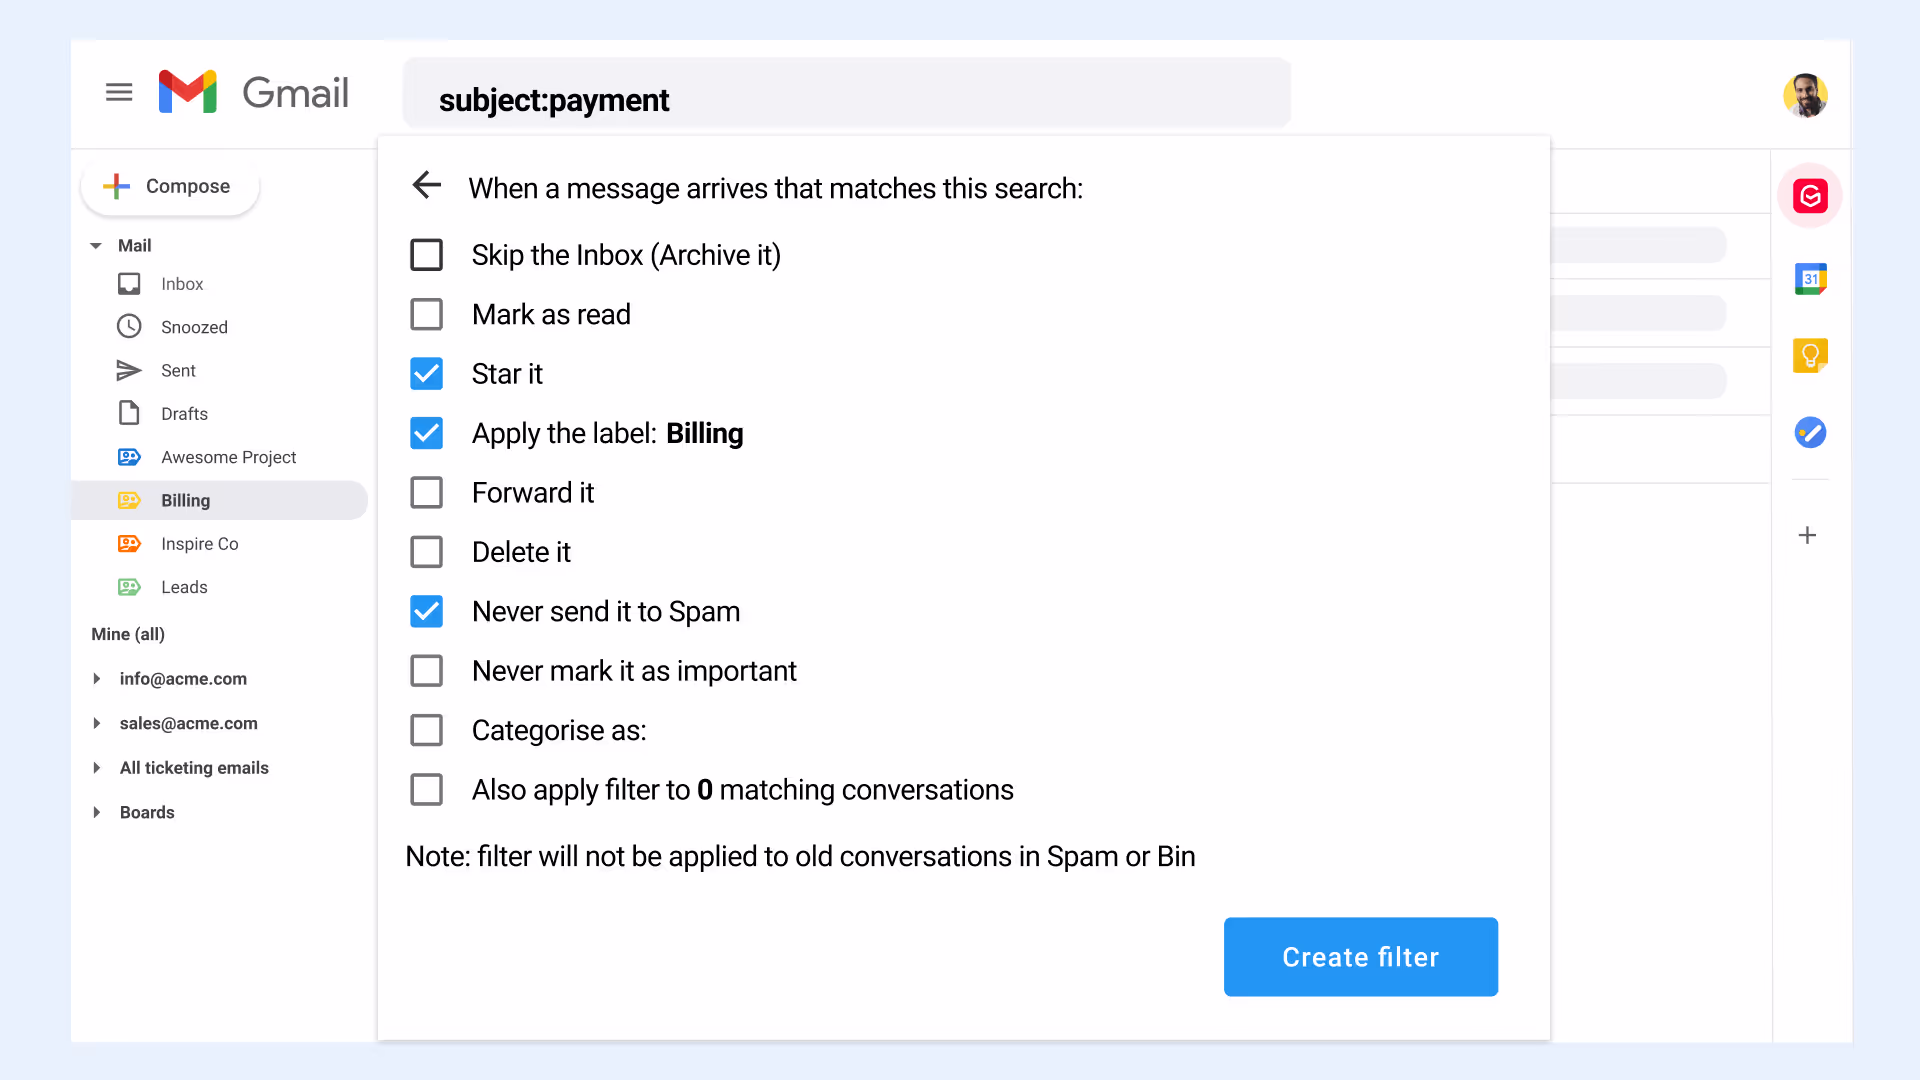
Specify what you want Gmail to do when it encounters a match, such as applying a star or a label.
- Finally, click on the blue "Create filter" button.
Another Gmail tip: If you need to include multiple senders in the same filter, each sender’s email address should be separated with the word ‘OR’ - like john@gmail.com OR sandra@gmail.com.
Managing filters
Filters can be managed on the Settings page using the Filters tab.
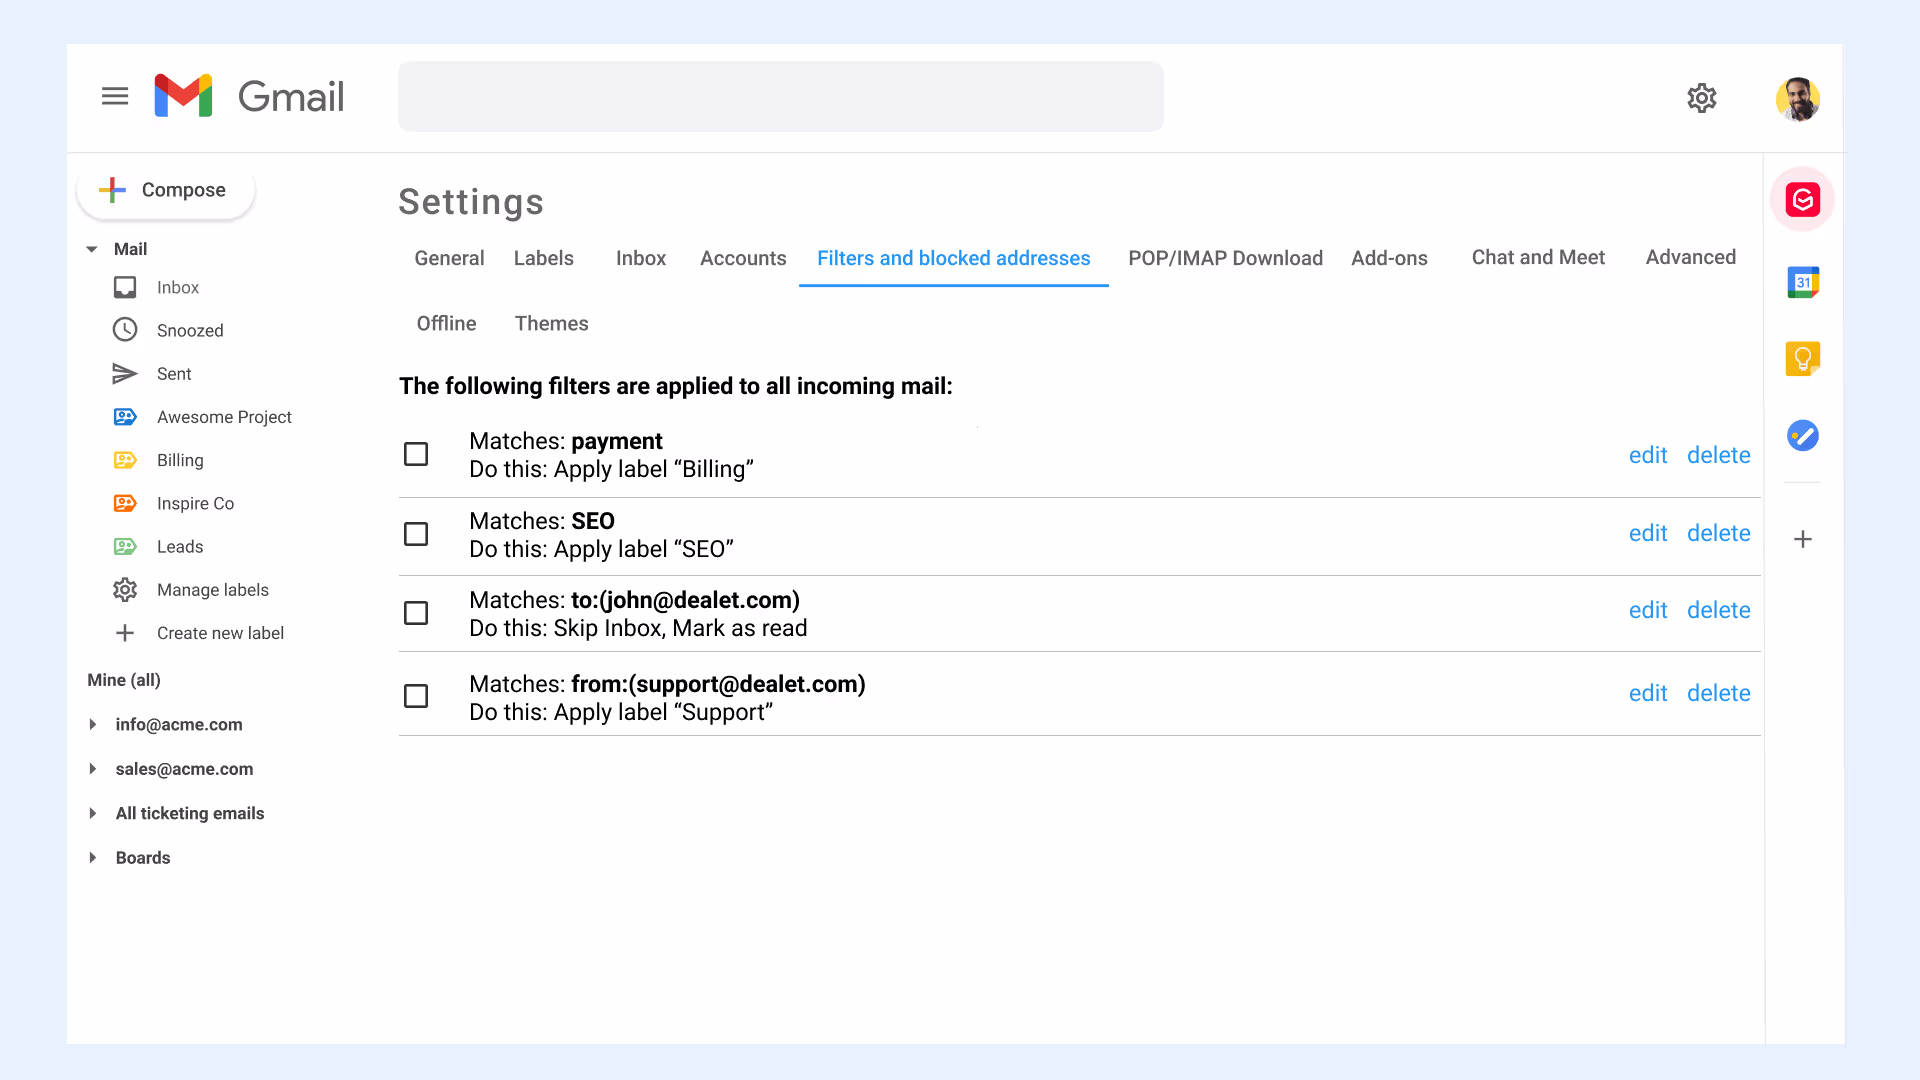
On this page you can create a new filter, plus you can delete, edit, import, and export existing filters.
Tip 7: Automate your daily tasks for immediate productivity gains
Imagine turning Gmail into your virtual assistant. It's possible with Gmelius. Here are just a few of the actions you can automate.
- Set up auto-replies
- Auto-assign emails to the certain members of your team.
- Use automated rules to follow your "If this - Then that" instructions.
You no longer have to worry about an inbox flooded with emails waiting for a response or that your clients aren't getting the immediate attention they deserve.
Tip 8: Set email reminders with Gmail nudge
Being a Gmail power user is also about not letting emails fall through the cracks. For you not to forget following up on an email, Gmail has a feature called “nudge”. It is basically a reminder feature. What it does is bring old emails back at the top of your inbox, with a suggestion to reply.

To turn on Gmail’s nudge, go to settings, and then to the General tab and then scroll down to “nudge”.
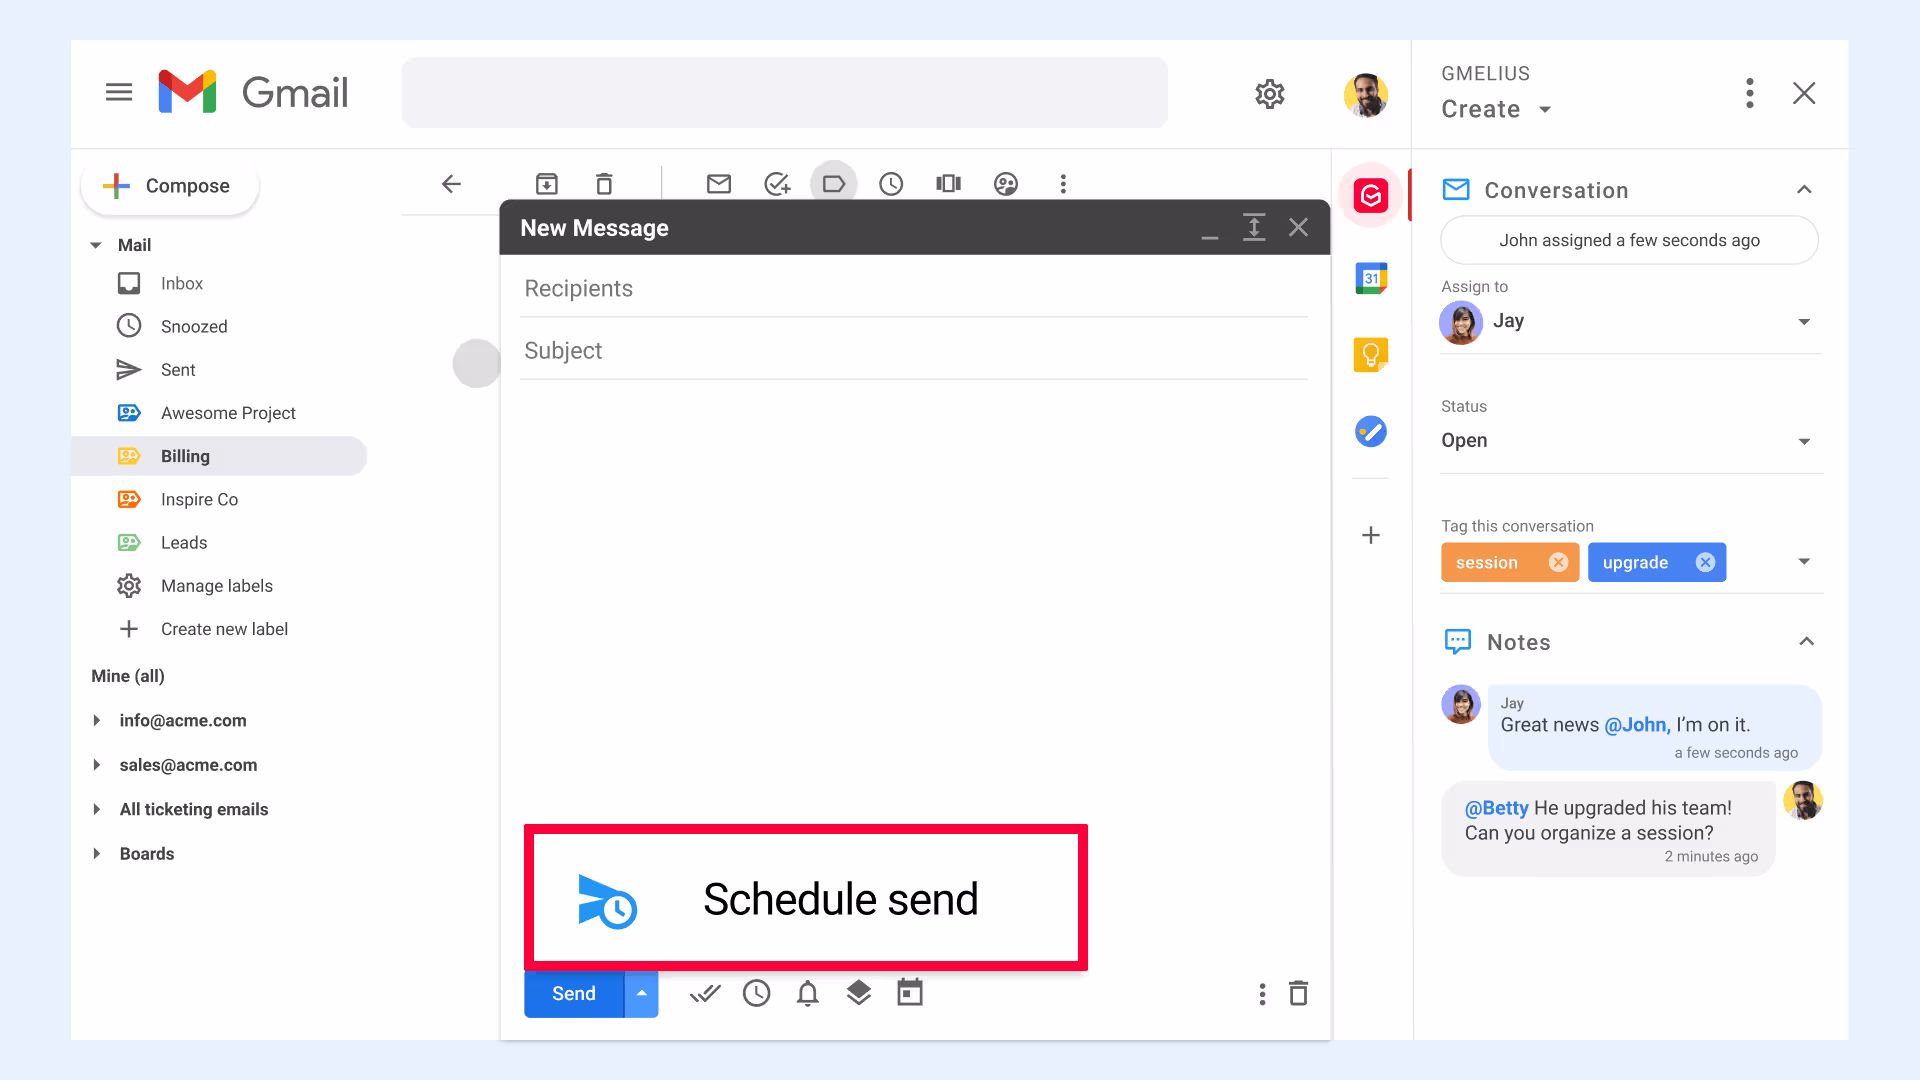
Tip 9: Schedule emails instead of sending right away
Being a Gmail Power User is also about knowing your recipient. When is your recipient the most likely to open your email? What time is appropriate for sending an email?
A simple Gmail hack is that instead of hitting “send”, click the little arrow on the right and select “Schedule send” to send your email at the right time.
Tip 10: Delegate your email account to someone else
With Gmail, the management of your inbox can be delegated to another person, such as a colleague or an assistant. This person can then read, reply to, send, delete, and organize your messages.
Set up email delegation when you are not available
Follow these steps to set up delegation:
- In the upper right-hand corner of the screen click the Settings button
- Click on the Accounts and Import tab
- Click on the Add Another Account link in the Grant Access to Your Account section
- Add the email address of the person you wish to grant access to, then click the Next Step button;
- Finally, click on the Send Email to Grant Access button.
The person you’ve chosen to delegate your emails to will receive a notification from Gmail confirming your request.
Understand the limitations of delegation
Delegating your Gmail account to a colleague or assistant can be a very handy tool for busy people, but there are limitations. Remember that the person you’ll be delegating access to must have their own Gmail account and the number of accounts you can delegate is limited to one.
You also need to remember that you can’t use Gmail’s delegation feature to create a group email account; and if Google does notice that many people are accessing the same Gmail account it’s within its rights to shut the account down. Note: By default, when a delegate opens a message the message is marked as read. If you want to change this, go to the Accounts and Import tab and select the ‘Leave Conversation Unread When Opened by Others’ option.
How to cancel delegation access
Let’s say you’ve decided you no longer want someone to have access to your Gmail account. To cancel delegation, follow these simple steps:
- In the upper right hand corner of the screen, click the Settings button;
- From the menu, select Settings;
- Next, click the Accounts and Import tab;
- Click on the Delete link next to the person’s name whose access you want to cancel in the Grant Access to Your Account section.
And you’re set!
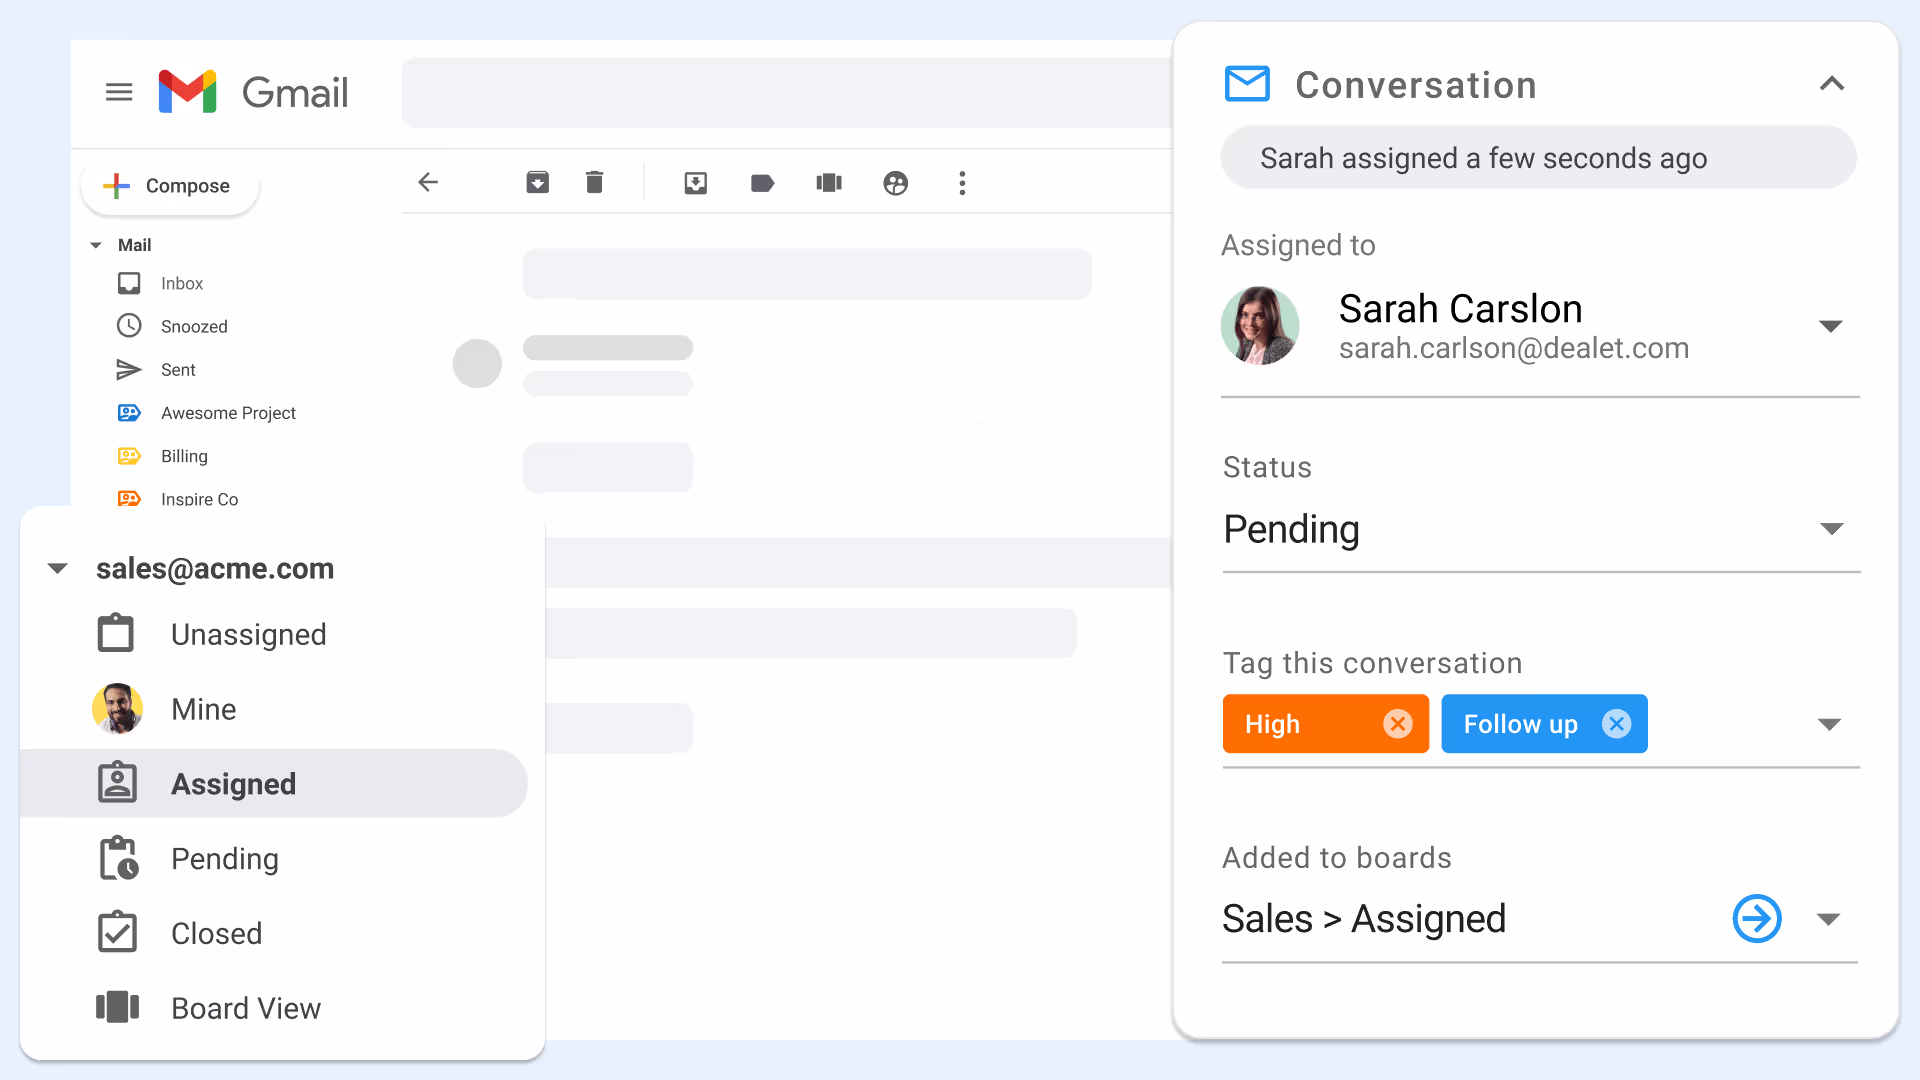
Another solution to avoid email delegation pitfalls
Gmelius allows you to share an email, a Gmail Label, or an entire inbox with your team. You can assign emails to your assistant, set priority levels or due date, so ownership and priorities are clear. As a bonus, you don't have to worry anymore about missing an email already marked as read. Discover how to delegate your emails safely using Gmelius.
Tip 11: Use Gmail Keyboard Shortcuts to Save Time
Did you know that Gmail provides many keyboard shortcuts, thus enabling you to complete tasks quicker?
If you’re not already using them, you really should take the time to familiarize yourself with the shortcuts and start using them for your common Gmail tasks.
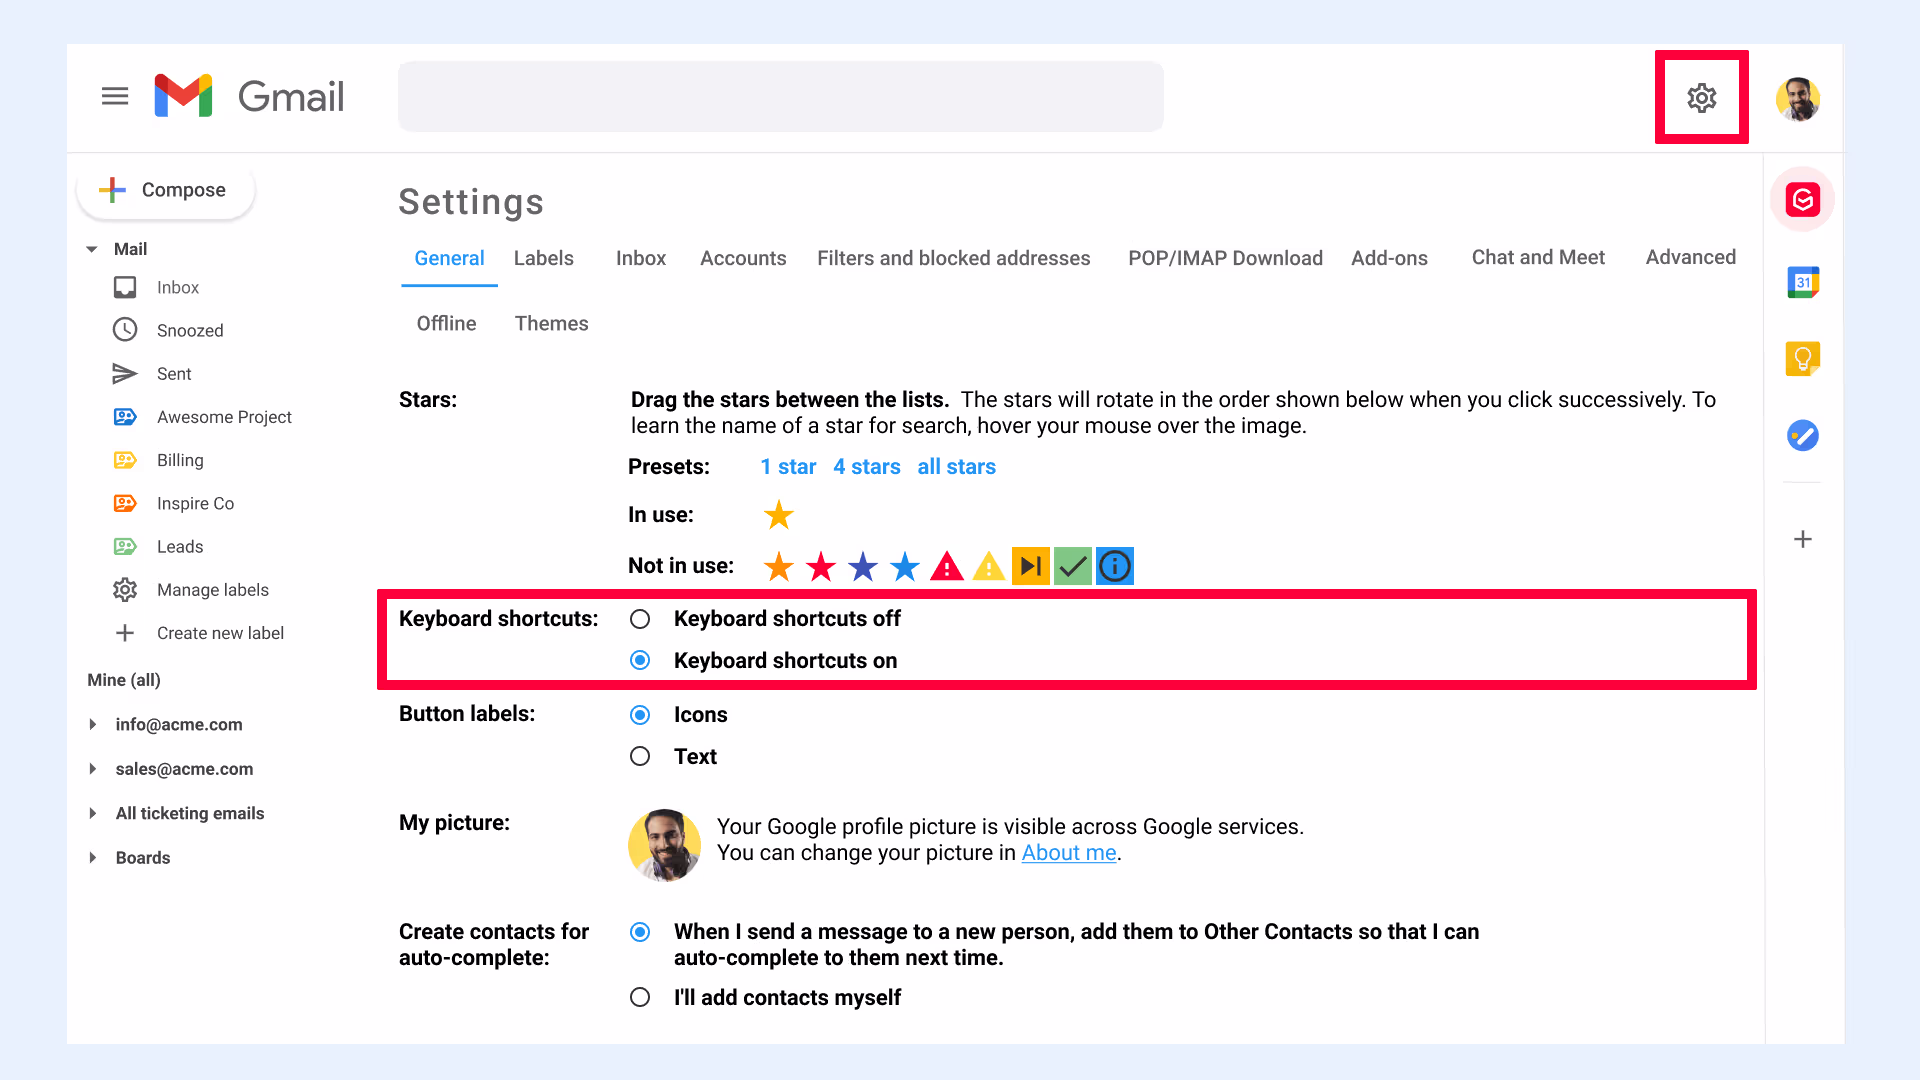
Turning on Gmail’s keyboard shortcuts
By default Gmail offers a number of shortcuts however there are others that are not available unless you turn them on. Follow these simple steps to turn Shortcuts on:
- In the upper right-hand corner of the screen click on the Settings button
- From the menu, select Settings
- Select the Keyboard Shortcuts option on the General tab
- At the bottom of the page click on the Save Changes button.
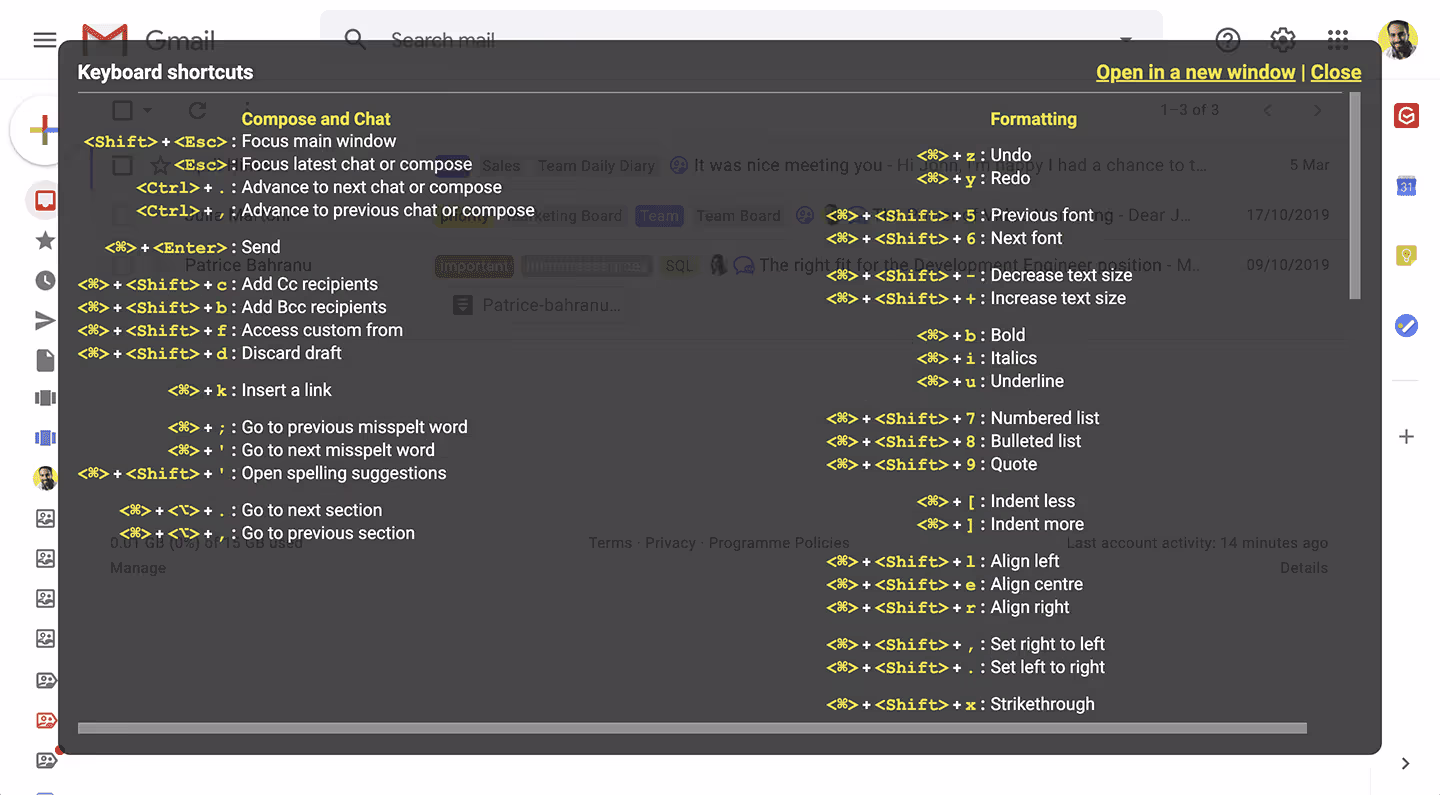
How to view a list of keyboard shortcuts
This is a secret Gmail hack. Press ? To view a complete list of keyboard shortcuts: remember that when you press the ? key you need to hold the Shift key down. See below for a comprehensive list of keyboard shortcuts.
Impressive, right?
Tip 12: Search through your emails faster
Another huge time-waster is searching through Gmail trying to find a certain email message. Yes, performing a basic search is easy. However, when you’ve got thousands of Gmail messages, whether they’re archived or in your Inbox it can often be difficult to find precisely what you’re looking for.
The solution is learning to perform advanced Gmail searches.
To do so, click on the arrow to the right of the search button.
Now, in the search window provided, you can search by sender, location, subject, recipient, attachments, words in the message or words not in the message, and date.
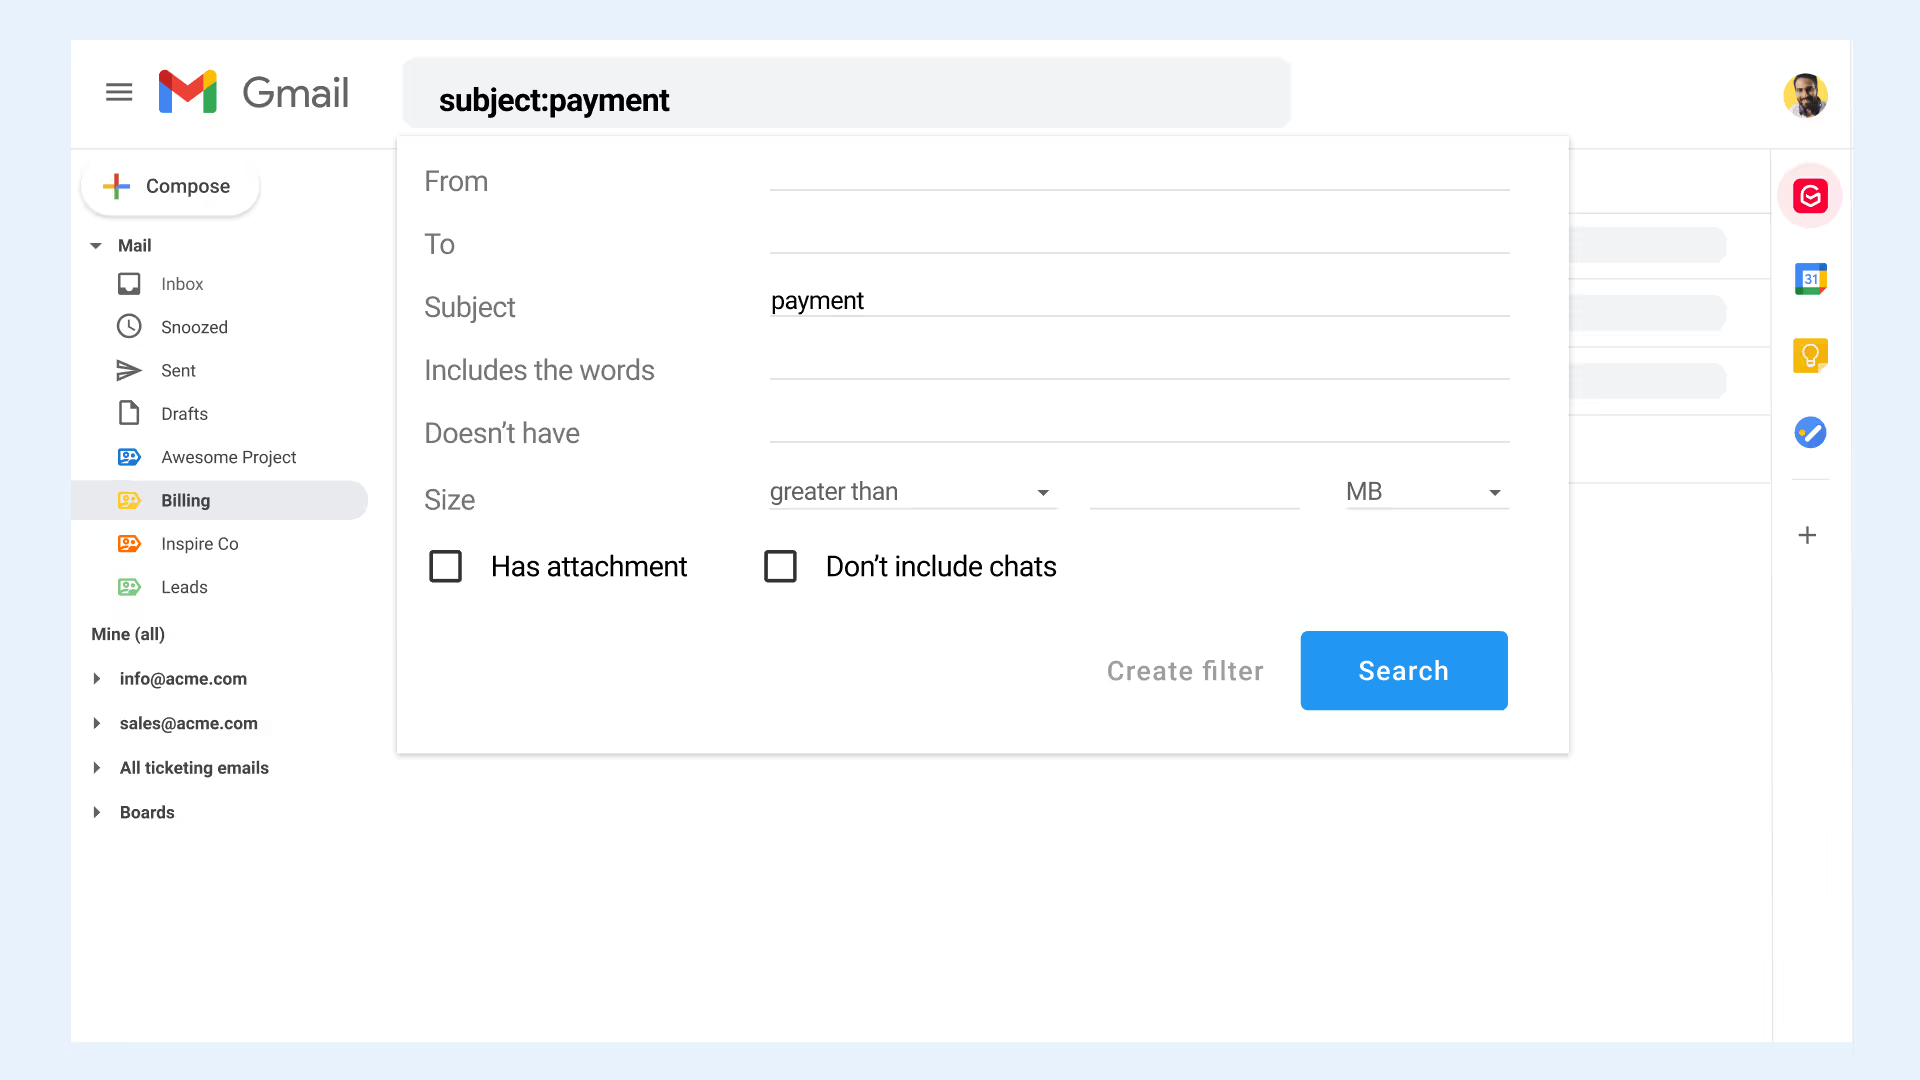
You also have the option of using various search operators in the Search box:
- has:yellow-star: Messages with a yellow star
- 2020 work plan: Messages containing this exact phrase
- Vacation-Geneva: Messages about a vacation, but without Geneva
- label:work from:Helen: Messages from someone named Helen with the label ‘work’
- after:2020/01/01: Messages dated after January 1, 2020
You can view a complete list of search operators here.
Tip 13: Use Gmelius email snippets
Many of your emails require you to input the same information. Gmelius allows you to use a quick backlash "\", that can inject in one click, everything from:
- Email closings
- Information recaps
- Needed list of documents
- Customer and employee onboarding processes
- or any other repetitive parts of your emails.
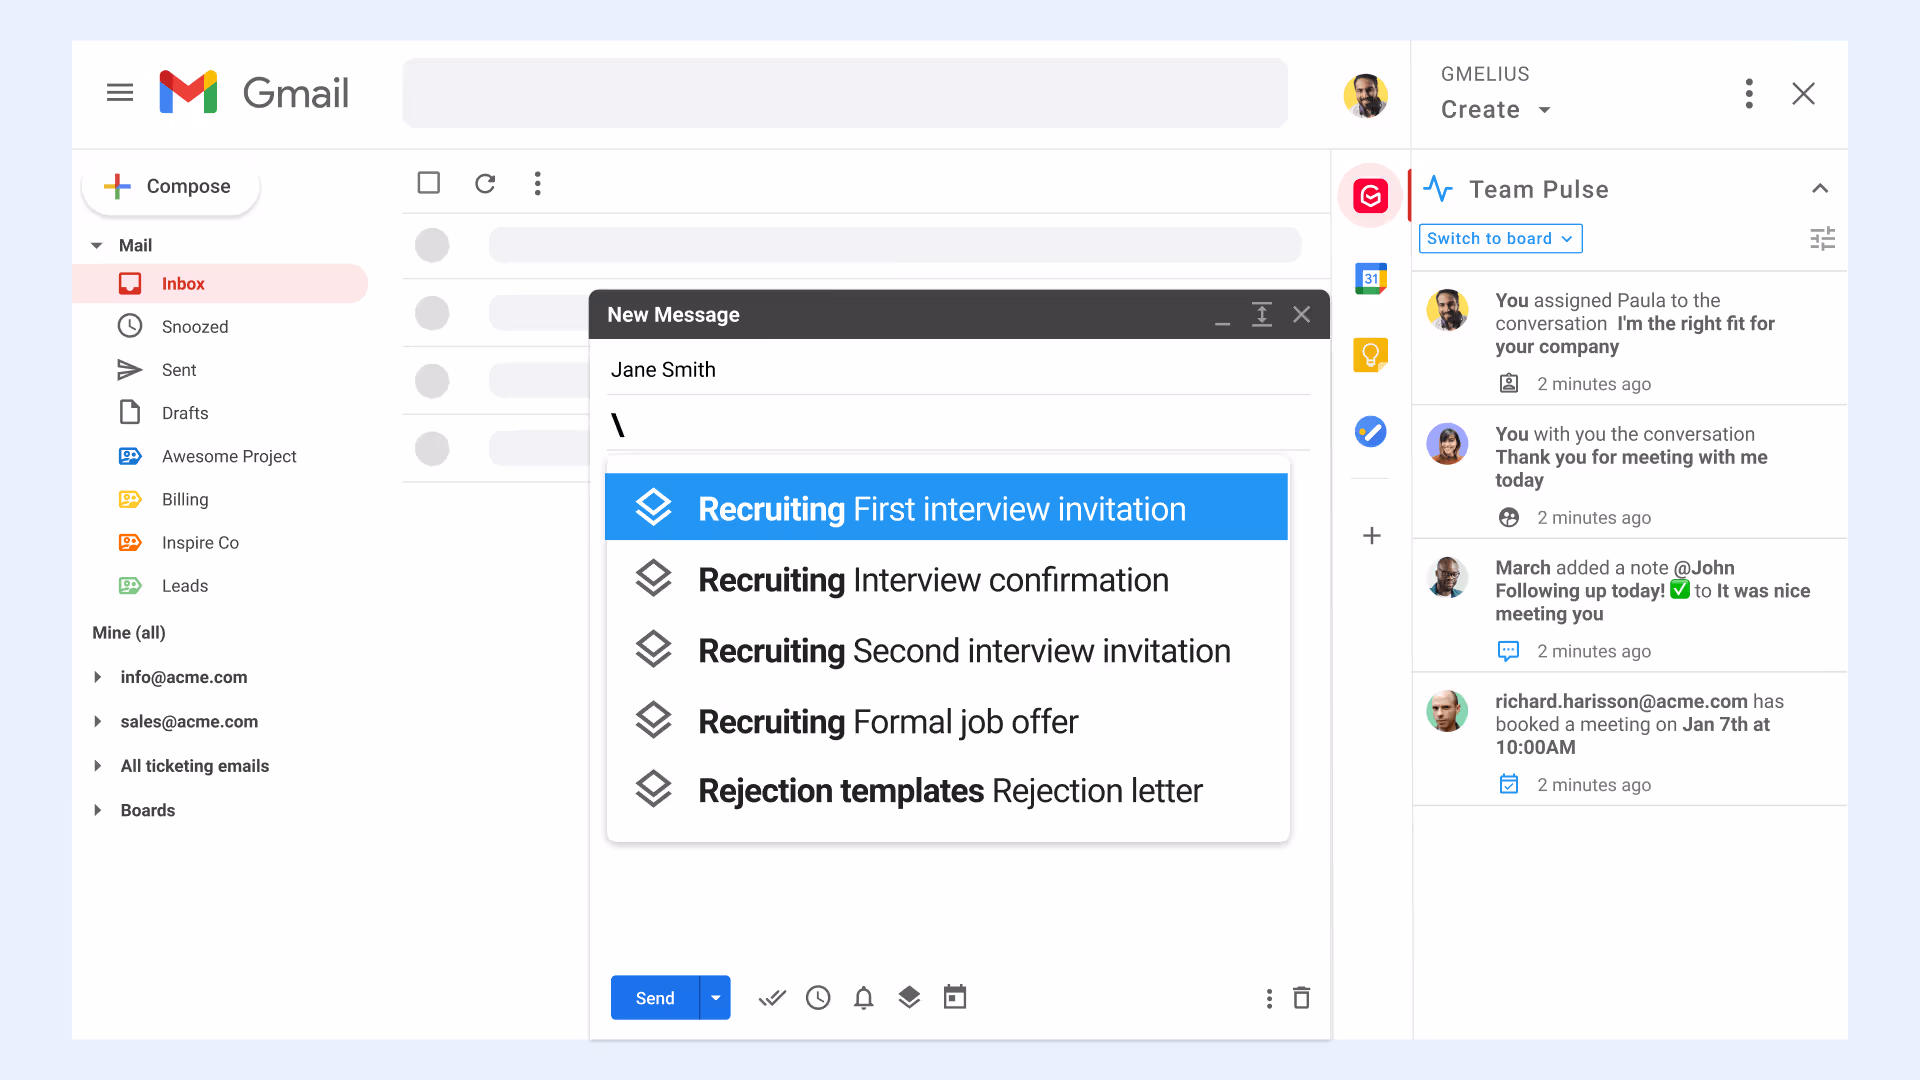
Snippets are saved into your template library, and easily accessed from your compose window. When combined with shareable email templates you and your team will save tons of time on your path to mastering Gmail.
Tip 14: Schedule meetings directly in Gmail
To avoid unnecessary back-and-forth emails to agree on a meeting time, you can insert beautiful calendar invites right inside your emails, and let others choose their meeting slots.
Gmelius Meeting Scheduler allows you to create a library of meeting types which you can access right from your Gmail compose window, or using the Gmelius mobile app so you can schedule meetings faster, even on the go.

Conclusion
It's now your turn to apply these Gmail tips to your daily email routine and boost how you and your team communicate and collaborate. Check out our recommendations for the 10 Gmail automation techniques to save hundreds of hours a day.
Try Gmelius for free to unlock the full power of your inbox.

.avif)
.avif)
.avif)
.avif)
.avif)