Workflow diagrams represent data visually, making it easier to make sense of complex information and improve business processes. Though it may seem intimidating at first, learning how to create workflow diagrams is fairly simple. Several online programs and apps make it easy for you to create diagrams that are easy to understand and share an impressive amount of information in a compact message.
To create the best workflow diagrams with the most efficiency, sign up for Gmelius through Google to access our integrations and channels.
Skip ahead to get the answers you need!
- What is a Workflow Diagram?
- Best Workflow Diagram Tools
- How To Automate Your Workflows
- How To Create a Workflow Diagram: Step By Step
- 3 Workflow Diagram Examples
- Automate and Create Workflows With Gmelius
What Is a Workflow Diagram?
A workflow diagram is a visual representation that illustrates the sequence of steps or tasks involved in a business process. It is designed to show how work flows from one activity to another, helping to map out each stage and decision point in a process. By using standardized symbols and shapes, workflow diagrams simplify complex processes, making them easier to understand, analyze, and optimize.
Workflow diagrams are often used to visualize processes within teams or organizations, enabling everyone to see how different tasks interconnect and the order in which they should be completed. They often represent tasks and actions with shapes, like the legend on a map:
- Boxes = Action items
- Diamonds = Decision required
- Ovals = Start and finish process
- Circles = Skip ahead
Arrows connect these tasks to illustrate the chronological order of tasks in a workflow diagram. These diagrams are valuable tools for improving clarity, communication, and efficiency within teams. They help identify bottlenecks, redundancies, or inefficiencies, allowing for improvements and better workflow management.
Whether you're mapping a simple task or a complex business process, workflow diagrams ensure everyone involved understands their role and the overall process, leading to smoother operations and reduced errors.
Best Workflow Diagram Tools
Learning how to create a workflow diagram is much harder without the appropriate programs and apps. These user-friendly tools can help create diagrams for all your business needs. Gmelius uses both Trello and Zapier to automate different functions available in these workflow diagram tools.
Option 1: Trello and Diagrams.net
Trello is a web-based Kanban board program that helps with workflow organization. Trello offers a free Power-Up tool, called Diagrams.net. Diagrams.net is an open-source workflow diagram tool with a user-friendly interface. Draw.io allows you to create, store, and share diagrams.
With Diagrams.net, users can:
Create Custom Diagrams: You can design various types of diagrams to visualize complex workflows, project timelines, or organizational structures.
Store and Share Diagrams: Diagrams.net saves all your work directly in Trello, which can be accessed, edited, and shared by team members in real-time. This promotes collaboration and ensures everyone is on the same page.
Integrate with Other Tools: Since it’s open-source, Diagrams.net can also be integrated with other productivity tools such as Google Drive, Dropbox, and OneDrive, offering flexibility in where diagrams are stored.
Pro Tip: Integrate Trello with Gmail to get workflow diagram updates in your inbox.
Option 2: Zapier and Miro
Automate features by triggering actions through zaps. Zapier allows applications to connect to thousands of other web services, including one of the best workflow diagram tools, Miro. Miro enables you to create beautiful charts and diagrams with their integrations, while Zapier helps you automatically add cards to your Miro diagrams. Working together, these applications can create beautiful workflow diagrams with amazing automation.
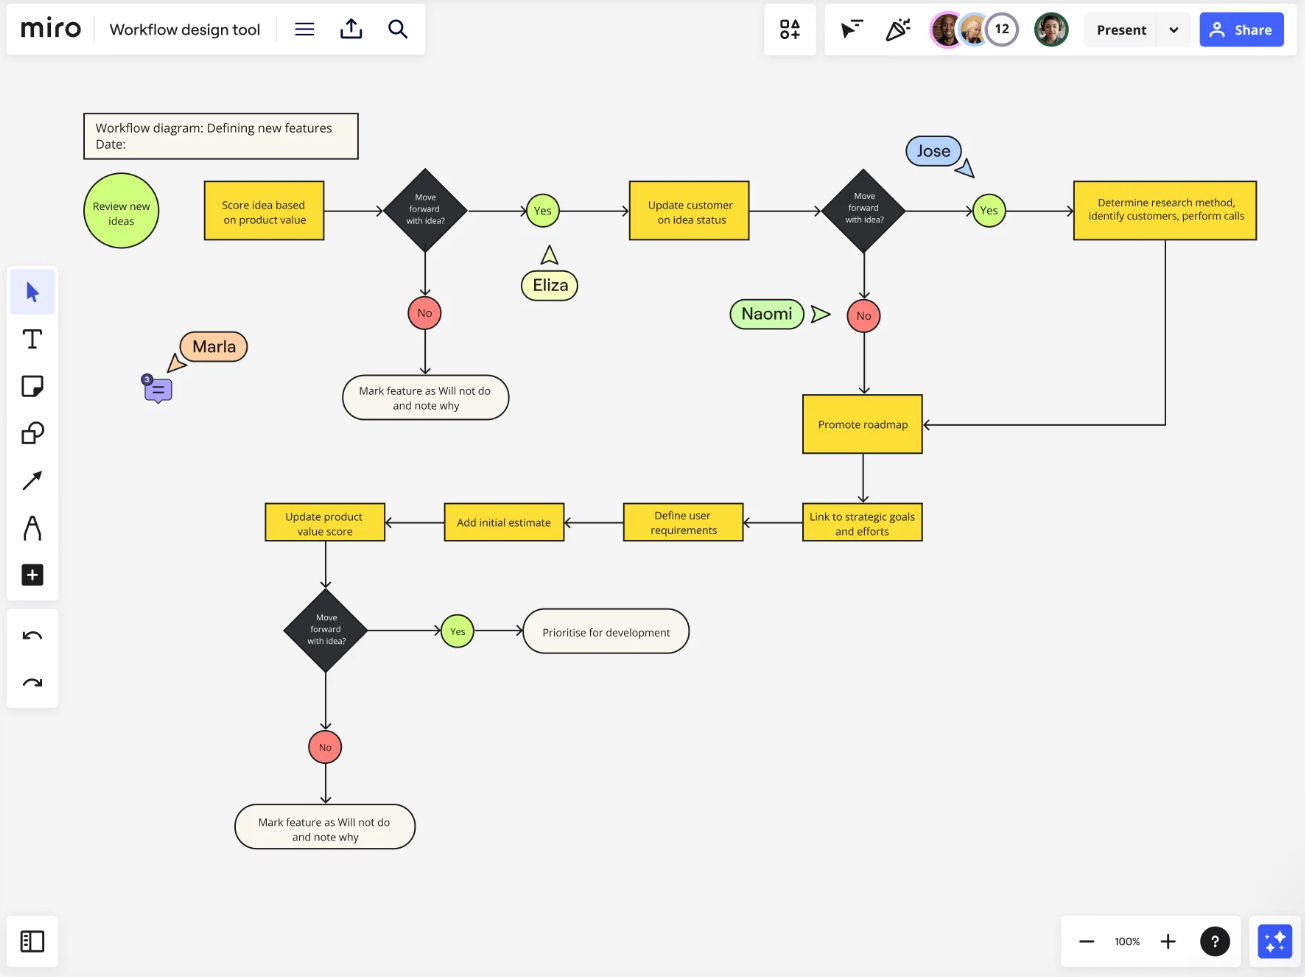
Here’s how Zapier and Miro can work together to enhance workflow diagram creation:
📇 Automated card creation
With Zapier, you can create "zaps" to automatically generate cards in Miro when a specific action occurs in another app. For example, when a new task is assigned in Trello, a new card can automatically be added to a Miro board to reflect that task’s status in the workflow diagram.
⏱️ Real-time updates
As workflows evolve, Zapier can sync your Miro diagrams with other tools in real time. If a customer request is marked as resolved in your support tool, Zapier can trigger a change in Miro, updating the workflow and keeping the diagram up-to-date without any manual input.
🤝 Collaborative integration
Teams often work across multiple tools, and keeping everything in sync can be challenging. Zapier can automatically send updates from one tool to Miro, making it easier to collaborate across teams. Whether you’re working with marketing, sales, customer support, or product teams, everyone can be on the same page without needing to manually update diagrams.
⚡ Streamlining workflow automation
The combination of Miro’s visual diagramming capabilities and Zapier’s workflow automation offers a seamless experience for creating and automating workflow diagrams. By automating actions like creating new tasks, updating statuses, and notifying team members, you ensure that your workflow remains organized and efficient.
📊 Enhanced reporting
Once your workflow diagram is set up in Miro, Zapier can help you trigger automated reports and task summaries based on your workflow's progress. For example, a completed task in a CRM can trigger a workflow update in Miro, which in turn can generate a report to track milestones for management.
How To Create a Workflow Diagram: Step-By-Step
You can create a business workflow diagram for multiple processes within your business. Depending on the scenario and type of business practice, the specifics will vary, but there are some general steps to take in order to create a successful business workflow diagram.
Step 1: Determine the process
It's important to focus on one business process at a time so you don’t end up with an overly complicated visualization. Determining which process to work on is the first step in creating a workflow diagram.
Step 2: List the steps in the business process
Next, outline each step involved in the process. Take a detailed approach and note every action, decision, or task that needs to happen. Depending on the complexity of the process, this step could involve:
- Listing each task or action that needs to take place.
- Identifying key decision points.
- Mapping out potential outcomes or branches in the process.
It's essential to be thorough and precise to ensure the workflow diagram accurately reflects how the process works.
Step 3: Gather information
Now that you know which process you'll be diagramming, it's important to collect all the information related to that process. It helps to make a list.
- Resources
- Responsibilities
- Key Decisions
This information is the basis of the workflow and will help you create a visual representation.
Step 4: Draft the diagram
If you're not used to working with workflow diagram tools or feel more comfortable creating with pen and paper, you can always start with a manual diagram. That way, recreating it as a digital workflow becomes a simple matter of selecting shapes and creating connections.
Note: some diagram tools also add links and attachments to different steps within your workflow. This allows you to link tools and documentation to different stages of your business process.
Step 5: Share the final draft
Once you've perfected your workflow diagram, share it with your team members to make sure everyone understands the steps and actions required to execute the process successfully. Sharing the diagram will also help people understand their role in the bigger picture. This is especially beneficial when you're mapping out processes that span multiple departments.
Getting extra eyes on your diagram may also prompt insights into opportunities for improvement. Asking your team for feedback reminds them of their role as project stakeholders, encourages a sense of ownership, and strengthens interpersonal connections.
Step 6: Track, analyze, improve
When every step of a business process is documented, it becomes much easier to spot bottlenecks and other potential problem areas. You can also identify key players in the process.
Analyze the diagram to determine which tasks are absolutely necessary, which can be discarded or streamlined, and which ones can be automated.
Note: Creating a workflow diagram template for your business's processes can give you a solid base to work from when adapting existing processes or developing new ones. By using a template, you can keep all of your previous workflow diagrams as historical records you can reference when needed.
3 Workflow Diagram Examples
You can use workflow diagrams for different businesses and industries. These examples can help you understand the visual layout of common business practices and how each breakdown is created.
Example 1: Customer support workflow diagram
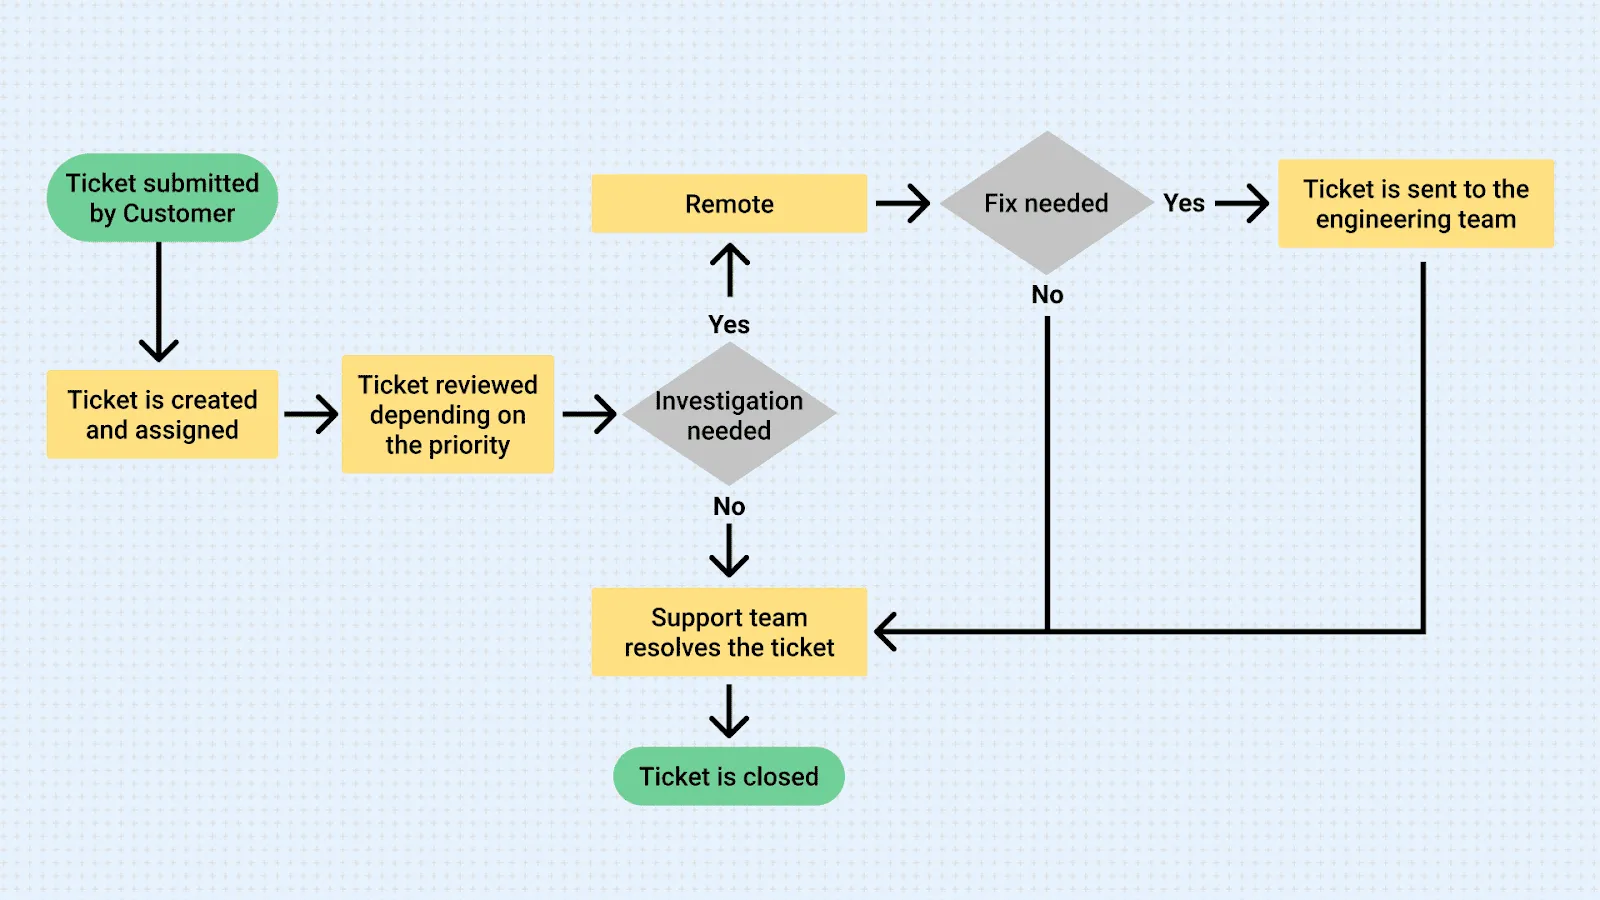
This example illustrates the process that takes place when a customer submits a support ticket. We represent the start and finish of the process in green oval bubbles.
- Start - A customer submits a ticket
- Ending - The support team closes the ticket
After the customer submits the ticket, the support team performs a series of tasks—represented as yellow rectangles to the end.
- The ticket is created and assigned
- The assigned team member reviews the ticket depending on priority
We then split the diagram based on a decision-making moment, represented as a grey diamond. The image shows two moments in which the diagram can split, based on the decision.
3.Does the ticket need more investigation or can the issue be fixed immediately?
- The issue needs more investigation
- Try fixing the issue with more investigation
- Can you fix the issue?
- Yes
- Resolve the issue
- Close the ticket
- No
- Pass the ticket to the engineering team
- They will close the ticket when resolved
- Yes
- Can you fix the issue?
- Try fixing the issue with more investigation
- Fix the issue immediately
- Close the ticket
Eventually, if the procedure represented in the diagram is followed closely, the process concludes with a closed ticket.
Example 2: Outbound sales workflow diagram
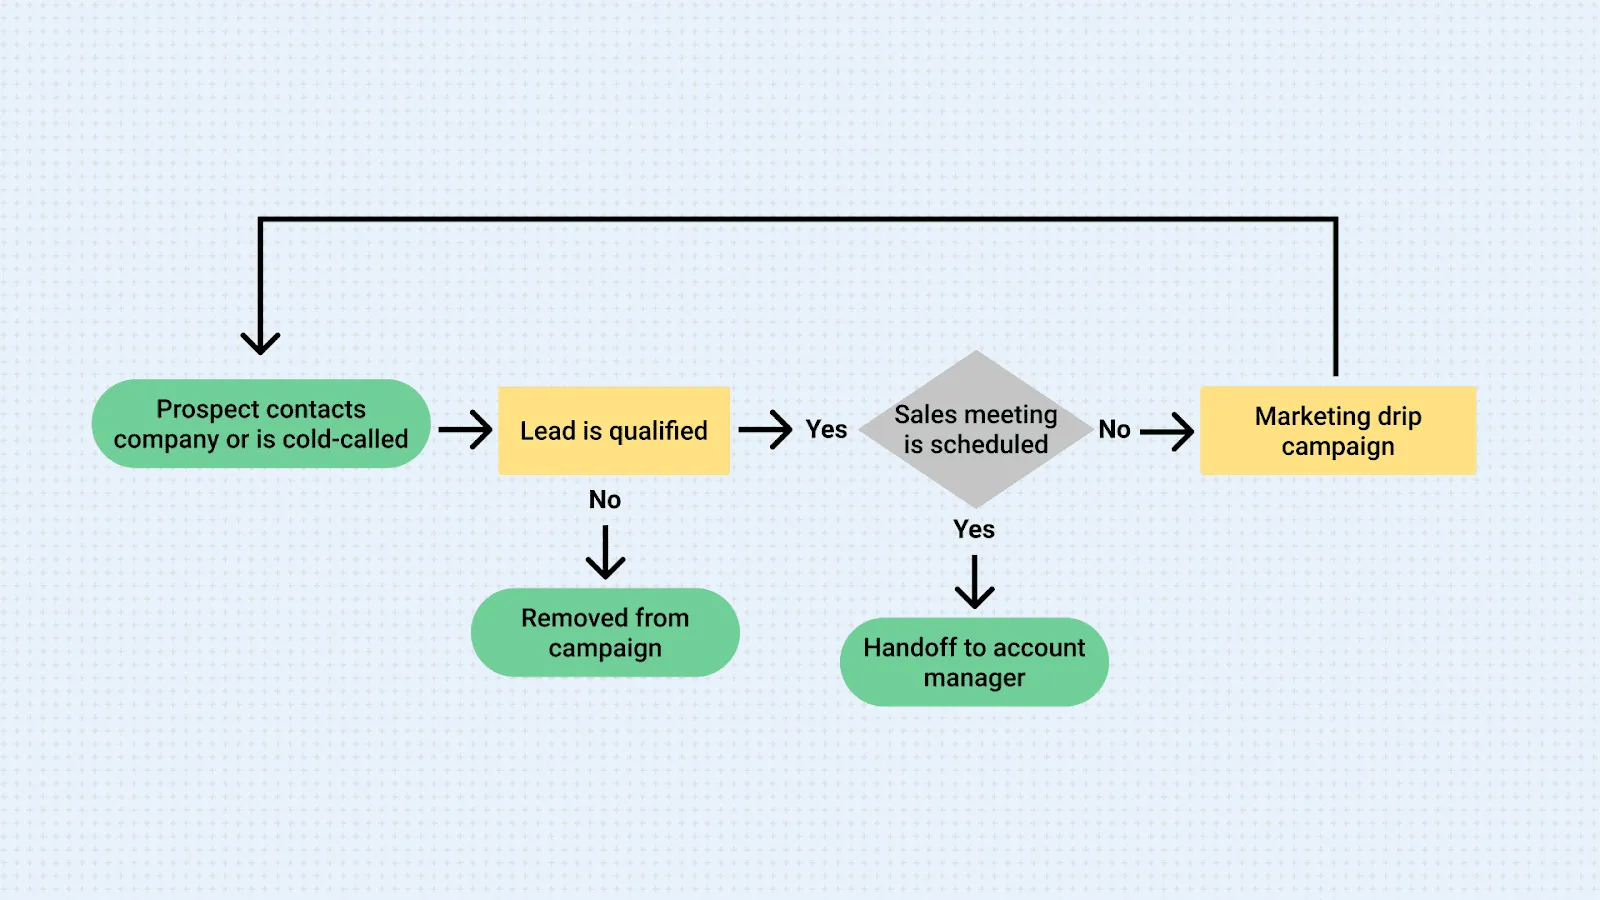
This sales workflow diagram shows the process that starts when a prospect contacts the company or is cold-called by the company. Represented by green oval bubbles, the workflow diagram has one start and three possible endings.
Start - Prospect contacts company or is cold-called
Ending - Prospect is removed from the campaign
Ending - The team hands the Prospect off to the account manager
Ending - The process starts over
The diagram starts with a prospect contacting the company or being cold-called. Right after this, a decision-making point determines whether the team qualifies the lead.
- No - They remove the lead from the campaign
- Yes - If the team qualifies the lead, they determine if a sales meeting is required
- No
- The lead is entered into the company's marketing drip campaign and the process starts over
- Yes
- The sales team hands the lead off to the account manager
- No
Example 3: Logistics workflow diagram
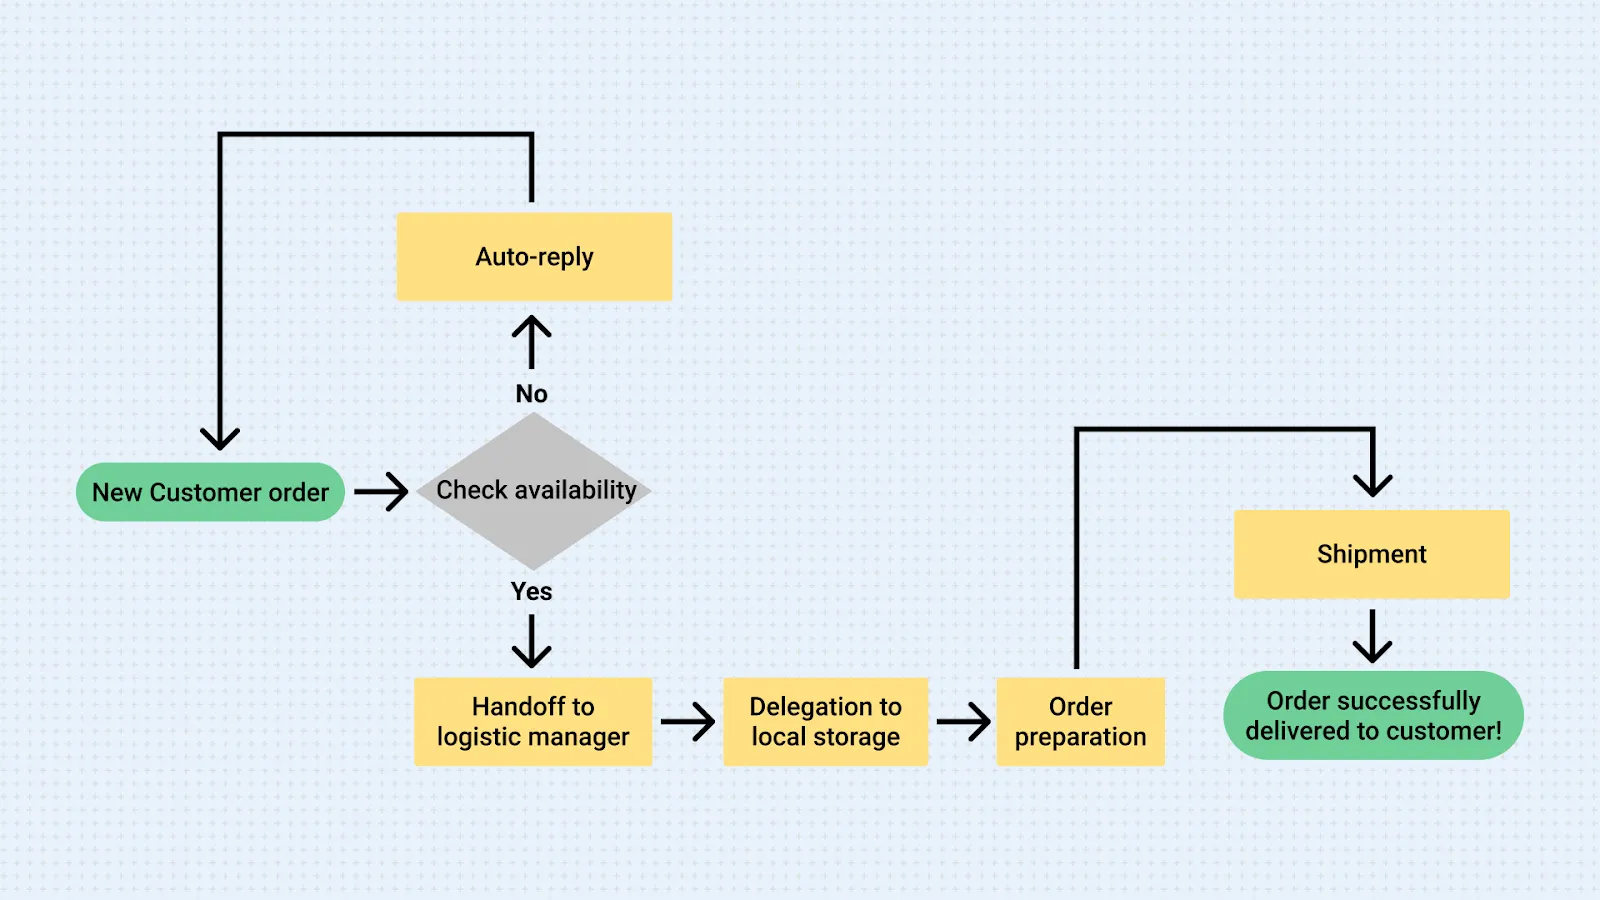
This logistics workflow diagram shows how a customer can create a successful order in industries like consumer packaged goods (CPG), retail, or construction. This diagram has one start and one ending, with one decision-making point where the diagram splits.
- Start - New Customer Order
- Ending - Order is successfully delivered to the customer
When a new customer places an order, the logistics department needs to check if the requested product is available. This is a decisive moment.
- Yes
- If the product isn't available, an automated reply gets sent to the customer to let them know, and the process repeats with a new order.
- No
- If the product is available, the order passes on to the logistic manager
- The logistics manager then delegates the preparation of the order to the local storage facility
- Then prepares the order
- Then ships the order
- The process finishes when the customer receives their order
Once You Have Your Workflows Diagram, It's Time to Automate
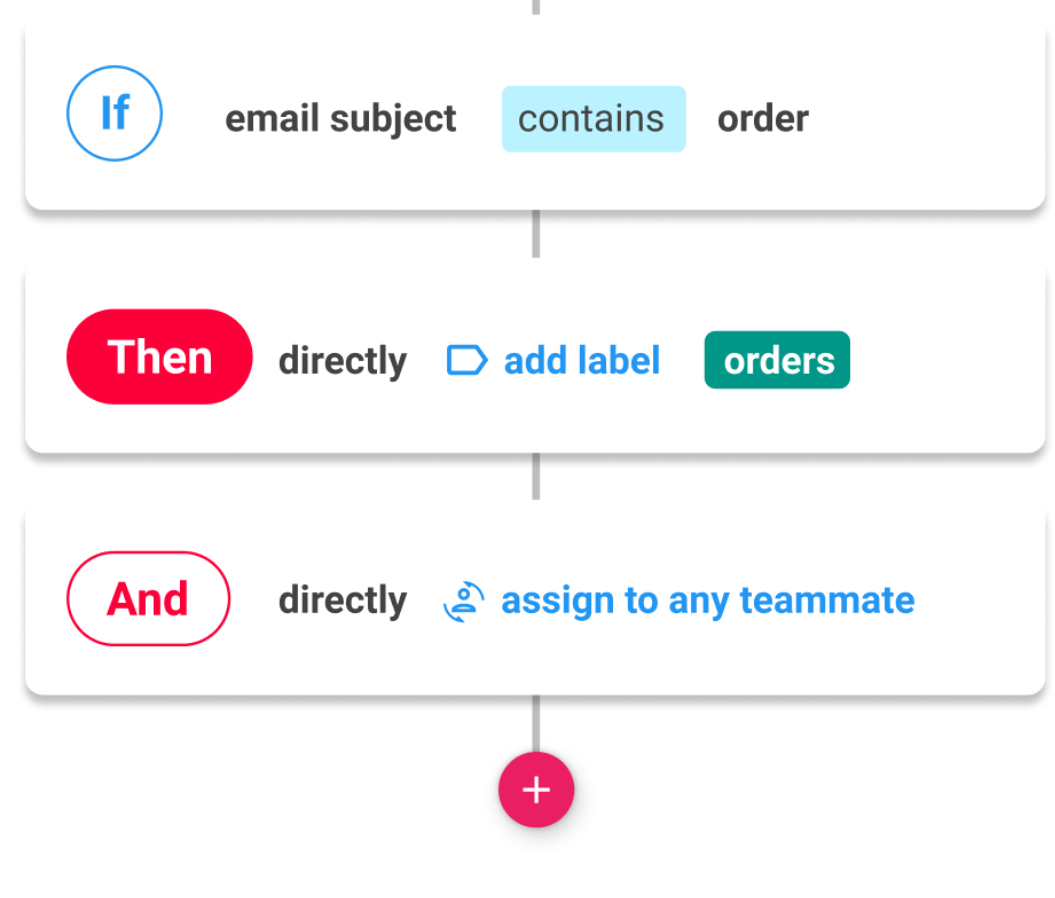
Workflow diagrams make it easy to share business processes with your team to get everyone on the same page. Unfortunately, diagrams themselves don't actively do anything for you. It's still up to you and your team to execute each step in the workflow efficiently, and that's not always easy. Fortunately, this is where automation can help. Gmelius helps you create workflow automations using simple "if this, then that" triggers.
Our automation includes but is not limited to:
- Auto-assigning tasks
- Sending auto-replies (for example, any of these 50 email auto responses)
- Auto-drafting replies to emails
- AI-tagging to auto-sort your inbox
- Automated email sequences
- Automatic notifications
Learn how Gmelius can help you automate your team’s workflows within Gmail and Google Workspace.
Best Practices for Creating Workflow Diagrams
Here are some tips to help you create clearer, more effective workflow diagrams:
- Keep it Simple: Avoid making the diagram too complex. Focus on key tasks and decision points to make it easy to understand.
- Use Clear Labels: Clearly label each shape to explain the task or decision it represents.
- Stick to Standard Symbols: Use universally recognized symbols for consistency (rectangles for actions, diamonds for decisions, etc.).
- Use Color: Color-code the different steps for better visual clarity. For example, use one color for actions and another for decision points.
- Break Down Complex Processes: If a process is too detailed, break it into sub-processes or create multiple smaller workflow diagrams.
- Involve the Team: Share the diagram with your team for feedback to ensure it reflects the real workflow and improves collaboration.
Frequently Asked Questions (FAQs) About Workflow Diagrams Answered
1. What is the main purpose of a workflow diagram?
A workflow diagram visually maps out business processes, helping teams understand each step, identify inefficiencies, and ensure tasks are completed in the right order. It improves communication, reduces errors, and makes processes easier to optimize.
2. What are the most common symbols used in workflow diagrams?
- Rectangles/boxes = Action or task
- Diamonds = Decision points
- Ovals = Start and end points
- Circles = Connectors/skip ahead
- Arrows = Flow direction
These standardized symbols ensure diagrams are clear and universally understood.
3. What industries benefit most from workflow diagrams?
Workflow diagrams are widely used across industries such as healthcare (patient journey mapping), finance (approval workflows), IT (incident resolution), logistics (order fulfillment), and sales/marketing (lead nurturing pipelines).
4. What are the best tools for creating workflow diagrams?
Some popular tools include:
- Miro – great for collaborative diagramming.
- Diagrams.net (Draw.io) – free, simple, and integrates with Trello.
- Lucidchart – advanced flowcharting with enterprise features.
- Visio – Microsoft’s enterprise-grade diagramming software.
- Gmelius + Gmail integrations – for automating workflow updates.
5. How do workflow diagrams help with team collaboration?
By making processes visible, workflow diagrams act as a “shared language” across teams. Everyone understands roles, dependencies, and responsibilities, which reduces confusion and helps cross-functional teams (like sales + support + operations) stay aligned.
6. Can workflow diagrams be automated?
Yes. Tools like Zapier allow automation by connecting workflow steps to real-time triggers (e.g., closing a support ticket automatically updates a Miro diagram). Gmelius adds automation inside Gmail by assigning tasks, tagging, and triggering notifications.
7. What’s the difference between a workflow diagram and a flowchart?
They’re closely related, but:
- Workflow diagram = Focuses on how tasks move through a business process.
- Flowchart = Broader, can represent algorithms, logic, or technical processes beyond workflows.
8. How do you know if your workflow diagram is effective?
An effective workflow diagram should be:
- Simple and easy to understand at a glance.
- Accurate in reflecting real processes.
- Actionable—making it clear where bottlenecks, redundancies, or automation opportunities exist.
- Usable as a training tool for onboarding new employees.
9. How often should workflow diagrams be updated?
Workflows should be revisited whenever a business process changes—like adopting a new tool, adding new team members, or adjusting customer service policies. Best practice: review key workflows at least quarterly to keep them accurate.
10. How can Gmelius enhance workflow diagrams?
Gmelius integrates with Gmail and collaboration tools to:
- Auto-assign tasks
- Tag and sort emails automatically
- Send notifications for workflow updates
- Run automated email sequences
This reduces manual effort, ensuring the workflow diagram isn’t just a “map” but actively drives execution.
Conclusion
Learning how to create a workflow diagram can be intimidating, but luckily, there are user-friendly tools available for you and your team to create and automate workflows. Visualizing business procedures can ensure that your team is following the proper steps and coming to the same result each time.
Start by defining the process, selecting the right tools, and mapping out the flow. Once your diagram is ready, share it with your team and continuously refine it to improve productivity.
Automate your team's workflow with Gmelius to guarantee you are not missing notifications, assignments, and responses.


.avif)
.avif)

.avif)
.avif)
