.avif)


Gmail labels provide quick organization, reducing the time required to retrieve information. Labels in Gmail offer flexibility with features like color coding and sub-labels, making them more versatile than traditional folders. This guide takes you through the organization process step-by-step for a neat, actionable, and well-organized inbox.
Skip ahead for the answer you need now:
- How to create a Gmail label
- How to share a Gmail label
- How to add Gmail labels with filters
- How to edit a label
- How to create a nested Gmail label
- How to search within labels
- How to manage tasks using Gmail labels
- Best Practices for Using Gmail Labels
If your team spends hours on email each day, Gmelius can help you get organized.
Sign up for Gmelius through Google to access our features and Gmail integrations!
What are Gmail Labels?
Gmail labels are a powerful tool for organizing your inbox and making it easier to find specific emails. Unlike traditional folders, Gmail labels allow you to assign multiple labels to a single email, giving you more flexibility and customization options. This means you can categorize an email in several ways, making it easier to locate later. For instance, an email from a client about a project can be labeled both under “Client” and “Project,” ensuring you can find it regardless of the context you’re searching in.
By using Gmail labels, you can streamline your email management and reduce the time spent searching for important messages. Whether you’re managing personal emails or coordinating with a team, labels can help you keep your inbox organized and efficient.
In Gmail, team members can create a label to categorize emails that are sent, received, or drafted. In other words, labels are a simple way to organize and declutter your inbox.
Gmail Labels are accessible from the left sidebar, displayed with an arrow-shaped icon (more on how to color them later).

What is the difference between Gmail labels vs. folders?
Much like folders, labels group relevant emails together. But Gmail users can add multiple labels to one email for extra flexibility—unlike email folders.
For instance, sales teams can use email labels to organize their shared inbox by creating different labels, such as "Leads," “Contacts,” and “Deals.” Project managers, on the other hand, might create one label for a given project and another to classify emails from an external vendor.
How to Create a Gmail Label?
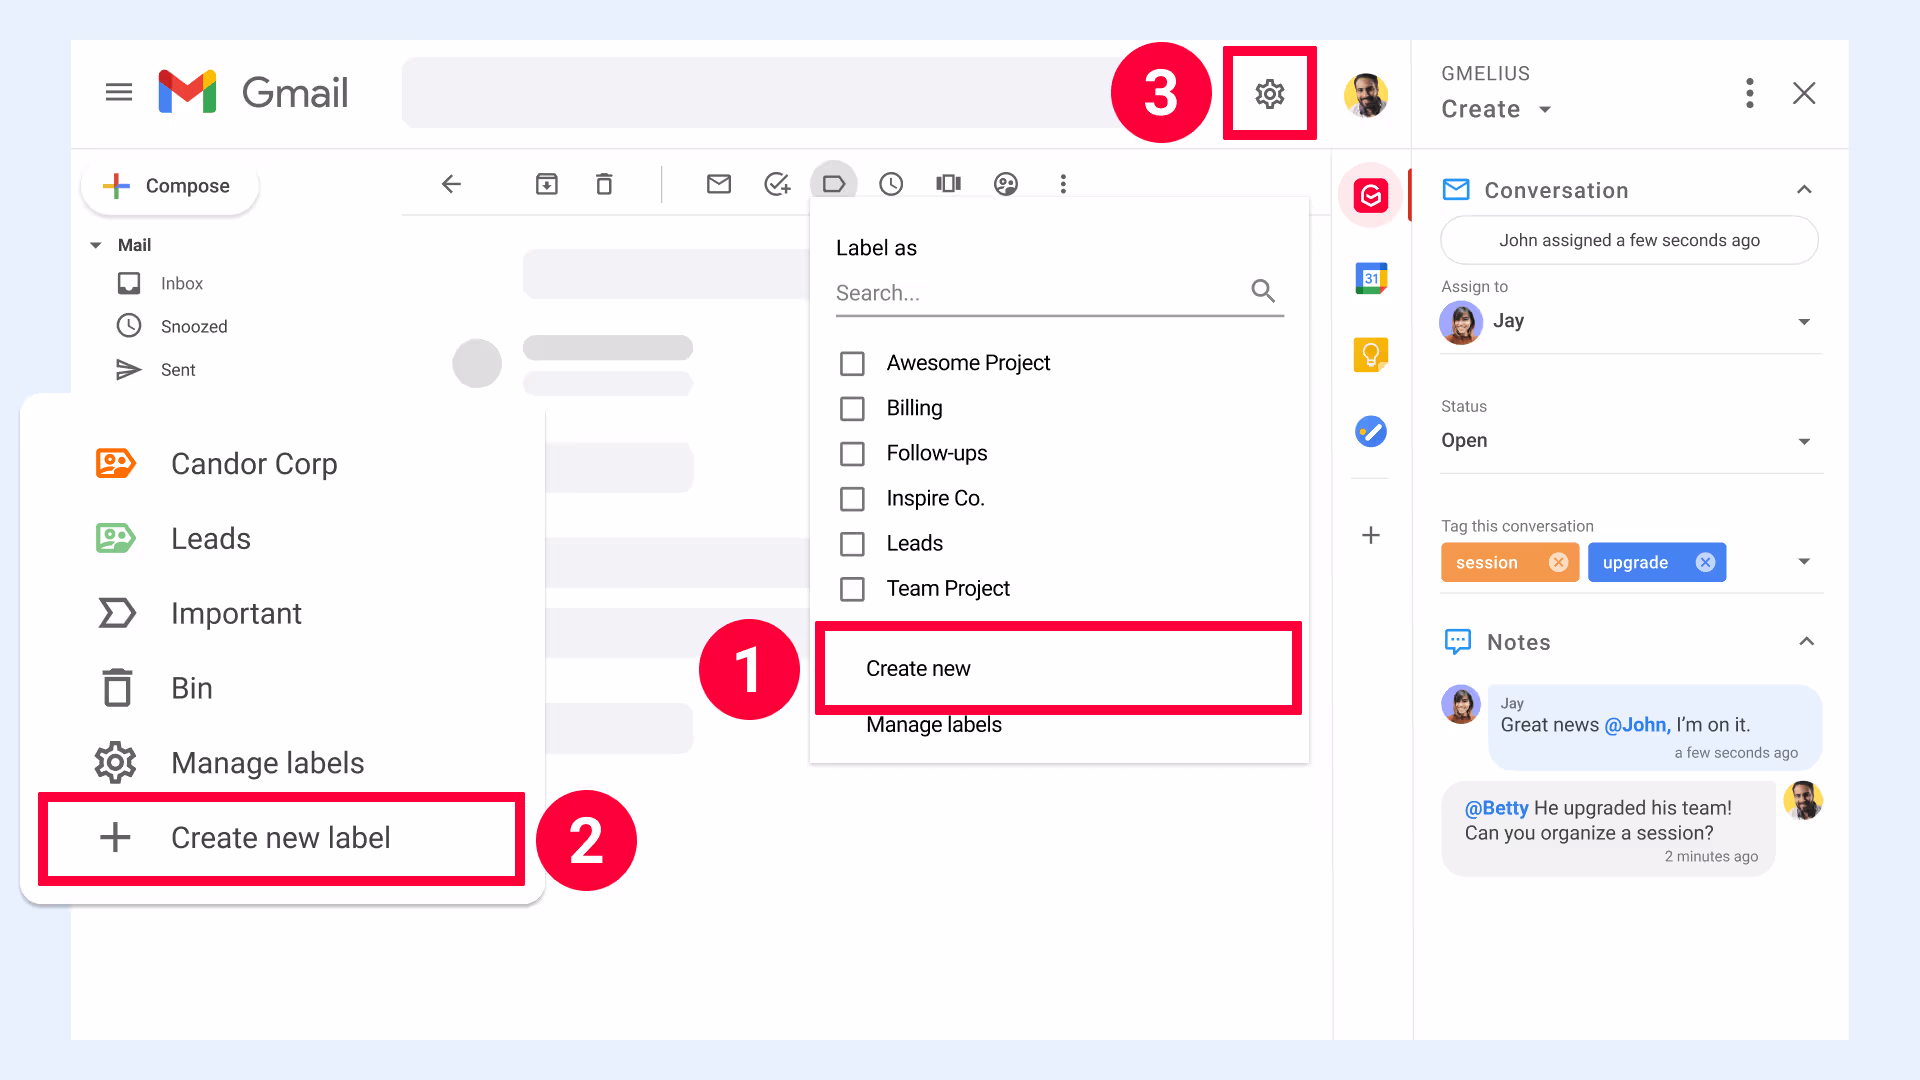
Creating a label is simple. Any logged-in Gmail user has three options:
- From inside an email, select the "Label As" icon at the top of the window. Then select "Create New Label" and name the label accordingly.
- From the left-hand menu, select "Create New Label," enter the name of the category and, if required, subcategory.
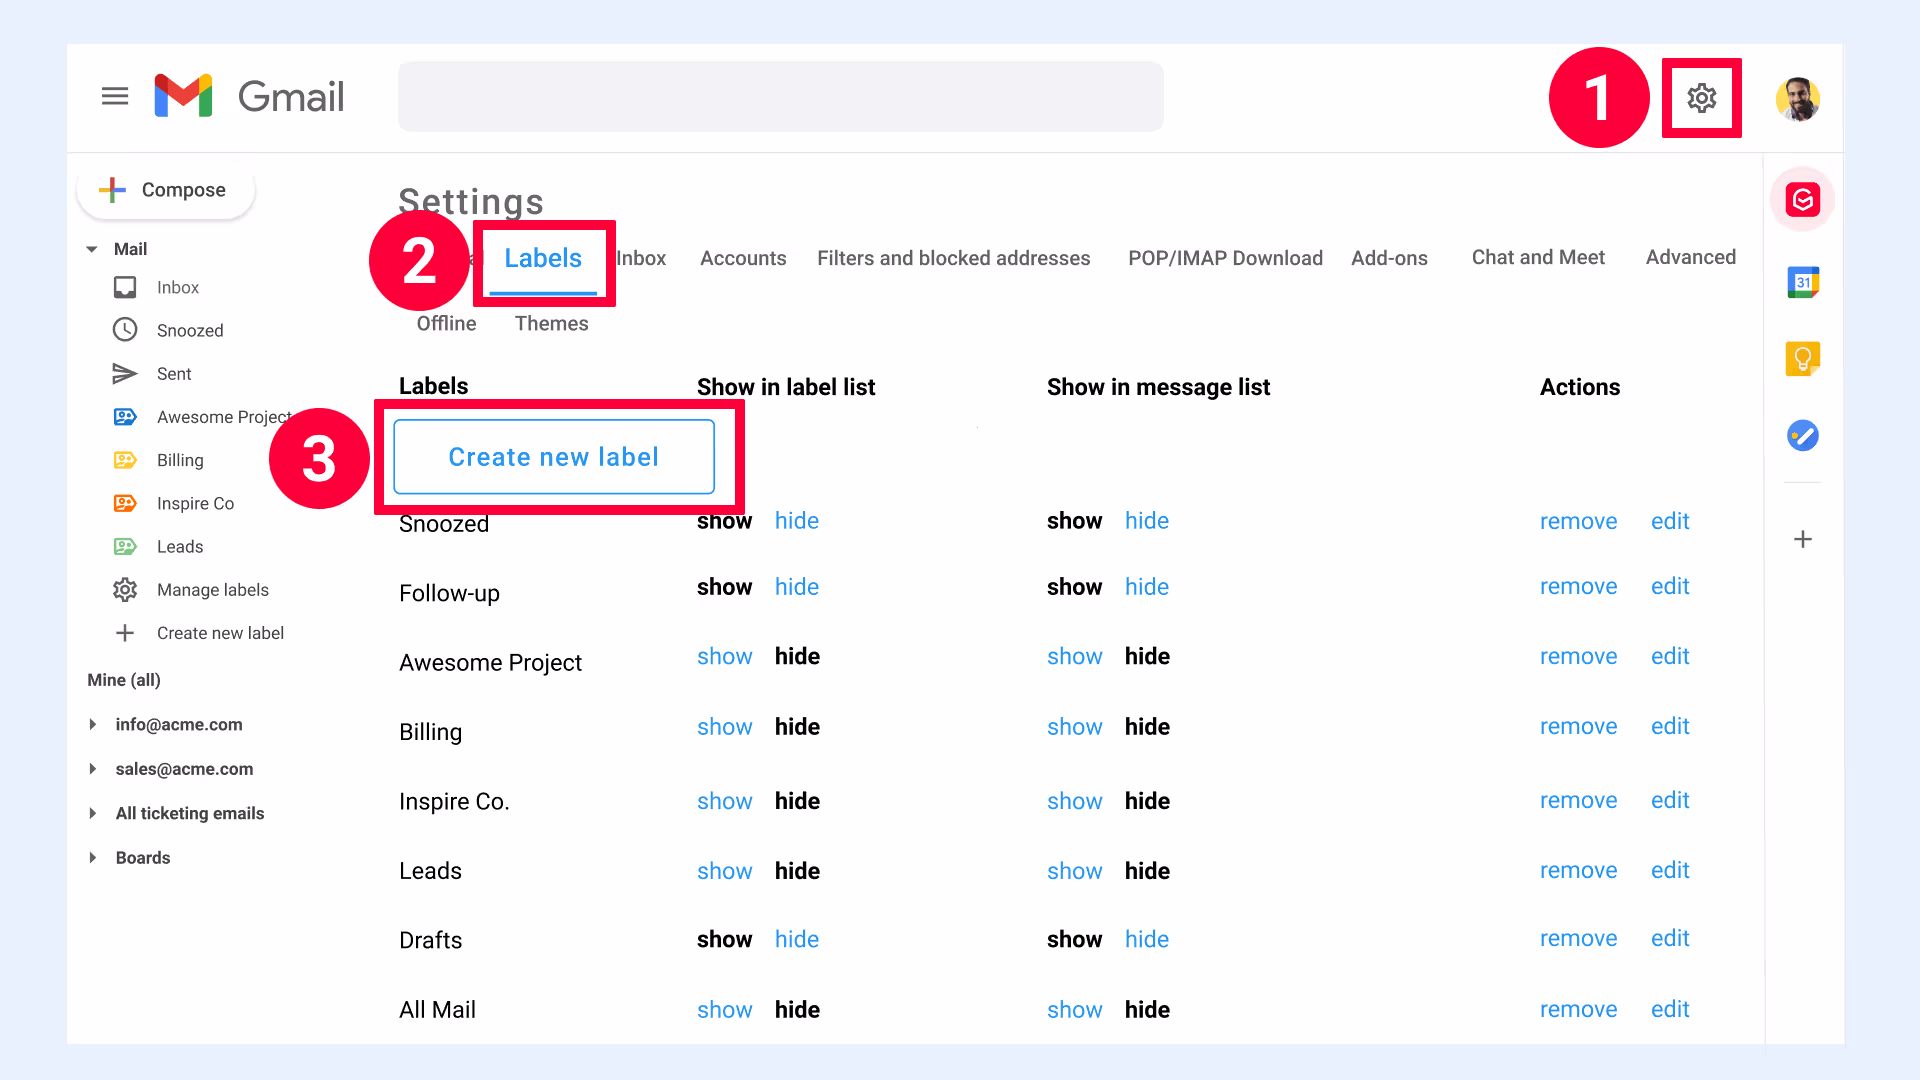
- From the top right window corner, select the gear icon and then "Settings" from the drop-down menu. Next, select "Labels" and then "Create New Label."
Our guide to configuring an email label in 5 easy steps explains this process in more detail.
Using filters to add a label
You can add a label using a filter. It"s quick, easy, and allows you to automate your inbox categories:
- Inside Gmail, click the gear icon and select "Settings."
- Next, click "Filters and Blocked Addresses" from the top.
- Select "Create" to apply a new filter.
- Select how you'd like the mail to be filtered. For example, you could use specific words or the sender’s name.
- Click "Create Filter" with this search.
- Check "Skip the Inbox" and "Apply" to apply the label.
- Click "Create Filter."

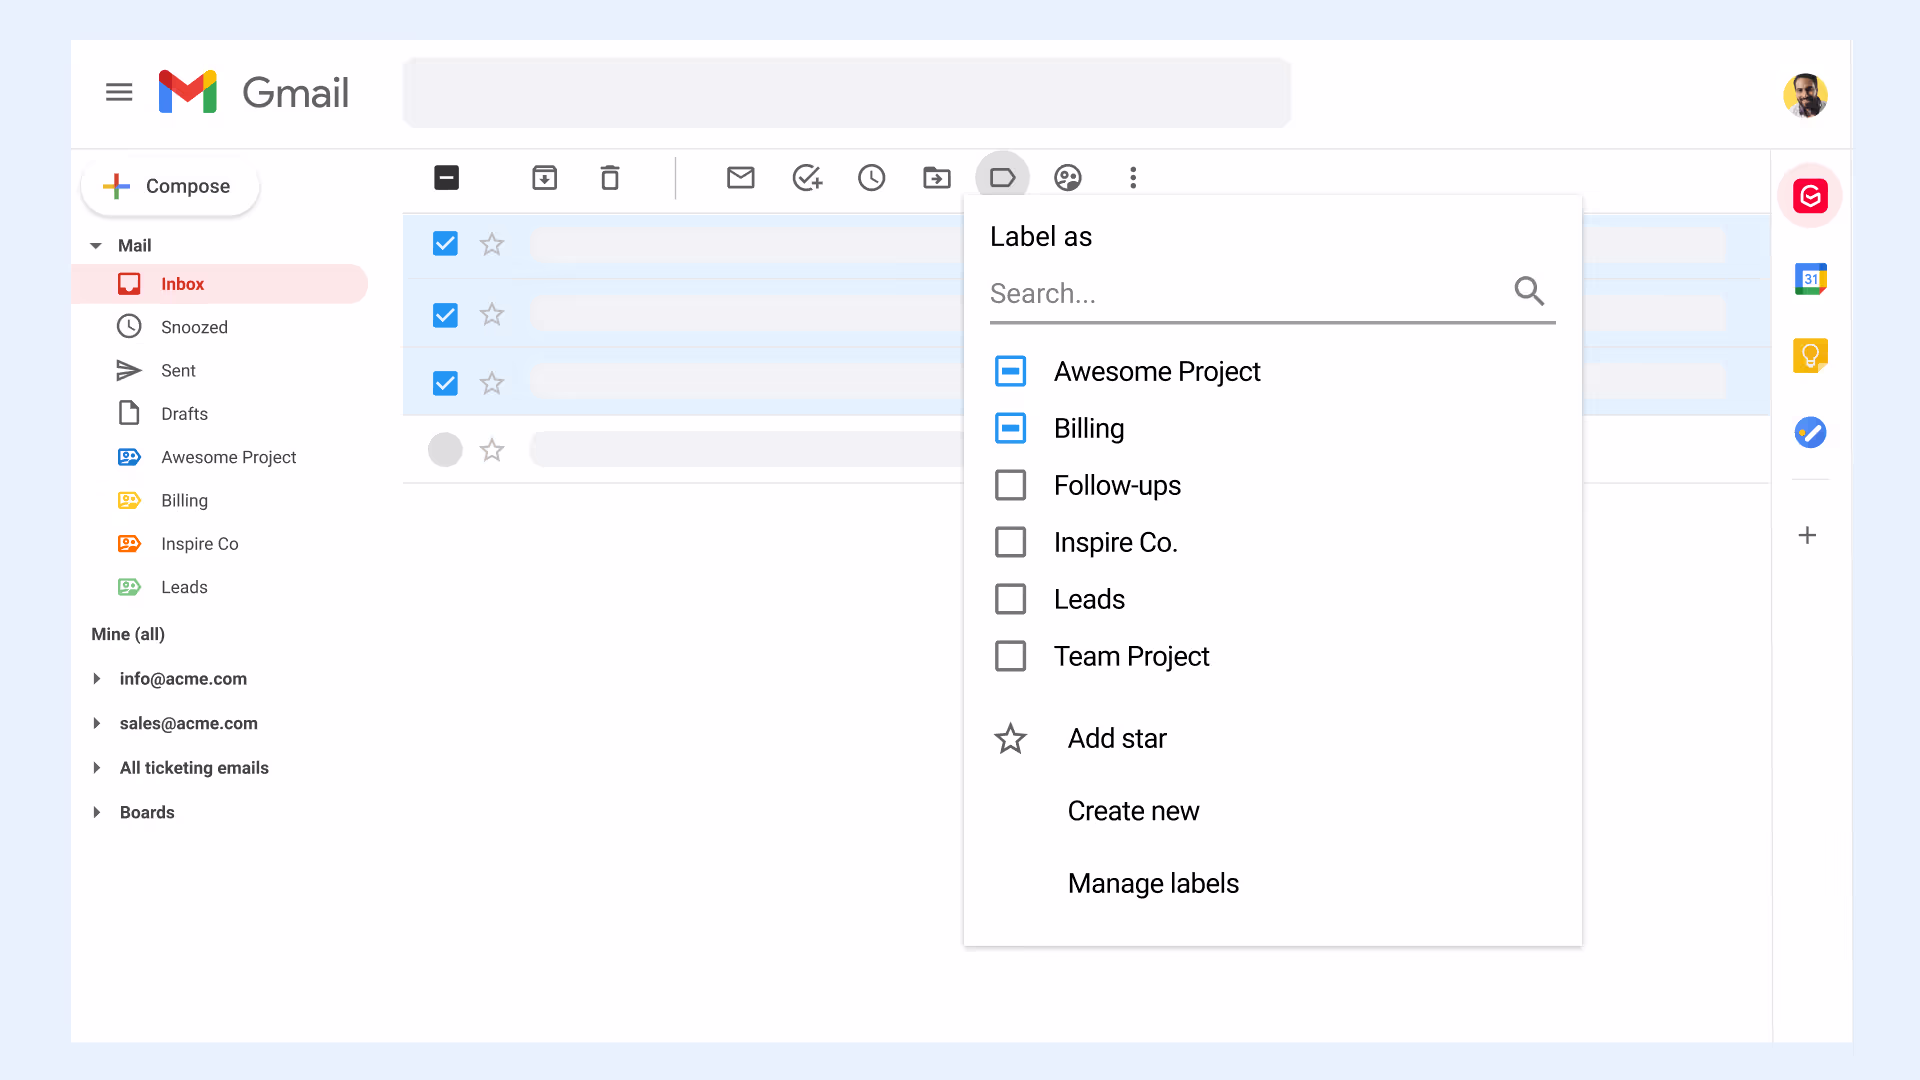
How to add or remove labels in bulk
You can also add or remove labels easily from multiple emails in one go by following these easy steps:
- Select the incoming messages from which you’d like to add or remove particular labels.
- Click the "Label As" icon from the top.
- Either select or deselect any labels.
- Click "Apply."
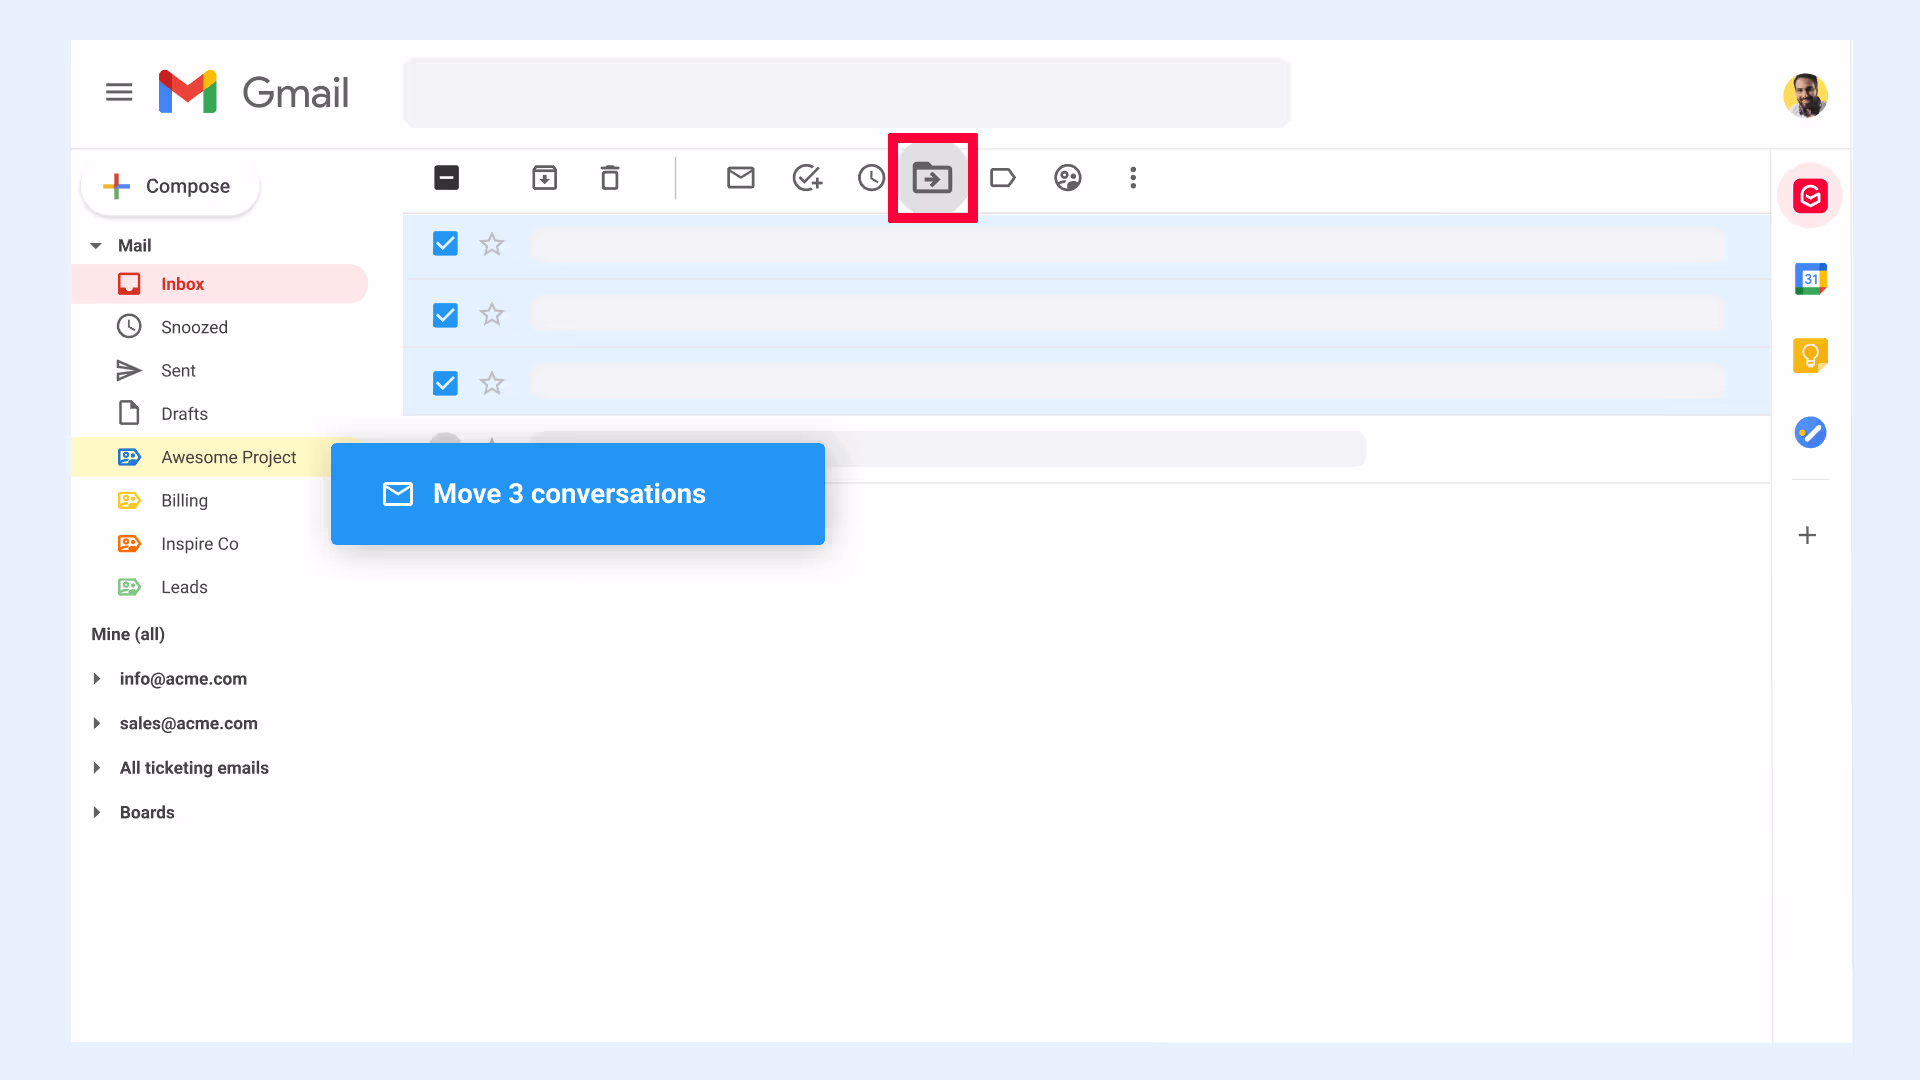
Using the “Move to” button to apply a label
The “Move to” button allows users to archive emails in a few clicks.
- Open or select the email(s) you would like to move.
- Select the "Move To" icon from the top.
- Select the destination folder or label under which you‘d like to move the email(s).
To move more than one email, simply select multiple emails and drag them into a chosen label from your Gmail inbox.
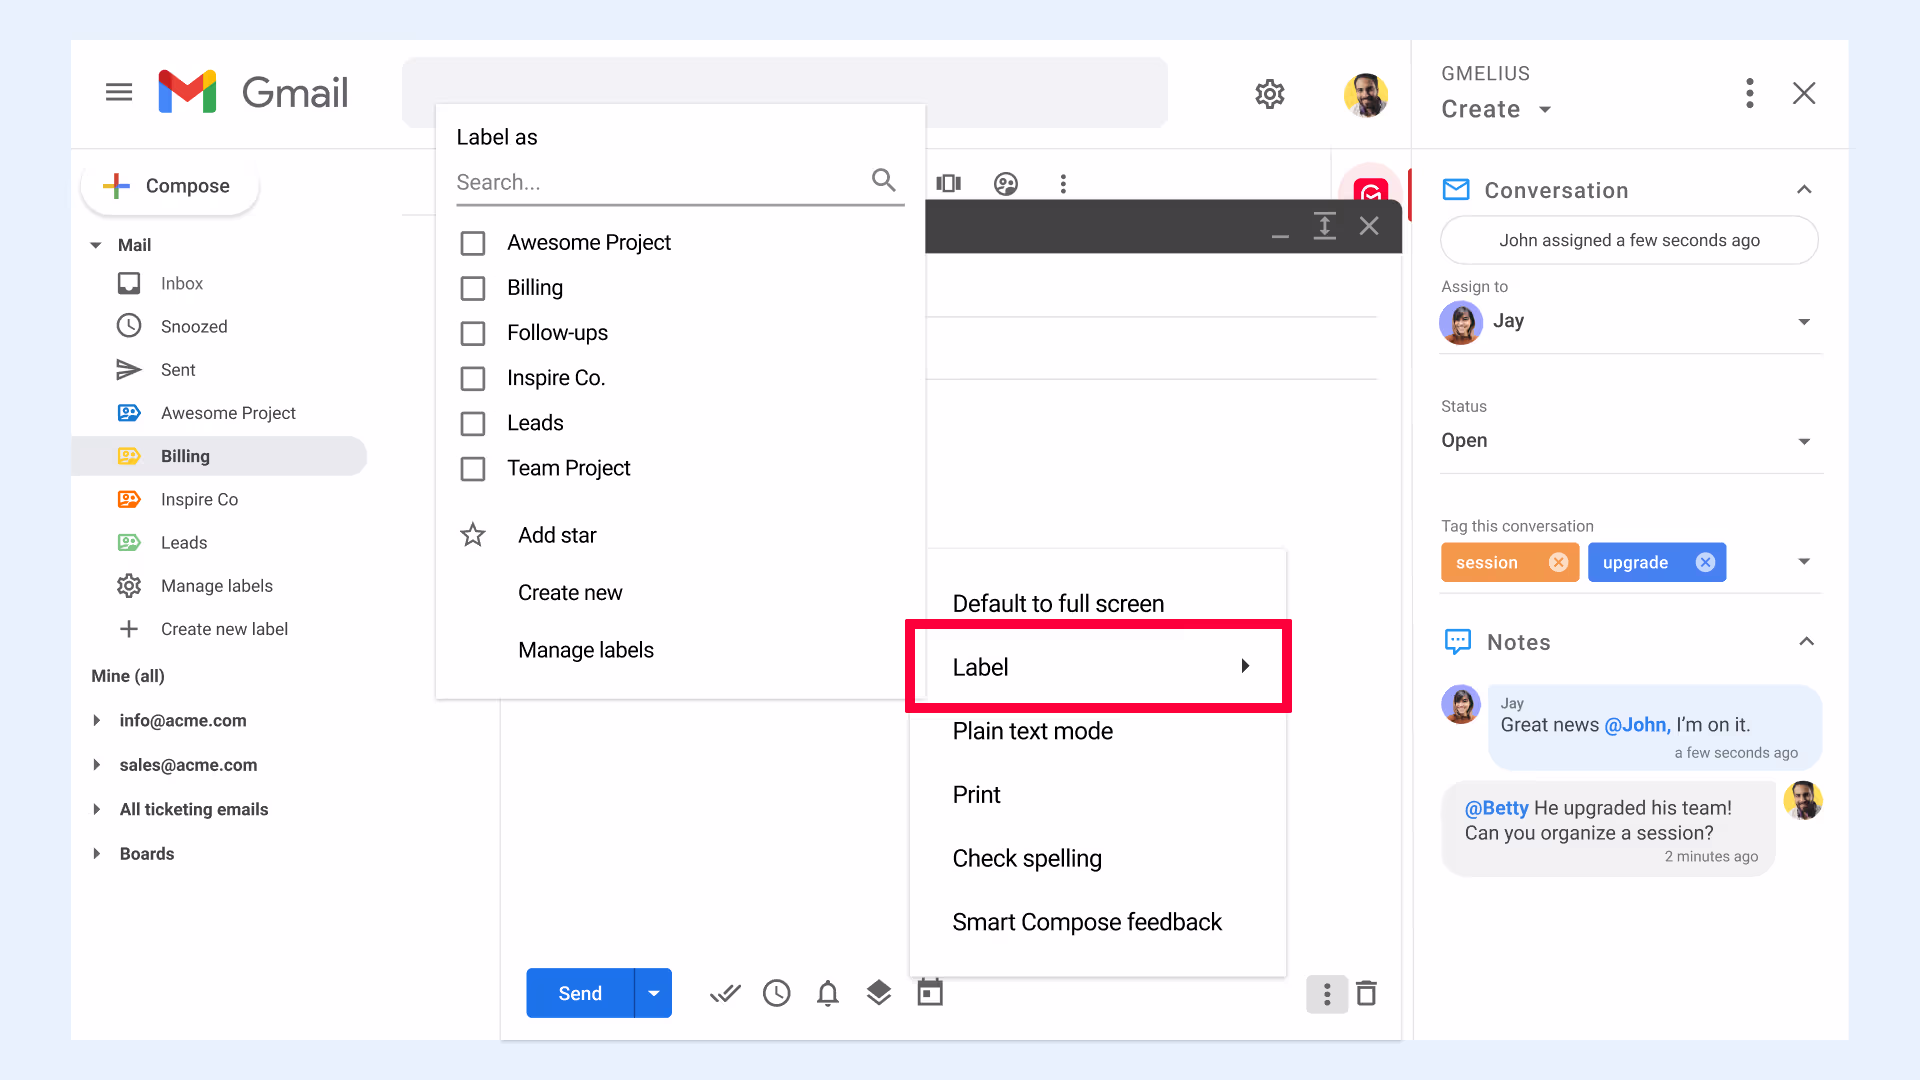
Adding labels to outgoing emails
Adding labels to outgoing emails allows teams to keep a thorough record of information stored in an organized place. To do so:
- Compose a message from your Gmail account
- Select the "More Options" icon (the three stacked dots on the right side) in the toolbar at the bottom of the compose window.
- Choose "Labels" from the new menu that opens.
- Another menu will pop up with the available labels; check the one(s) you want to use. Or select "Create New" and enter your new label name.
- You can also choose to "star" the message from the same menu if required.
- Select the body of your message again to close all of the menus.
- Compose your message and hit send as usual. The label(s) that you chose will be applied to the message and any ongoing email chain.
Can You Share Gmail Labels?
Email solutions have great utility for many, however, they were originally designed for individual use. This creates serious obstacles for modern teams working collaboratively across departments, offices, locations, and time zones.
With Gmelius, you can share your labels with your team. Teams can create, manage and share existing labels with other team members or external contacts. All members included in a shared label have access to the emails—and full email threads (including future replies)—filed under the label. Sharing labels can encourage transparency and accountability around team emails, which further support efficient and successful team collaboration.
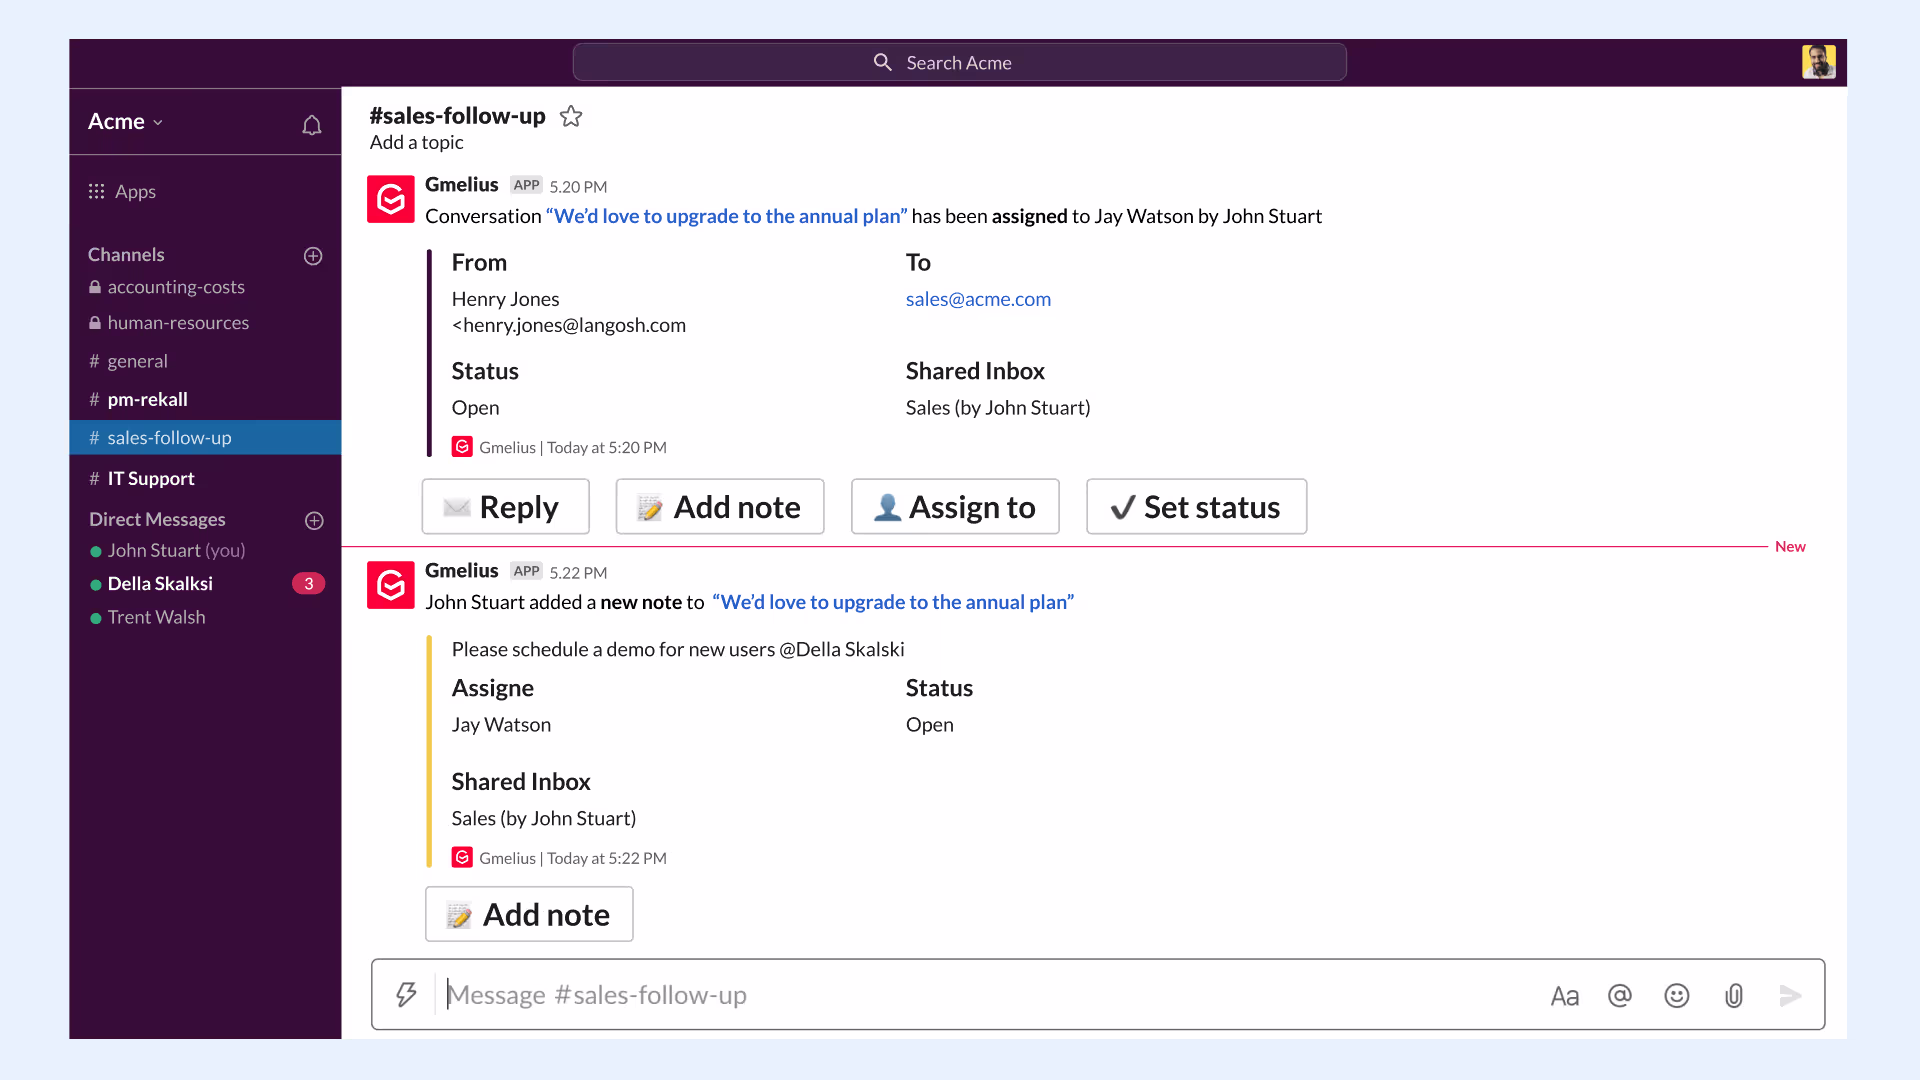
And if your team is on Slack, you can even use the Gmelius Slack integration to create a full sync between shared labels and your chosen Slack channels.
For further details with screenshots follow the article on how to create a shared label.
While you can always add a label manually, automating the process will save you a ton of time. Depending on your use case, there are multiple ways to add labels to emails automatically.
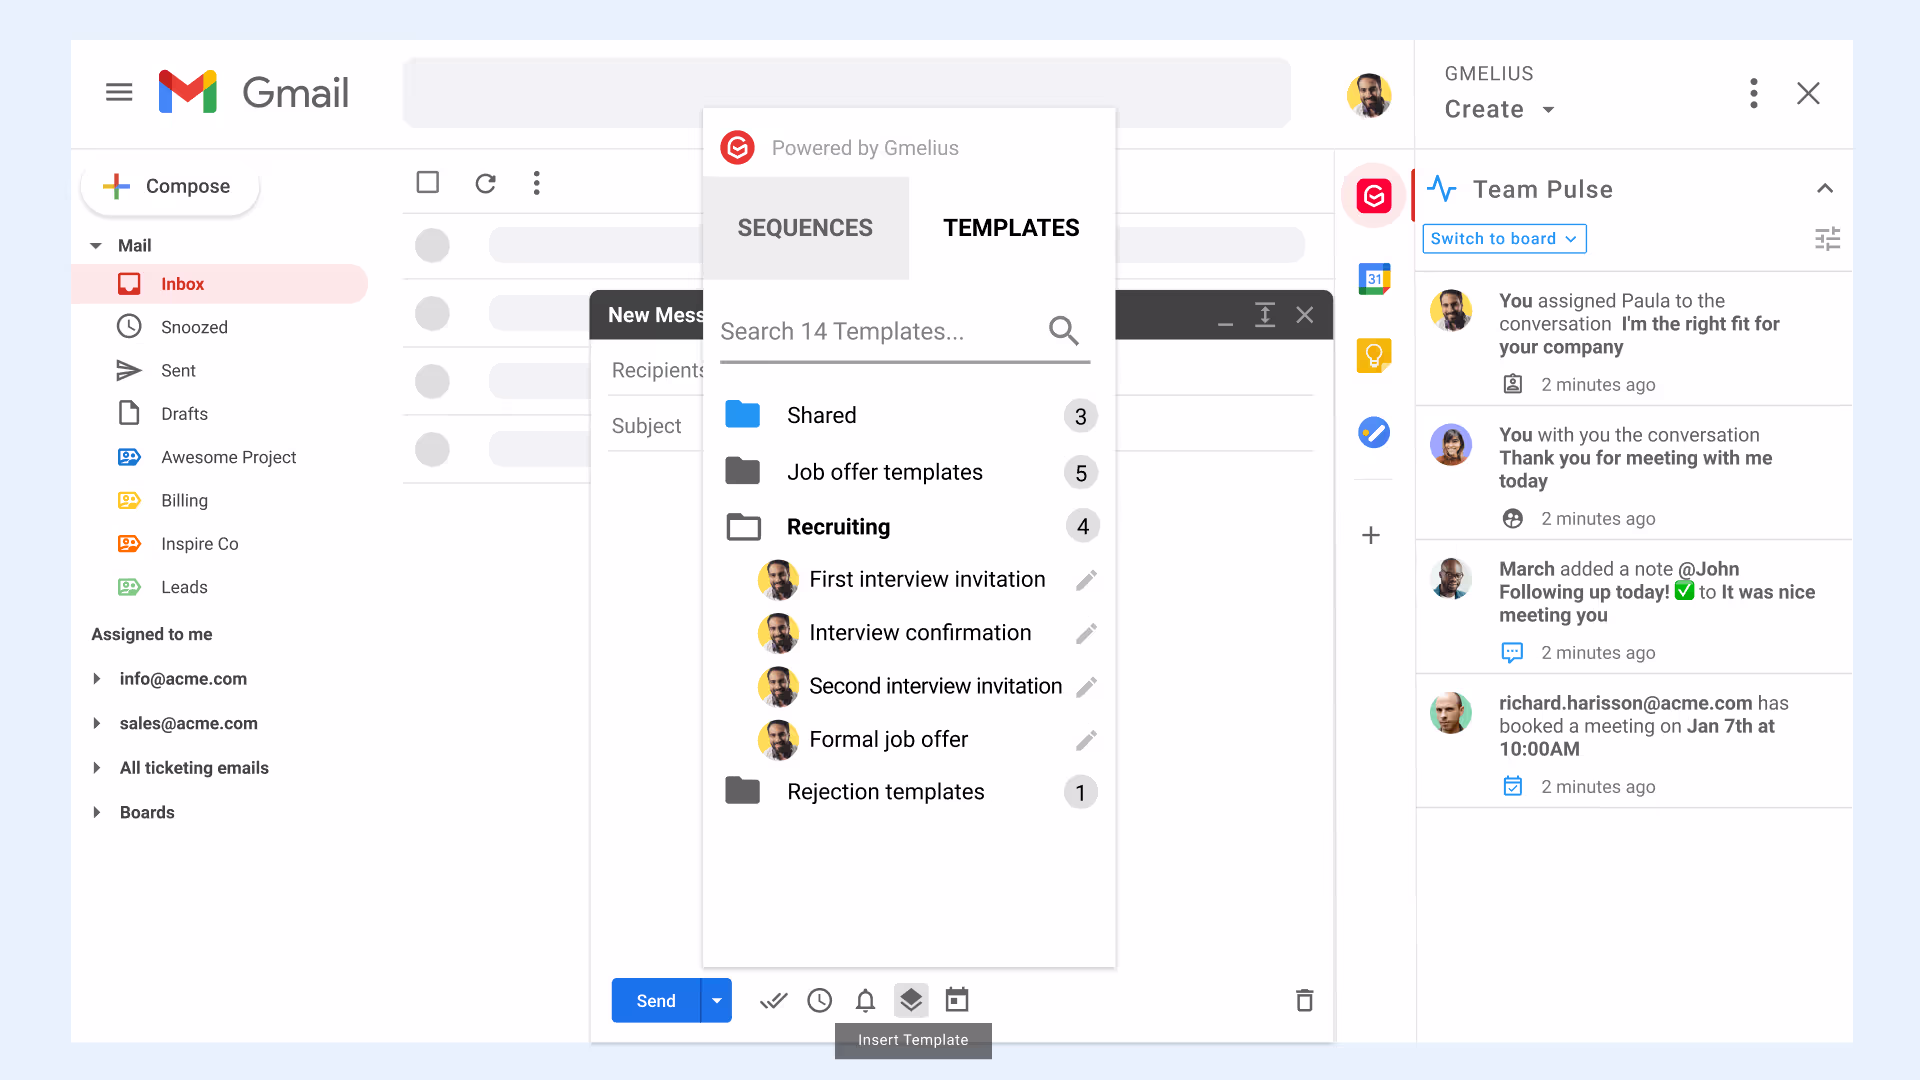
Can You Add Labels and Create Templates Using Automation?
Gmail is arguably the most feature-packed email provider on the market. However, to achieve the most effective results, you need advanced automation features like email templates and sequences.
Gmelius allows users to create, share, and send personalized email templates and automated follow-up sequences based on the recipients’ interactions, associated with the appropriate label.
To do so, first, install Gmelius and create an email template using the "Label As" function. Once a template is selected in the compose window, the label will be applied automatically.
Sequences can also be used as an advanced automation feature. When creating an automated sequence, you can direct Gmelius to add labels at certain stages in the workflow.
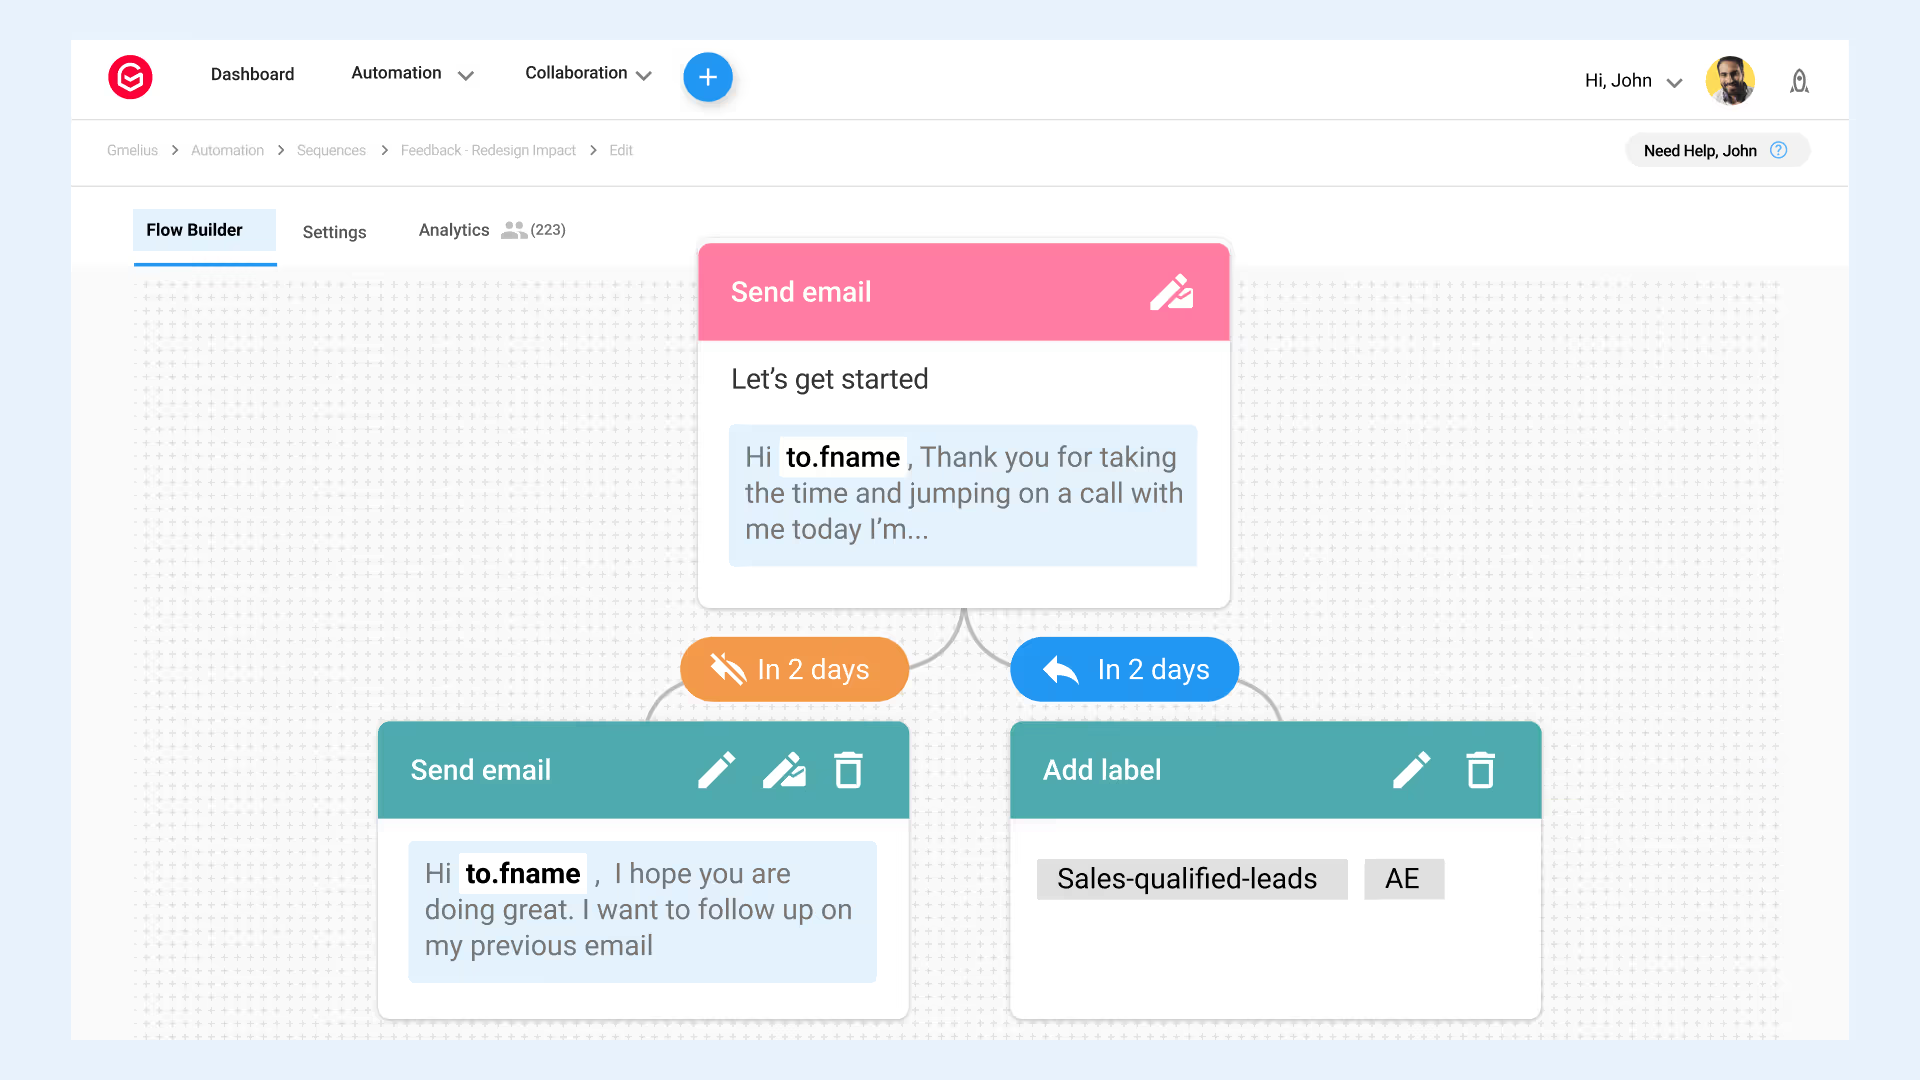
All email templates, sequences, and conversations sync in real-time across your entire team and all their devices, so once you receive a reply, you"ll find the email under your chosen label.
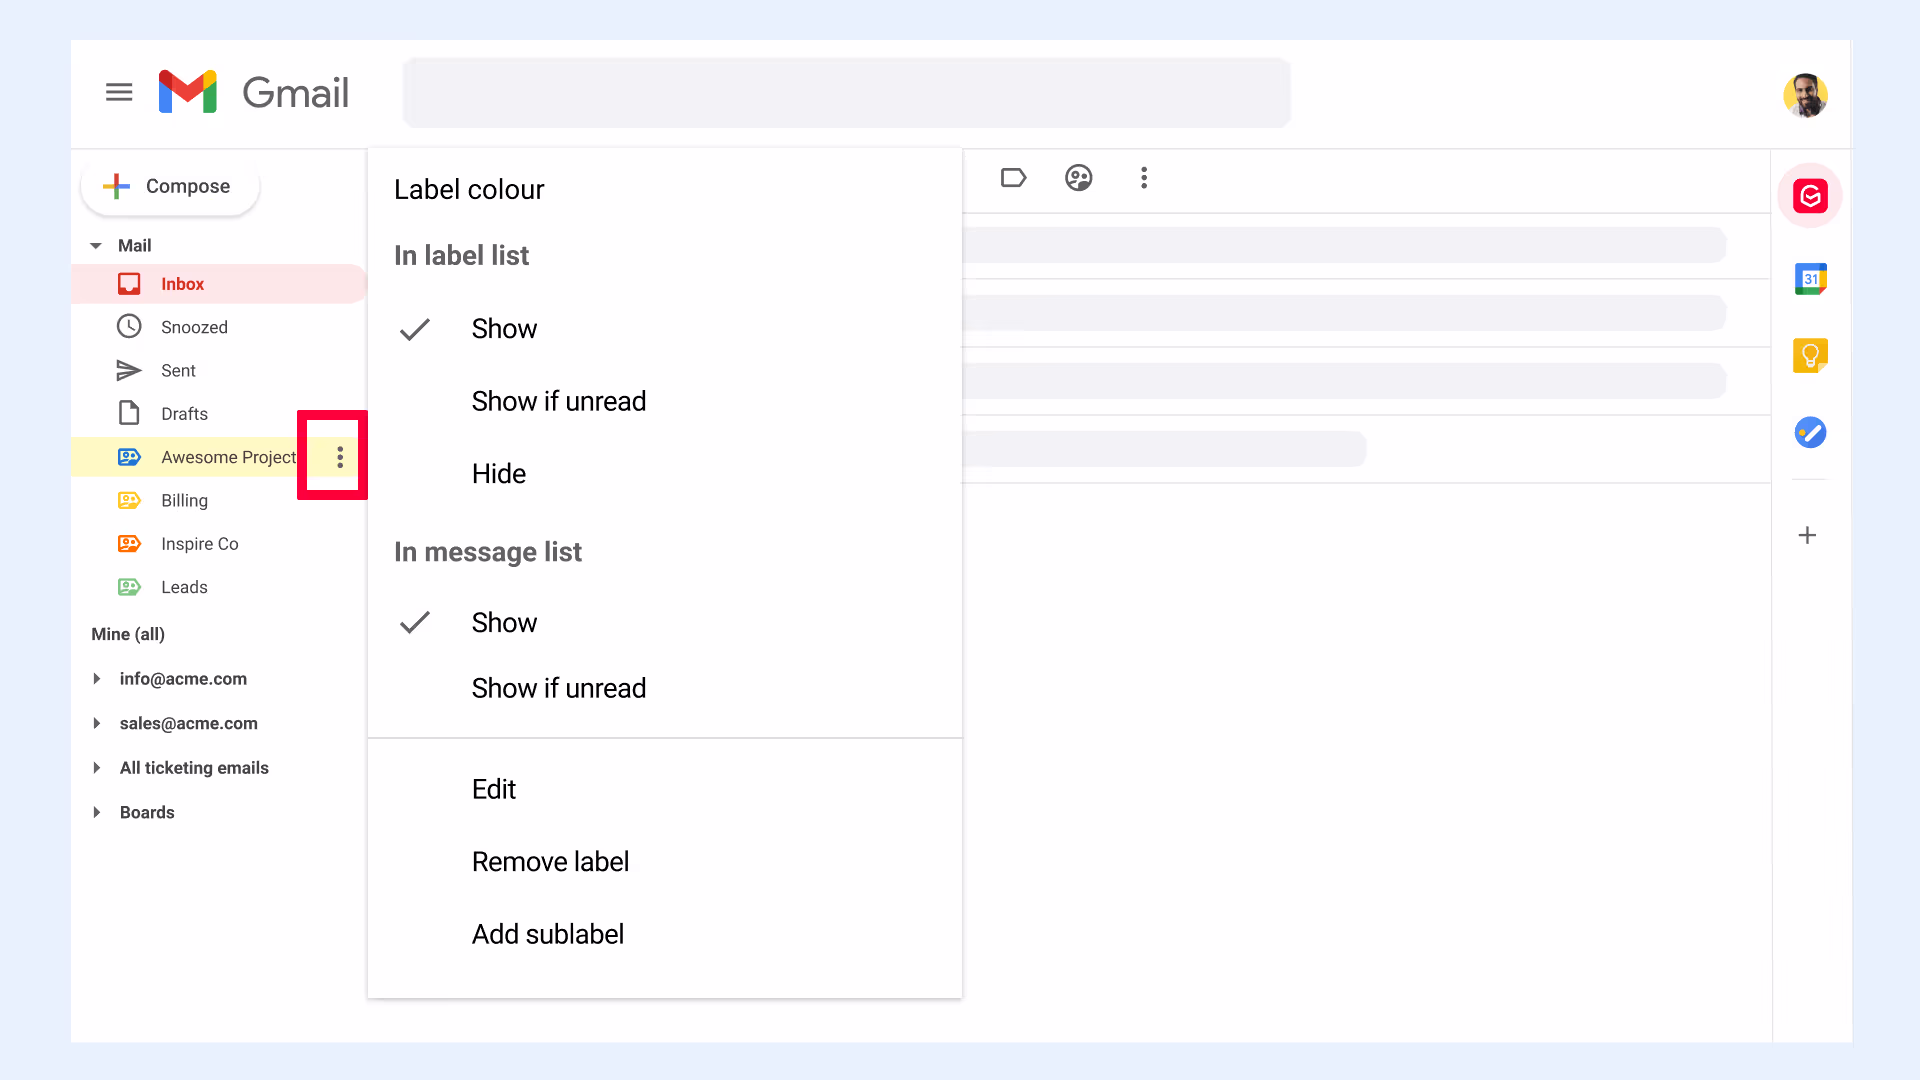
Editing Gmail labels to meet your needs
Once you create a label in Gmail, you can also edit the label icon's color, name, and visibility in order to manage your Gmail labels in amore scalable way and keep your Gmail inbox organized in the long-term.
To edit the label, follow these steps:
- On a computer, open Gmail (labels cannot be edited from the Gmail app).
- On the left side of the page, hover your cursor over your label's name.
- Click the down arrow from the drop-down menu.
- Click "Edit."
- Make changes to your label.
- Click "Save."
Creating nested labels
For more complex projects, users can nest labels within higher-level (parent) categories. For instance, if your firm provides accounting and tax services, you can create a parent label for "tax" and sub-labels for each customer you're serving.
Here’s how to set up a nested label in Gmail:
- Select the gears icon in the window's top-right corner, and choose "Settings" from the drop-down menu.
- Select "Labels" if the Labels tab isn’t displayed.
- Select "Create New Label" and enter a new label name.
- Select a higher-level label in the drop-down menu inside the "Nest" label section.
- If you need to move an existing sub-label to a different higher-level label, navigate to the "Labels" section and find the label you would like to change.
- Select "Edit" in the Actions column.
- Choose a new higher-level label from the drop-down menu in the "Nest" label.
- Click "Create" or "Save."
To un-nest a label, follow these steps:
- In the "Labels" section, find the sub-label you want to convert.
- In the Actions column, select "Edit."
- Deselect the "Nest" label.
- Select "Save."
Searching for a label
Searching with multiple filters can be intimidating, but you can achieve a lot if you have the right queries in place. For instance, you can search for all emails under one label sent by a specific email address.
To search, follow these steps:
- In the search bar at the top of Gmail, enter the "label: label_title".
- Use the up and down arrow keys to highlight the label you want to open.
- Click "Enter" to view the emails in that label.
- Press the spacebar after the label name and enter the text that you want to search for within the label. For instance, if you"d like to only see emails from one email address, enter the label: "label_title email_address".
Greater productivity with Gmail labels + Kanban boards
Gmail labels offer many unique options to organize tasks. With Gmelius, teams can manage tasks and projects with labels, as our unique platform offers a project management suite from within Gmail. Teams can turn labels into Kanban boards directly in Gmail. Emails become task cards to visualize easily, and you can move them from one column to another to help drive tasks to completion.
With powerful automation features, team members can set rules to place tasks in the right column automatically, so you don’t need to drag and drop task cards manually. Team members can also turn a label into a Kanban board.
You can even integrate your Kanban boards with Trello using Gmelius. Our Gmail to Trello 2-way integration allows you to sync your boards in real-time to reduce data dispersion or communication gaps.
If your team already has a tailored board on Trello, but would like the option to work from Gmail, you can import your Trello boards inside Gmail using Gmelius.
To learn more about our 2-way Gmail to Trello integration, read this article.
Gmail Labels are a great feature of Gmail’s functionality that allows you to customize and organize your workflow by project, by client, and more! However, Gmail alone doesn’t do everything. Fortunately, the powerful combination of Gmail and Gmelius empowers teams to be more productive, save time, and improve transparency and alignment.
In Closing: Tips for Using Gmail Labels Effectively
Here are some tips for using Gmail labels effectively:
- Use multiple labels: Assign multiple labels to a single email to categorize it in different ways. This flexibility allows you to find emails based on various contexts.
- Create nested labels: Create nested labels to organize related emails under a parent label. For example, you can have a parent label for “Projects” and nested labels for each specific project. Same for Clients, Departments, Employees.
- Use labels for notifications: Use labels to control which messages trigger notifications, allowing for more customized notification settings.
- Keep your label list organized: Keep your label list organized by showing or hiding labels as needed. This helps maintain a clean and focused inbox.
- Use labels for smarter searches: Use labels as variables in searches to narrow down results and make it easier to find specific messages.
- Apply labels while composing: Apply labels to new messages while composing to ensure that the email and any replies remain organized.
- Let Gmail apply labels for you: Let Gmail apply labels to messages based on specific criteria using Gmail filters or Gmelius rules. This will help you save time and streamline your email management.
By following these tips, you can get the most out of Gmail labels and make your email management more efficient and effective.
Ready to organize your inbox using Gmail labels? Check out our features and integrations and improve team communication and collaboration. Sign up today!
TL;DR: We Answer Your Frequently Asked Questions (FAQs) About Gmail Labels
1. What are Gmail labels?
Gmail labels are tags you can apply to your emails to keep your inbox organized. Unlike traditional folders, you can assign multiple labels to a single email, allowing for more flexible categorization so you can find messages based on different contexts, such as by project, client, or urgency.
2. What is the difference between Gmail labels vs. folders?
The primary difference is that an email can only exist in one folder, but it can have many labels. This makes labels more versatile. For example, a single email about an invoice for "Project Alpha" could be labeled both "Invoices" and "Project Alpha," making it easy to find from either category.
3. How do I create a label in Gmail?
You can create a label in Gmail in three simple ways:
- From an email: Open an email, click the “Label as” icon at the top, and select “Create new.”
- From the sidebar: Click “Create new label” in the menu on the left side of your inbox.
- From Settings: Go to Settings > Labels and click the “Create new label” button.
4. How do I add a label to an email in Gmail?
To add a label in Gmail, simply select one or more emails. Then, click the “Label as” icon at the top of the screen and check the box next to the label(s) you want to apply. You can also drag and drop the selected emails directly onto a label in the left sidebar.
5. How do I delete a label in Gmail?
To delete a label, you must be on a computer. Hover your cursor over the label’s name in the left-hand menu, click the small down arrow that appears, and select "Remove label." This action deletes the label but does not delete the emails that had that label.
6. How can I automatically label emails in Gmail?
You can automatically label emails in Gmail by using filters. Go to Settings > Filters and Blocked Addresses and create a new filter. You can set rules based on the sender, subject, or specific keywords. As the final step, choose the “Apply the label” action to have Gmail auto-label matching incoming messages.
7. Can I use a Gmail auto label for outgoing emails?
Yes. You can apply labels to emails as you compose them. In the compose window, click the three-dot "More options" icon, select "Label," and choose the appropriate label. Any replies in that conversation will also have the label applied automatically.
8. Can you share Gmail labels with a team?
While Gmail does not have a built-in feature for sharing labels, you can use third-party tools like Gmelius to create and share labels with your team. This allows everyone on the team to access and manage a central set of organized emails, which is ideal for collaborative projects and shared inboxes.
9. How do you create a nested label (or sub-label) in Gmail?
Nested labels help you create a more organized hierarchy. To create one, click "Create new label" and after giving it a name, check the box for "Nest label under:" and select a parent label from the dropdown menu. This is perfect for organizing complex topics, such as a main "Clients" label with individual client names nested underneath.
10. How can I edit an existing Gmail label?
Find the label you wish to edit in the left sidebar. Hover over its name, click the down arrow, and select "Edit." From this menu, you can change the label's name or its nesting. You can also assign a custom color to the label to make it stand out visually in your inbox.
11. How can I turn my Gmail labels into a project board?
While Gmail itself doesn't have this functionality, you can use a tool like Gmelius to transform any Gmail label into a visual Kanban board. This feature converts emails into task cards that you can move between columns, allowing your team to manage projects and track progress directly from your shared inbox without needing a separate project management tool.
12. Can I automatically apply labels when sending email templates or sequences?
Yes, advanced tools like Gmelius integrate this functionality directly into Gmail. You can create shared email templates and automated follow-up sequences that are preset to apply specific labels when sent. This ensures that all communications for a campaign or project are correctly categorized for your entire team from the moment they are sent.

.avif)
.avif)
.avif)
.avif)
.avif)